C64 OS Networking Guide
Commodore 64 Ultimate Network Setup
The Commodore 64 Ultimate is based upon the Ultimate 64 from Gideon's Logic, but it has a custom firmware that was developed under the supervision of Commodore. The goal of the custom firmware is partly to brand the Commodore 64 Ultimate differently than the Ultimate 64, but also to make it more user-friendly.
Step-by-step
The following guide gives an overview of hardware compatibility options for the Commodore 64 Ultimate. At the end there is some technical information about what address space each device occupies to help you understand how they can be used together.
For C64 OS, it is ideal to use several devices in combination. An REU for memory expansion, an IDE64 (optionally) for faster storage than the IEC bus can provide, a SwiftLink or Turbo232 for networking, and the Ultimate Command Interface for some special features of the C64 Ultimate such as accessing the RTC (realtime clock).
Commodore 64 Ultimate Configuration
The power switch on the Commodore 64 Ultimate has features which can be activated by rocking it up or down and holding it for certain lengths of time before releasing.
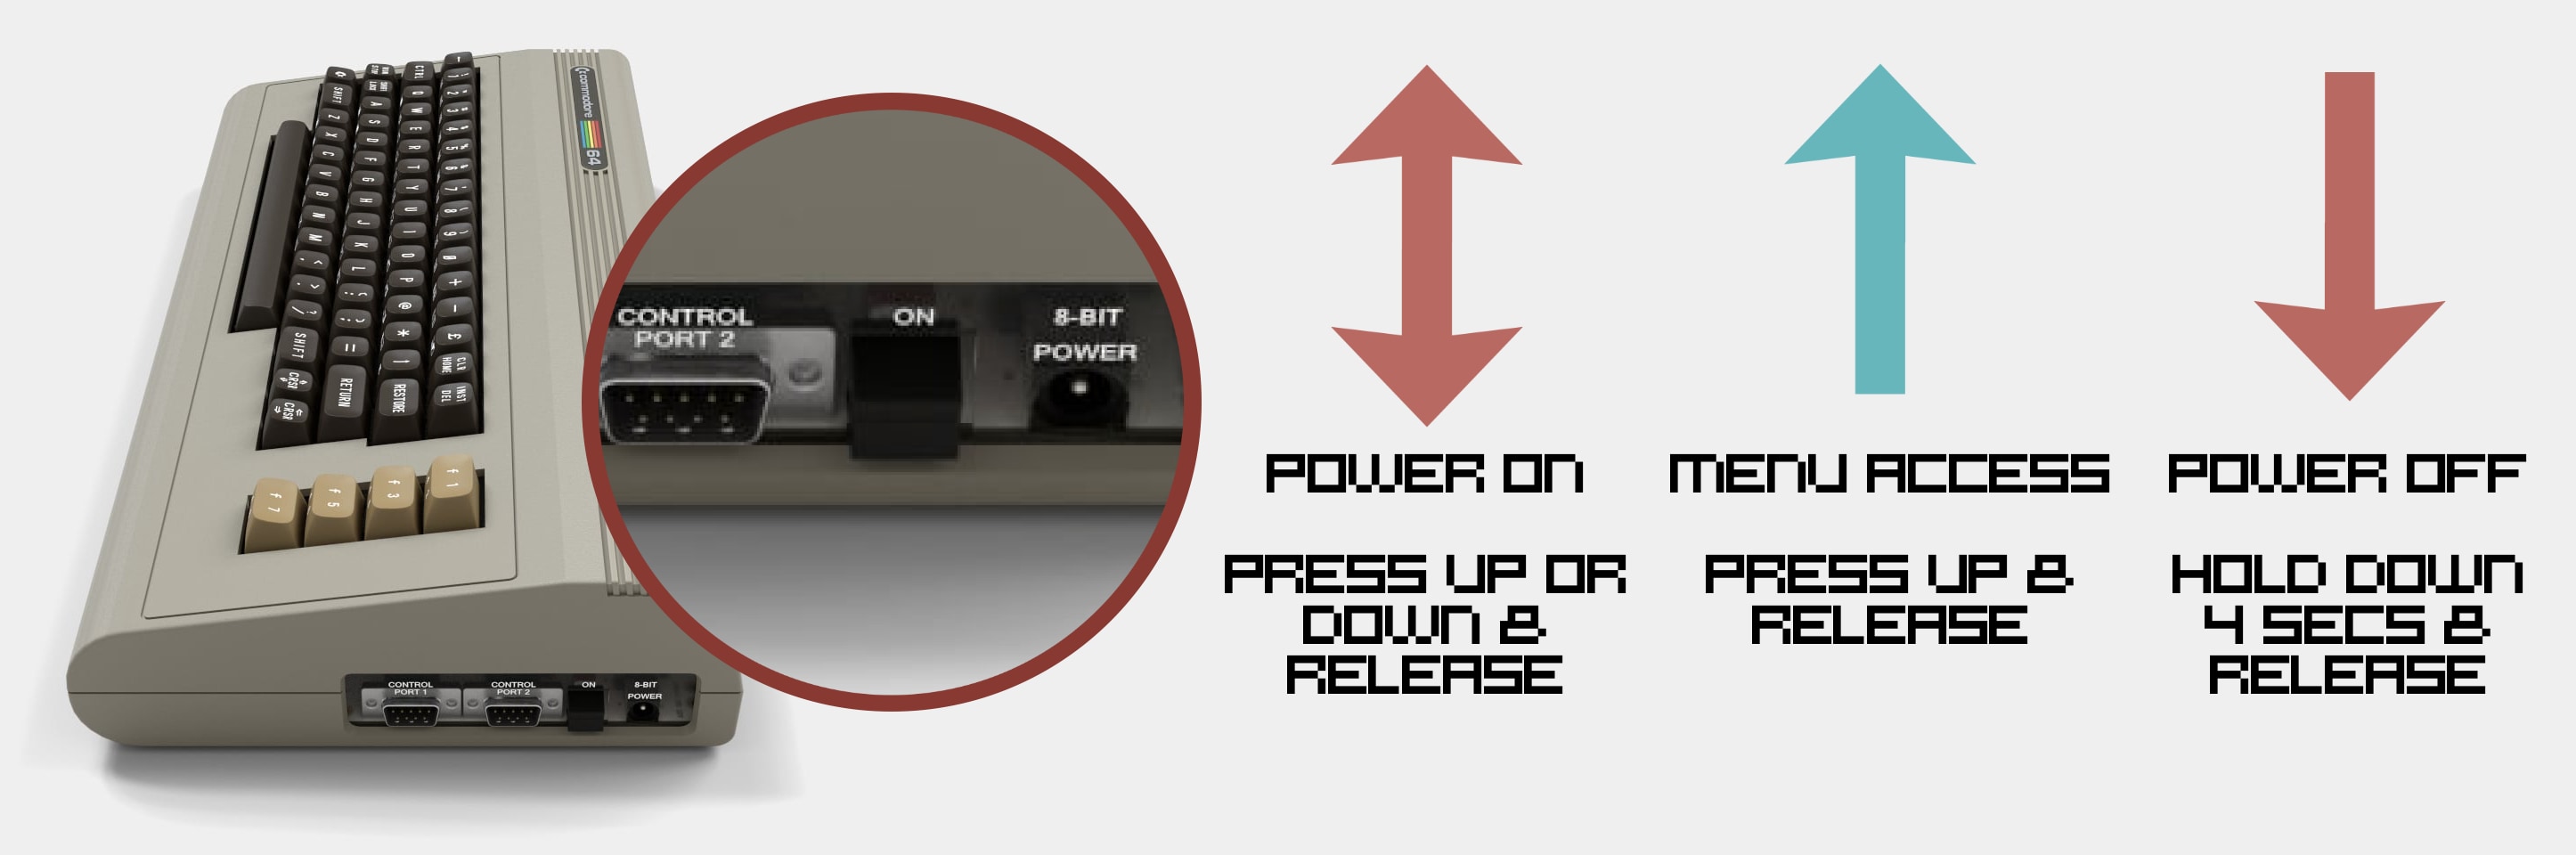
Commodore 64 Ultimate - power button controls
To power on the computer, rock the switch up or down and release.
Once the computer is powered on, rock the switch up and release immediately to enter the Commodore 64 Ultimate's main configuration menu.
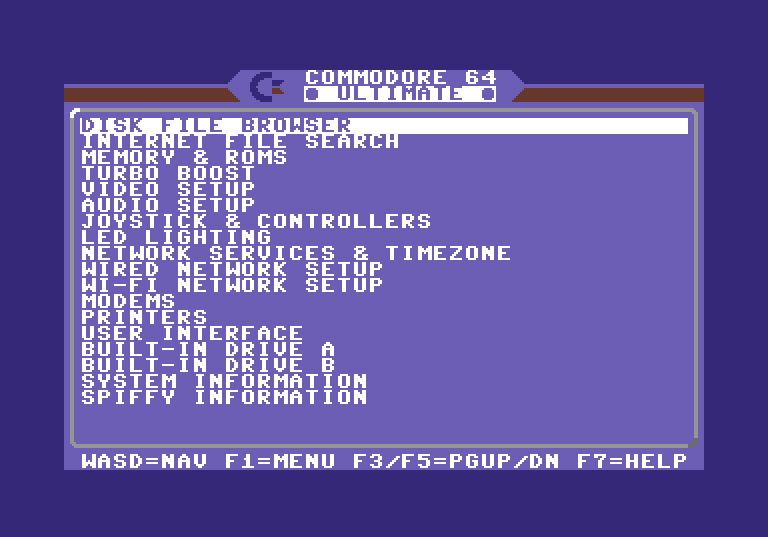
Commodore 64 Ultimate - main menu
A deeper menu for advanced settings is available from the main menu by pressing F2 (SHIFT+F1).
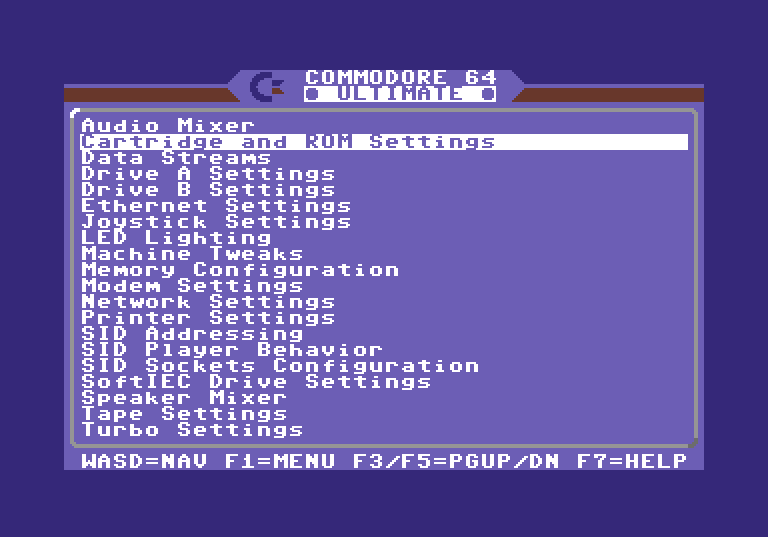
Commodore 64 Ultimate - advanced settings menu
Menu Navigation
To learn how to navigate the menu system, refer to the Commodore 64 Ultimate User's Guide, Chapter 1: Setting Up → Configuring the C64U.
WiFi/Ethernet Configuration
To learn how to configure and connect the Commodore 64 Ultimate to your local area network by ethernet or WiFi, refer to the Commodore 64 Ultimate User's Guide, Chapter 11: C64U Networking and Wi-Fi.
Cartridge Settings
While in the main menu, press F2 to enter the advanced settings menu. Select Cartridge and ROM Settings.
- If you are using an IDE64, under Bus Sharing - I/O 1 choose external.
- If you have purchased a license to the JiffyDOS C64 KERNAL ROM overlay, be sure that it is selected under Kernal ROM.
- Under RAM Expansion Unit choose Enabled. And under Size choose 16 MB.
- Under Command Interface choose Enabled.
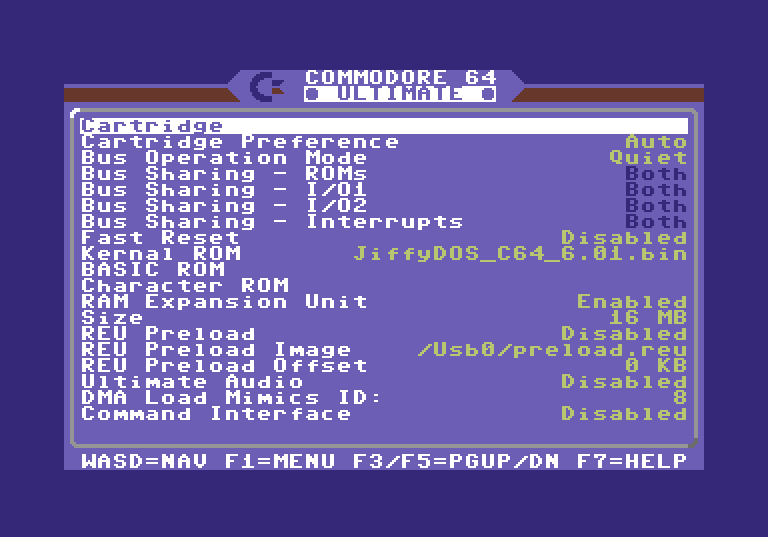
Commodore 64 Ultimate - cartridge settings menu
Modem Settings
While in the main menu, press F2 to enter the advanced settings menu. Select Modem Settings.
- Under Modem Interface choose ACIA / SwiftLink.
- Under ACIA (6551) Mapping choose DF80/NMI. (See note, below. *)
- Under Hardware Mode choose SwiftLink.
-
Under Handshaking choose the following options:
- Do RING sequence: Enabled
- Drop connection on DTR low: Enabled
- RTS Handshake: Enabled
- CTS Behavior: Active (Low)
- DCD Behavior: Active (Low)
- DSR Behavior: Active when connected
- Automatic Rx Pushback: Disabled
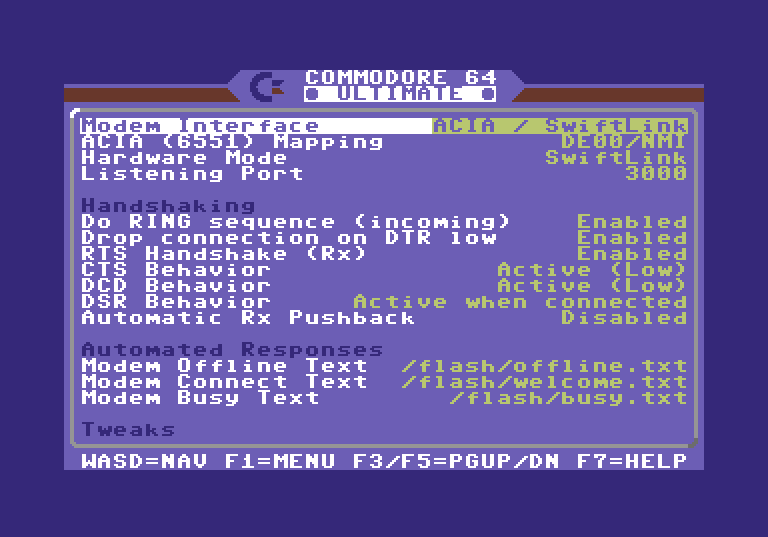
Commodore 64 Ultimate - modem settings menu
* About ACIA (6551) Mapping
For use with C64 OS, DF80/NMI is preferred because this address will not conflict with an REU, GEORAM or IDE64.
The screenshot above shows DE00/NMI. $DE00 is the base of I/O 1. This address can be used for SwiftLink, but not at the same time as a GEORAM or an IDE64. Despite the conflict with GEORAM and/or IDE64, $DE00 may be preferred if other telecommunications software you want to use doesn't have driver support for the SwiftLink at $DF80.
C64 OS Configuration
Now that the Commodore 64 Ultimate has been configured with an REU, the Ultimate Command Interface, and a SwiftLink, C64 OS can be configured to take advantage of these features.
Configuration Tool
Refer to the C64 OS User's Guide, Chapter 3: Configure and settings for instructions about how to load and run the C64 OS Configure Tool.
- Under the Expansion Memory section, choose the maximum of 31 slots for Fast App Switching.
- Under the Drivers section, when it asks for your a realtime clock driver, choose UCI (UltimateII+/Ultimate64).
- Under the Go-Menu Places section, if you have not already configured custom go-menu places, choose Yes to configure default places. Having valid places is important for C64 OS to function properly. These can be customized later from File Manager.
Network Utility
Power off the Commodore 64 Ultimate and wait for 30 seconds. Power the Commodore 64 Ultimate back on. Boot C64 OS. If you are taken into File Manager, switch to App Launcher by choosing it from the Go menu.
From the Utilities menu, choose Settings. Under the Hareware section, choose Network.
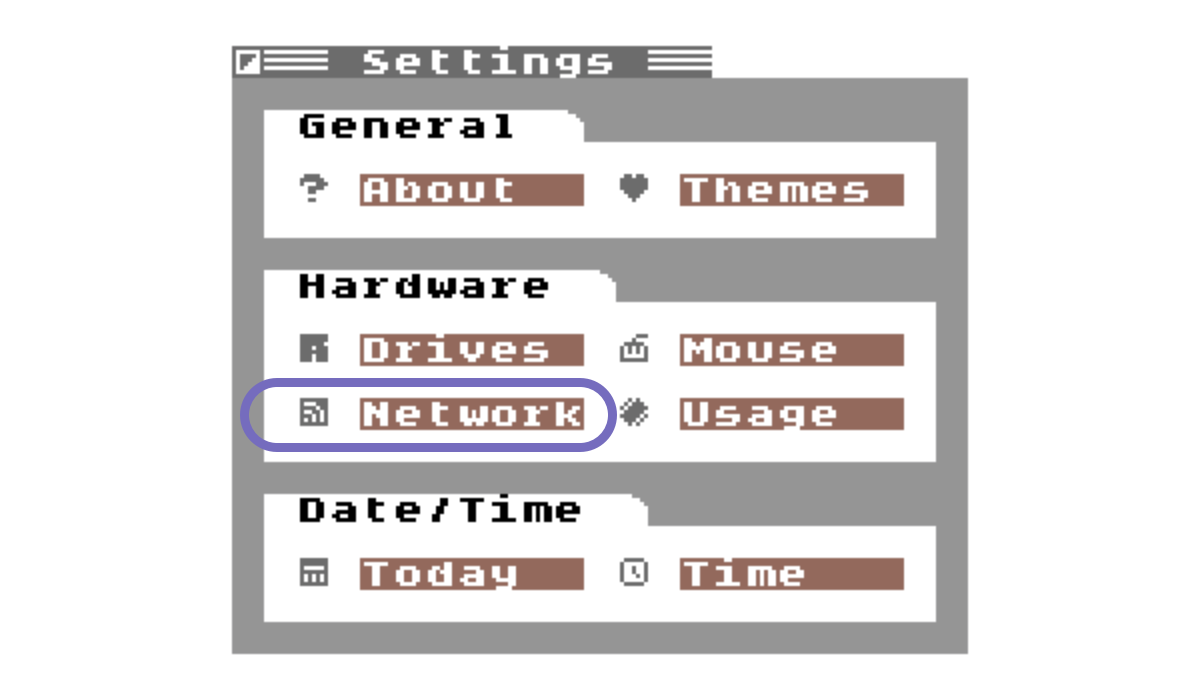
Reset Network Settings
If you are trying to configure network settings and things are not working or the computer is locking up, reset the network settings.
Power off the Commodore 64 Ultimate and wait for 30 seconds. Power the Commodore 64 Ultimate back on. Boot C64 OS. If you are booted into App Launcher, switch to File Manager by choosing it from the Go menu.
Choose System from the Go menu. Scroll down and open the system's settings directory. Scroll down, select network.t (if present). Choose Scratch from the File menu. On the window, confirm the scratch by clicking Start.
Proceed to configure networking again. Power cycle the computer once, first. Then open the Network Utilty from within App Launcher. (It cannot be run from File Manager.)
Driver Tab
Under the Drvr tab of the Network Utility the default driver should be set to "None". If you do not see "None", the previously configured driver could interfere with how the computer operates. If a driver other than "None" appears here, you should first go through the "Reset Network Settings" described in the note above.
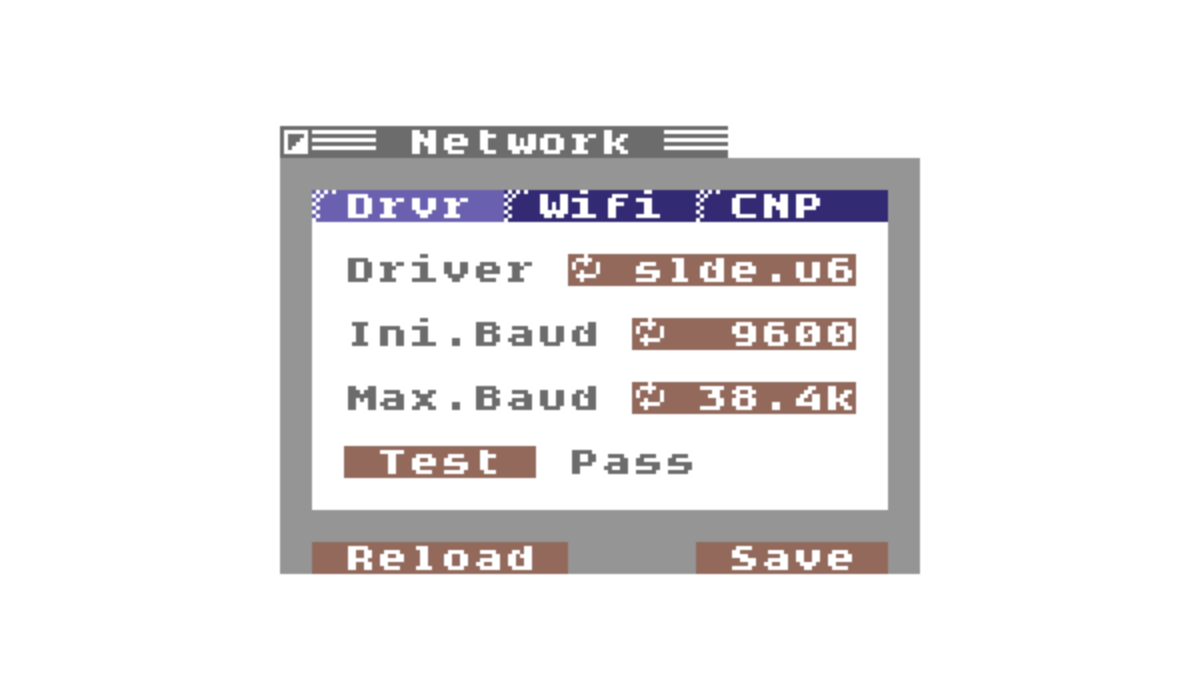
Click the Driver cycle button to select the correct driver. (Hold the COMMODORE key while clicking to cycle the button in reverse.)
Pick the correct driver
If you configured the ACIA (6551) Mapping to "DE00/NMI", you must choose the driver "slde.u6"
If you configured the ACIA (6551) Mapping to "DF80/NMI", you must choose the driver "sld+.u6"
The Ini. Baud and Max. Baud settings are not critical as the SwiftLink and modem are emulated and designed to work at the highest speed. Choose 38.4K for both options.
Click "Save". You should see the word "Pass" appear beside the Test button. If the word "Pass" does not appear, something is misconfigured. Review the settings from the top to make sure everything is configured correctly.
WiFi Tab
The Wifi tab of the Network Utility is typically used to provide the SSID and Password for a WiFi access point. However, the Commodore 64 Ultimate cannot have its WiFi access point set from software on the C64 side.
Review the Commodore 64 Ultimate User's Guide, Chapter 11: C64U Networking and Wi-Fi, to learn how to configure the computer to connect to either WiFi or ethernet. Either one is sufficient to provide internet to the whole machine, but this must be done from the Commodore 64 Ultimate's own menu system.
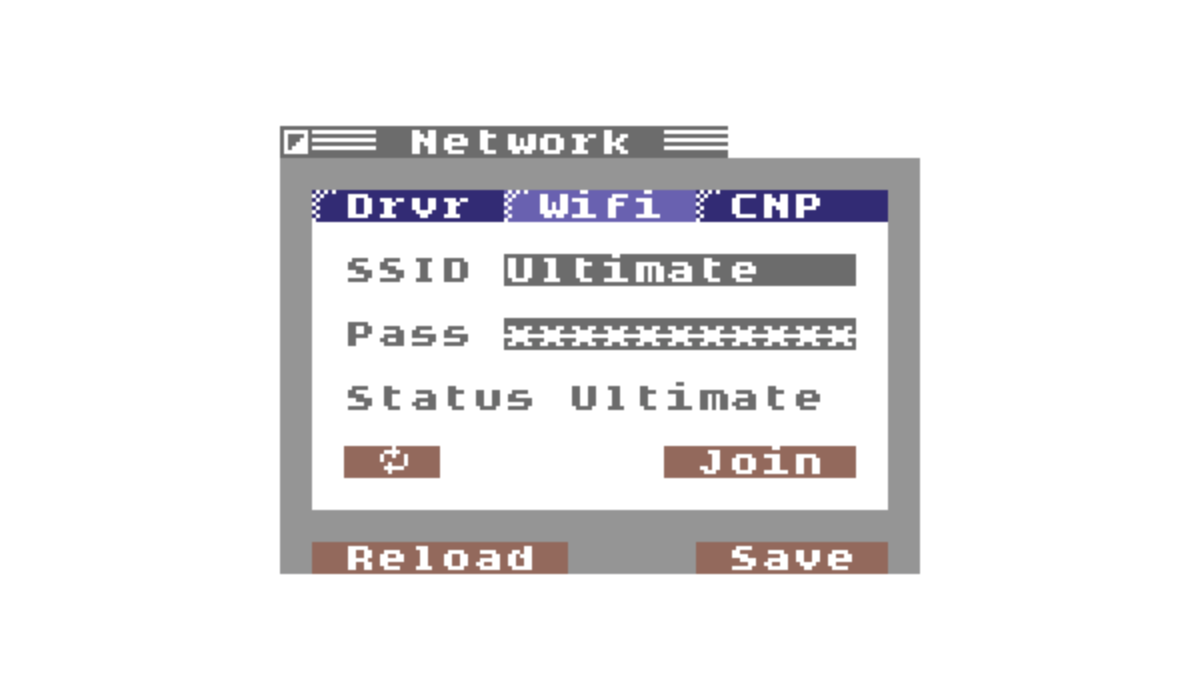
In order for the C64 OS Network Utility to proceed you must provide something for the SSID and Pass fields. You can enter "test" and "test" or "Ultimate" and "password", etc., but these fields cannot be left blank.
Click "Save", then click "Join". You should see the word "Ultimate" appear beside the Status label. If the word "Ultimate" does not appear, something is misconfigured. Review the settings from the top to make sure everything is configured correctly.
CNP Tab
The CNP tab of the Network Utility is used to configure the host and port number for the CNP server. If you are using the CNP server provided by OpCoders Inc., enter "services.c64os.com" for the host, and "6400" for the port.
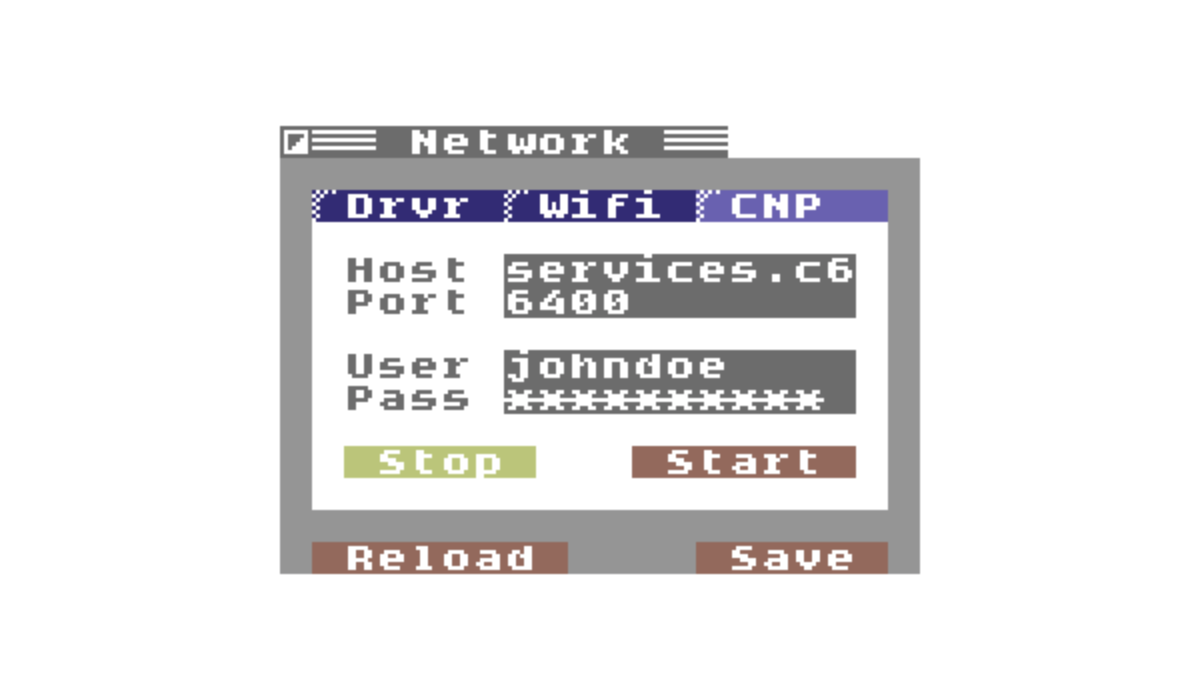
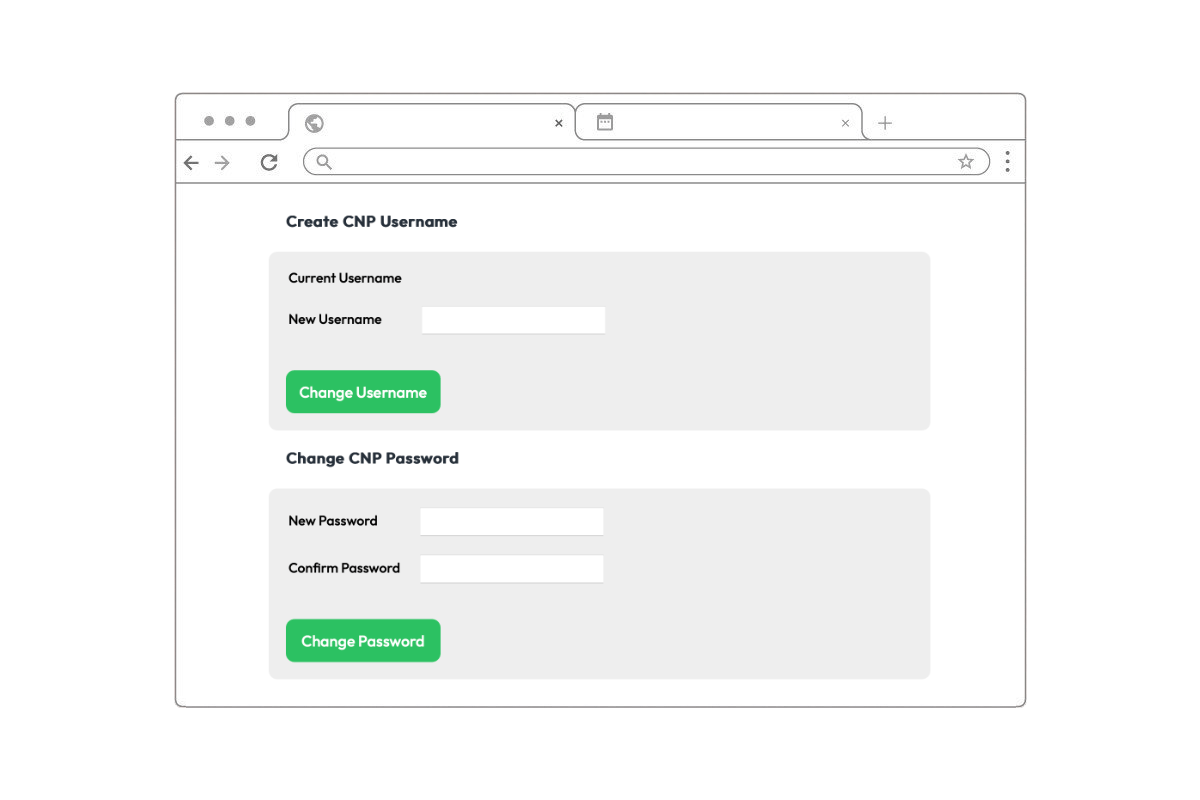
In order to authenticate with the OpCoders CNP server, you must provide your CNP username and password. These can be configured by logging into your account at https://www.c64os.com/c64os/account, and then clicking the "CNP Access" tab.
Security Considerations
Your CNP username and password are completely different from your email address and password used to log into your account at c64os.com.
The CNP credentials are sent in plaintext, so you should not reuse the same username or password that you use for anything else. You may change your CNP username and password at any time.
Once you have configured your CNP username and password, carefully enter them into the "user" and "pass" fields in the Network Utility. Click "Save".
Finally, click "Start" to establish the connection to the CNP server and go online. All buttons and fields should become disabled except the "Stop" button. They should remain disabled until you click the "Stop" button. If they re-enable automatically a couple of seconds after clicking "Start", review to ensure the host, port, user and pass fields have been filled in correctly.
Check CNP connection history
All of your successful connections to the CNP server are logged. You can review the log by signing into your account at https://www.c64os.com/c64os/account, and then clicking the "CNP Access" tab. Scroll down to find the CNP Usage Log.
Appendix: Hardware Addressing
The following section provides technical information about ideal expansion hardware for use with C64 OS and the Commodore 64 Ultimate, and their addressing requirements.
The Commodore 64 has two large (256-byte) areas for I/O expansion. These are called I/O 1 ($DE00-$DEFF) and I/O 2 ($DF00-$DFFF). In order for expansion hardware to be compatible it must use only non-overlapping I/O address space.
RAM Expansion Unit
The C64 Ultimate provides a virtual REU, compatible with the Commodore 17xx series of RAM expansion units. This can be enabled and configured up to 16MB. It can be configured for less memory, but under C64 OS there is no reason to configure it for less than the maximum.
Address use:
$DF00 - $DF0F
GEORAM
A GEORAM is a different kind of RAM expansion. It cannot be used as a substitute for a 17xx compatible REU for C64 OS. But it can sometimes be used in other ways.
Address use:
$DE00 - $DEFF (memory access)
$DFFE - $DFFF (memory control)
IDE64
IDE64 is an oversized cartridge with a compact flash card slot and an IDE bus terminal for IDE harddisks and ATAPI CD-ROMs, zip drives, etc. IDE64 is compatible with the Commodore 64 Ultimate and can be used as the C64 OS system drive. It's not required, of course, but if it is used it needs to be fit into I/O address space.
Address use:
$DE00 - $DEFF
Note: GEORAM and IDE64 are not compatible with each other, as they both use all of I/O 1.
Ultimate Command Interface
Ultimate Command Interface can be enabled on the Commodore 64 Ultimate. It provides access to some low-level features of the device. For example, it can be used to load files from the backend storage into the REU. For C64 OS, it can be used to read the realtime clock (RTC).
Address use:
$DF1C - $DF1F
SwiftLink
The Commodore 64 Ultimate can enable an emulated Swiftlink (6551 ACIA) for use with networking in C64 OS. Swiftlink occupies a small number of registers and the base address can be configured.
Address use:
$DE00-$DE03 (or)
$DF00-$DF03 (or)
$DF80-$DF83
$DF80 is the ideal base address for the Swiftlink, so that it does not interfere with the IDE64, GEORAM, or REU.
Part I: Getting Online
Table of Contents
This document is subject to revision updates.
Last modified: Aug 11, 2026