
C64 Archiver and Installer
A powerful combination for packaging and distribution
of Commodore 64 software bundles.
How are C64 files usually distributed?
D64 is the de facto standard for distributing C64 games, demos and utilities. These are disk images that duplicate the block-level storage of a 1541 disk that maintain the track and sector layout of the original. They maintain all original C64 metadata, such as the lock bit, the CBM File Type, PETSCII file names, and the order of files in the directory.
D64 files can be created from disks, can be written back to physical disks, are supported by all the emulators, and even have many tools for viewing and extracting their contents both on the C64 and on other platforms.
But, D64's are for disks.
The need to go beyond disks.
What happens if you want to distribute 500+ files? A D64 or D71 supports only 144 files. Even a D81 only supports 296 files. What happens if you want to distribute 3 MB worth of files? A D64 holds ~170 KB, a D71 twice that, and a D81 ~800 KB. What if you want to distribute a tree of files nested in subdirectories? D64, D71 and D81 support only a single root directory, just like their counterpart original disks.
The C64 OS system directory is a hierarchy of nested subdirectories. So, there needs to be some way to distribute a whole C64 OS installation. And for more everyday purposes, each individual C64 OS Application is also a hierarchy of nested subdirectories and they need to be packaged and distributed too. The following is a sample of a typical C64 OS Application bundle.
| Item | — | Item Description |
|---|---|---|
| My Application/ | Bundle for Application "My Application". | |
| about.t | Application metadata file. | |
| help/ | Subdirectory for help content. | |
| Introduction | Introduction help file. | |
| toc | Help table of contents. | |
| icon.charset | Application 3x3 icon. | |
| main.o | Application main executable file. | |
| menus.m | Application menus definition file. | |
| resources/ | Subdirectory for media resources. | |
| background.koa | A Koala graphic image file. | |
| main.sid | A PSID music file. | |
| utilities/ | Subdirectory for bundled Utilities. | |
| Some Utility | Bundled Utility executable file. |
We need a way to effortlessly roll this bundle of subdirectories and files into a single archive file, maintaining all the C64-specific file system metadata. We need to be able to create the archive on a C64 and extract it on another C64, such that the directories, the files, their filenames and CBM file types are maintained unmodified, despite having passed through multiple foreign operating systems and their file systems. Plus, the process needs to be sufficiently generalized that the archive could created from a CMD FD 2000 and extracted later to an IDE64. Or created from a SD2IEC and extracted later to a CMD RAMLink, and so on.
Introducing C64 Archiver
C64 Archiver reads through a directory tree and each file it finds it packs serially, end-to-end, within the archive file. Each directory and each file added to the archive begins with a header that stores the directory name and the number of items it contains or the filename and its other file system metadata.
The whole archive is prepended by a header that stores a magic string identifying the file as a C64 Archiver file, the version of the CAR format, the date and time when the archive was created, plus a note about the archive's contents, and more.
A CAR file can be transferred to a Mac or PC; It can be zipped or gzipped to make it smaller; It can be sent over FTP or HTTP and stored on a Linux, Mac or Windows file system; Later, the contents of the archive can be easily extracted to any other modern C64 storage device using the Installer Utility.
C64 Archiver creates CAR files, which are to the C64 what TAR files are to Unix. Greg Nacu — 2022 — C64OS.com
Supported CBM File Types
C64 Archiver supports packing DIR, PRG and SEQ file types. It does not support REL files, but these are quite rare. It does not support USR files because, by their very nature, USR files employ an unpredictable non-linear structure.
The advantages of CAR files.
C64 Archiver is a Commodore 64 Application, made for C64 OS.
It can archive any PRG- or SEQ-type files, not just C64-OS-specific files. CAR files have an advantage over D64 files for distributing content between two Commodore 64s:
- A D64 is always 175 kilobytes, even if the files inside total to a fraction of that.
- A CAR file is only as big as the files it contains, with no upper or lower limit on its total file size.
- A CAR file supports nested subdirectories and CBM FS metadata at the same time.
A CAR file could be used, for example, to roll up just a handful of C64 files, encapsulating their filenames and other metadata, yet only amass to, say, 20 KB total. This file could then be sent to a cloud service over a slow 2400 baud WiFi modem connection and not waste time transmitting what would otherwise be a mostly empty D64 file.
How to use C64 Archiver
//os/applications/:C64 Archiver
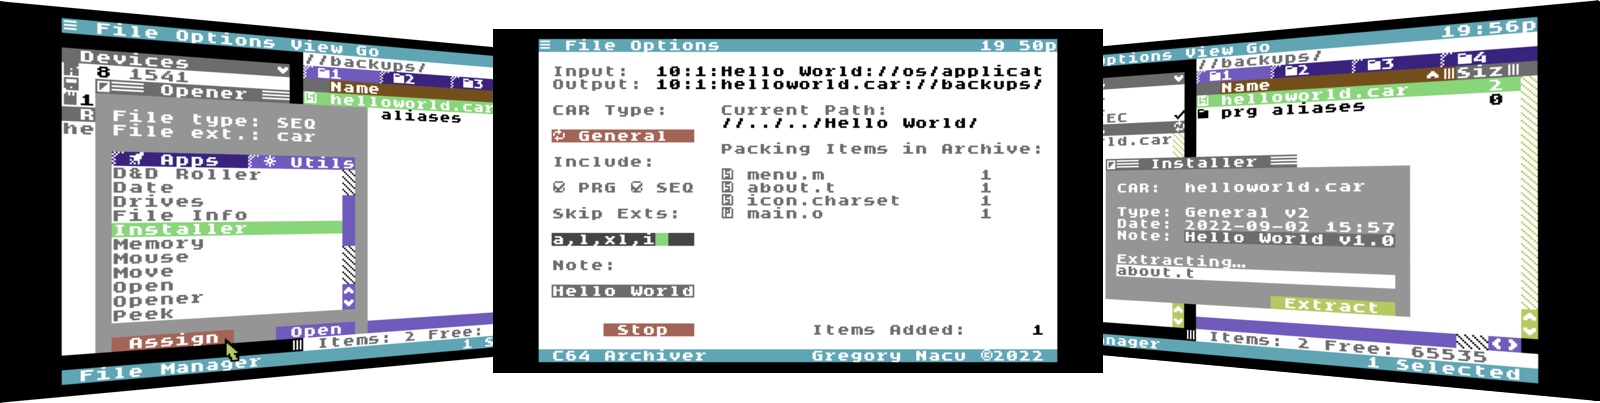
C64 Archiver is an Application for C64 OS. It comes bundled with C64 OS version 1.0. By default, an alias to C64 Archiver can be found on desktop 1 of App Launcher. Double-click the alias to open it.
Alternatively, you can open it from File Manager. Choose Applications from File Manager's Go menu, find C64 Archiver in the list of installed Applications and double-click to open it.


When C64 Archiver first opens, the screen is divided into three general sections.
The input and output strings are shown along the top. These indicate the starting place for what is to be added to the CAR file, and the name and place where the CAR file will be created. Upon first opening C64 Archiver, the input and output are empty and need to be specified before creating a CAR file can begin.
Down the left side of the screen are options for how the CAR file will be created. On the right side is a realtime display of what's happening while the archive file is being creeated.
The options include setting the CAR type, this can be set to: General, Restore, or Install. We'll say more about these later. Next we have options for things to include and things to skip. The checkboxes allow us to include PRG-type files, SEQ-type files, or both. At least one of these file types has to be selected in order to begin creating the archive. When recursively looking through the selected input directory, only files that match the selected CBM file types will be included in the archive. Other CBM file types will be skipped.
Skip exts is a field that allows you to enter a comma delimited list of filename extensions to exclude from the archive. Filename extensions can be from 1 to 6 characters long, following the last period in a filename. In the list, the extensions to be skipped should not include the period, and there should be no spaces between or around the extensions and the commas that separate them.
Lastly, there is a note field and a start button. The note field can take a note up to 30 characters long. The note should give an indication of what the archive contains. The CAR file's filename, naturally, also gives some indication of what the archive contains, but the file's name could also be changed or lost, or limited in length or available characters dependinng on the file system it passes through. The note is in PETSCII, is 30 characters long and won't get truncated, remapped, lost or changed as it passes through other computers or file systems.
The start button only becomes enabled when the input and output fields are specified and at least one CBM file type has been specified. It is not necessary to skip any files by extension, and a note is not required, although it is recommended.

Exploring the options
The options menu can be used to set the CAR Type. The menu options also enable keyboard shortcuts to be used.
| CAR Type | Shortcut | Description |
|---|---|---|
| General | COMMODORE+1 | Used for any purpose. Unarchives in-place. Results can be moved elsewhere after unarchiving. |
| Restore | COMMODORE+2 | Used for creating a complete C64 OS pre-structured restore image. Is used by c64restore tool during C64 OS installation to recognize an operating system restore archive. |
| Install | COMMODORE+3 | Used for creating overlay install archives. Installer uses install archives to extract files and place them into specific subdirectories in the current system directory. |
General is the most flexible and least restricted. You can use it to archive anything. When you unarchive a general CAR file, the files and subdirectories are simply extracted side-by-side with where the CAR file happens to be. After unarchiving is complete, it's then up to the user to move or copy those files wherever he or she pleases. There is no pre-ordained structure, place or purpose for the files in a general archive.
Restore is the most restrictive. It is used for creating complete C64 OS restore archives. To prepare for creating a restore archive, you customize, configure and tweak a C64 OS system directory, complete with Applications and Utilities installed, libraries and drivers bundled in, App Launcher desktops arranged with aliases and backdrops, and settings mostly cleared to defaults. Including clearing calendar events, recently opened files, and other personal data. The selected input item must be that system directory, and it must be named "os" in order to work with the "C64OS Setup" tool.
Install requires careful planning to be used correctly. It is used for creating overlay installation archives. The root directory that is added to the archive is mapped onto the current system directory at the time of installation. Subdirectories in the archive either correspond with subdirectories already found in the system directory or are created anew within the system directory.
For example, if you want to create an installer for an Application that also includes a driver and a library, you start by configuring a partial system directory skeleton that includes library, drivers and applications directories, such as:
| Item | — | Item Description |
|---|---|---|
| Install Root/ | Mock system directory, maps onto the actual system directory. | |
| applications/ | Corresponding applications subdirectory | |
| Hello World | New Application bundle | |
| about.t | Application metadata file. | |
| icon.charset | Application 3x3 icon. | |
| main.o | Application main executable file. | |
| menus.m | Application menus definition file. | |
| drivers/ | Corresponding drivers subdirectory | |
| ptr.somedriver | An example new pointer driver. | |
| library/ | Corresponding library subdirectory | |
| example.lib.r | An example new shared library. |
The "Install Root" directory above is selected as the archive input. The name of this root directory doesn't matter, as it gets remapped onto the actual system directory name at the time of installing the contents of the archive.


There also exist menu options for toggleing the PRG and SEQ type file includes. These provide keyboard shortcuts. COMMODORE+P toggles including PRGs, COMMODORE+S toggles including SEQ files.
Also under the Options menu are, Skip Code Files and Skip No Files. Skip Code Files fills in the skip extensions field with a set of standard file extensions that correspond to source code files.
| Extension | File Description |
|---|---|
| a | Turbo Macro Pro assembly source code file. |
| l | Raw label export from a multi-part binary. |
| xl | Extracted labels from raw label file for binary linking. |
| i | Auto-generating state files, in a binary format. |
With these standard file extensions specified you can create an archive of a directory that contains source and other code files and they will be excluded from the archive making it ready for distribution.
Note how the list of extensions to skip are specified: all together with no spaces surrounding the comma delimiters, no leading or trailing space, and without the period characters.

Choosing the input item
Every CAR file must begin with a single root item. If that item is a PRG or SEQ file, then the archive as a whole will contain only that single item. The root item may also be a directory, which will then also include the files contained within that directory, if they have a matching CBM file type and are not skipped because of their file extension.
The limit of one root item means you only need to select a single item using the Open Utility. Pick Choose Input from the File menu, or press COMMODORE+I. This opens the Open Utility. You can then navigate around the available drives, their partitions and file systems to find the root item for the archive. Select it and click the Open button, or double-click the item. The Open Utility closes and the serialized file reference to that item is displayed in the top section of the main interface.


Choosing the output archive
Next you must choose a name and output location for the CAR file that will be created, and into which the input files will be archived.
Pick Choose Output from the File menu, or press COMMODORE+O. This opens the Save Utility in create mode. You can then navigate around the available drives, their partitions and file system to pick a place into which to create the new CAR file.s
In the Save As field, enter the name of the output file to create. This file should end with the extension .car. Then click Create. The Save Utility is closed and a serialized file reference to the output file is displayed in the top section of the main interface.


Source and destination are independent
The input device and the output device may be the same device or they may be different devices. You could, for example, be archiving a directory stored on a CMD HD and outputting the archive file to an SD2IEC, or any other combination.
Note that it is possible to output the archive file to a legacy device (1541, 1571, 1581) where the source device is archiving a subdirectory tree, even though the legacy devices do not support subdirectories. As long as there is sufficient storage space on the output device to hold the complete CAR file. Note also that there are no pre-flight checks to confirm that the output device has sufficient storage space to hold everything being archived.

Input and output are selected and shown serialized.
Create the archive
To start archiving, click the Start button. Or choose Start from the File menu, or press CONTROL+COMMODORE+S.
If the Start button is disabled, make sure all of the requirements for creating an archive have been satisfied.
Once the archiving has begun, the mouse pointer is hidden to accelerate file transfers. It is therefore no longer possible to use the mouse to click the Stop button or choose Cancel from the File menu. You can however use the keyboard shortcut on the Cancel menu item, and stop the the progress of the archiving by pressing CONTROL+C.


As the archiving is underway, you can observe the current directory that it is working on, displayed on the right under the Current Path: label. Under the Packing Items in Archive: label is a list of directory items from the current directory that the archiver is working its way through. At the bottom right is an Items Added: label which counts the total number of items (files and directories) that have been packed into the archive so far.
When the archiving is complete, the details on the right side are cleared out, and the input and output file references are cleared out. The Stop button reverts to a Start button, but it is disabled until valid input and output items are selected again.
From here, you can proceed to create another archive from new input and output parameters, or return to Homebase by choosing Go Home from the File menu, or pressing CONTROL+COMMODORE+H
Advanced options and techniques
CAR version formats
The CAR file format header holds a version number. Version 1 was used during the beta period before the release of C64 OS v1.0. Version 2 is the main version that was released with the public release of C64 OS.
CAR version 3 is nearly identical to version 2, but adds a built-in CRC32 checksum. This checksum can be used by Installer to confirm the integrity of the archive.
In C64 Archiver, you may choose to create a CAR with (v3) or without (v2) the checksum. By default CARs are created with the checksum. Under the Options menu is the CAR Type menu. From this menu choose "No Check" to create a v2 archive with no checksum. The file is negligibly smaller, but is created slightly faster (since the checksum doesn't need to be computed.) To include the checksum, choose CRC32 from the "CRC32" from the Car Type menu. Use of the checksum is recommended.
Scratch files
When creating a CAR, the Restore-type and the General-type archives have no need to scratch pre-existing files since these CARs are always unarchived into a new base directory.
However, the Install-type archive is intended to overlay the system directory. C64 OS updates are released as Install-type archives. The Installer extracts the archive and aligns the base directory in the CAR with the current system directory. When extracting a subdirectory, if it doesn't exist, it is created. If it already exists Installer goes into the existing directory. When extracting a file, if the file doesn't already exist it creates a new file. And if the file does exist it is overwritten with the file being extracted from the archive. This is the fundamental behavior of updating.
There are situations where an older file ought to be removed, not just overwritten. This happens, for example, if the system update wants to rename a file. It can extract a file with the new name, but it should remove the old file with the old name. This can be accomplished by using a ".scratch" file. In a directory where an old file needs to be scratched, create a SEQ-type text file with the name ".scratch". In this file, list filenames in this directory that should be scratched, one filename per line, with the C64 standard carriage return ($0d) line ending.
For example, to create an Install-type archive that updates a library and changes its name from foo.lib.r to bar.lib.r, the directory that gets archived could look like this:
basedir/
  library/
    bar.lib.r
    .scratch
And in that .scratch file, there would be one line, ending with a single carriage return, foo.lib.r
When the archive is created, C64 Archiver sees a file with the special name .scratch (which C64 OS treats as a hidden file, due to the leading dot.) Instead of adding this file to the archive, it opens the file, reads in the filenames and adds each filename to the archive with a special "scratch" file type and zero byte file size. When Installer is unarchiving, it first extracts and creates a new file called "bar.lib.r" then it encounters "foo.lib.r" of type scratch in the archive, and rather than creating a file with that name it scratches a file with that name in the directory it's currently in.
Temporary updaters
The .scratch file allows an Install-type archive to remove old files. And by removing an old file and adding a new one with a different name it can also effectively rename files. However, sometimes this is not enough.
C64 OS lists //os/temporary/:updater as an optional boot component. It also lists //os/library/:temporary.o as one of the last boot components. Together, as C64 OS boots up it will first load and run any file called updater found in the temporary directory. This updater can be used to do anything necessary to update the system. In past C64 OS updates this file has been used to take an existing settings file, with the user's custom settings in it, and split it into three different files. Because it had to maintain the user's settings, it was not sufficient to scratch the old file and replace it with three new ones.
After the updater runs, later in the boot process the //os/library/:temporary.o boot component scratches all files in the //os/temporary/ directory. This ensures that the updater is only run once.
All this considered, an Install-type CAR file may include a file called "updater" that it extracts to the //os/temporary/ directory. When Installer extracts the the files from the CAR, it writes the updater to temporary. After extracting all the files in the archive, C64 OS is quit back to BASIC. Upon booting back up, the updater is run and scratched automatically.
How to use Installer
//os/utilities/:Installer
Installer is a Utility for C64 OS that is used to extract general- and install-type CAR files. Installer comes bundled with C64 OS version 1.0.
Video Demonstration: How to install C64 OS v1.01 (6 minutes)
A CAR file created with C64 Archiver on one C64 can be transferred to another C64. With it, all the files stored inside, their metadata, and their organization within a tree of subdirectories, are transferred to the other C64 completely intact. To reconstruct the files and their subdirectory tree you have to extract the CAR file using the Installer Utility.
Start with the C64 OS File Manager, and use it to locate a CAR file.

File Info Utility showing the details of the selected helloworld.car file.
Open a CAR file
Select the CAR file and choose Open from the File menu, or double-click it to open it. The Installer Utility is assigned by default to open CAR files.
If you want to confirm this, or re-establish this assignment, hold down the CONTROL key while opening the CAR file. The Opener Utility's panel appears. For the selected file, it shows the file extension is "car" and it may show the CBM file type as either SEQ or PRG.
Select the Utils tab. From the list of installed Utilities scroll down and select Installer. Click Assign to establish Installer as the default opener for CAR files. Then click Open to proceed to open the Installer Utility.

Opener Utility showing the list of available Utilities.
SEQ or PRG?
A CAR file should be SEQ, but it may have been assigned the wrong CBM file type when transferred from another computer. Being marked as a PRG does not interfere with the file's ability to be extracted.
The PRG type tells the drive that it should be loadable, but it is in fact purely a data file, thus, it should for semantic reasons by marked as a SEQ file. Typically PRG files do not exceed around 200 blocks (~50 KB) because a loaded file has to fit in memory, but a SEQ file has no upper limit on size. A CAR file could easily exceed 200 blocks, as it embeds any number of files into one big file.
Just like the File Info Utility and others, the Installer functions like a floating palette. It reflects the file selected in File Manager. Therefore, another way to get to this point is to manually open the Installer utility first, then navigate the file system to where the CAR file is and select it.
If you unselect all files, the Installer clears out its fields. If you select a file that is not a CAR file, the Installer tells you the selected file is not a CAR file. As you change which file is selected, Installer opens the file and reads in its header. It doesn't just depend on a .car filename extension, it validates that the header conforms to a C64 Archiver file.


Besides showing the name of the file, it also shows the type and version number of the archive. In the example below, it shows "General v2." This is a general-type C64 Archive and it is in the version 2 format of the archive. (Version 1 was pre-release and did not support the note. Future versions of the C64 Archiver format may add new features.) It then shows the date and time when the archive was created and the note that was assigned.
General: When a general-type CAR file is selected the button is eneabled and its title is set to "Extract".
Install: When an install-type CAR file is selected the button is enabled and its title is set to "Install".
Restore: If a restore-type CAR file is selected, the button is disabled. Restore-type CAR files are meant to be extracted by the c64restore tool as part of the full C64 OS installation process.

Installer Utility showing the header info of a CAR file.
You can close the Installer at any time without proceeding to extract the CAR file.
Integrity Check
Starting in C64 OS v1.06, the Installer Utility has the ability to perform an integrity check on a CAR file. Integrity check is only available for version 3 CAR files. In the image below, the type is displayed as Install v3. The v3 is the archive format version. If the CAR is a format earlier than v3 the "Check" button is disabled.
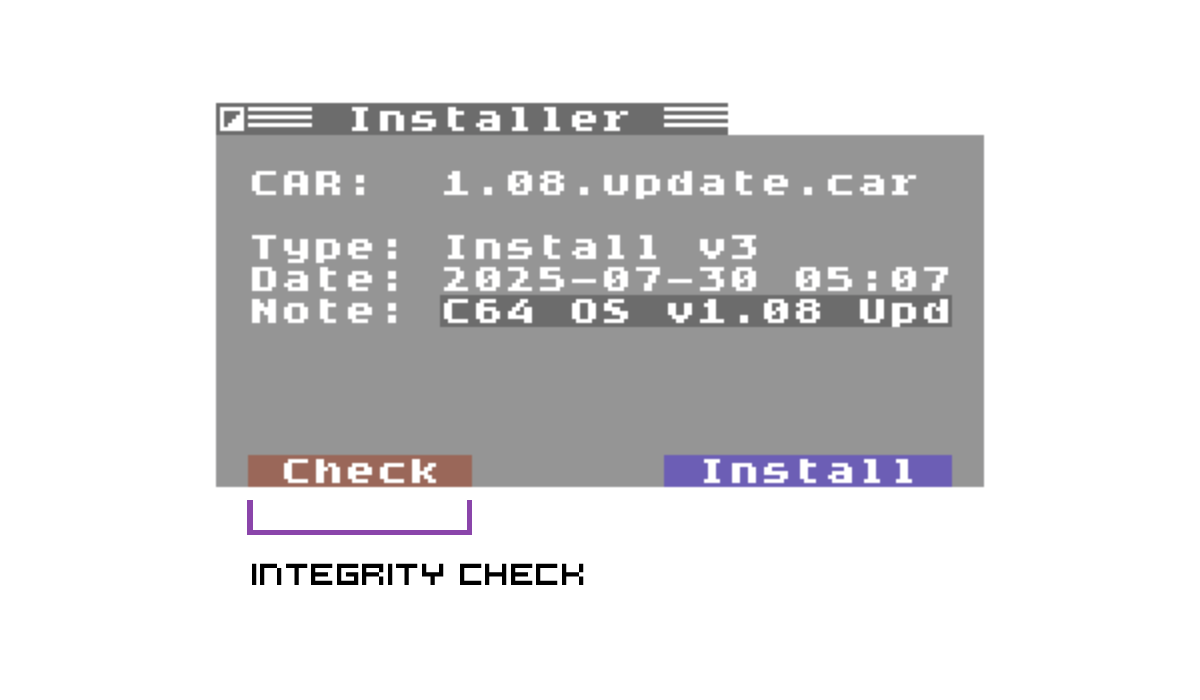
Installer Utility with integrity check button
To perform an integrity check, simply click the button if it is available. While the check is being performed a spinning clock icon appears beside the button, the Extract or Install button is temporarily disabled, and there will be lots of disk activity on the device where the CAR is located. When the integrity check is completed and the check passed, the spinning clock is replaced with a checkmark and the Extract or Install button is enabled again. This file is safe to use.
If the check does not pass, the spinning clock icon is replaced by a splat icon (an asterisk) and the Extract or Install button remains disabled. If this is an Install-type CAR, this CAR is damaged and it should not be installed. If this is a General-type CAR, the file is still damaged, however some of its contents may be salvageable. Deselect the file in File Manager, then reselect it again. Installer will read in its metadata again and make the Extract button available again. You may try to extract the archive, but you should be careful with the contents as they are likely damaged.
Although the Installer Utility is not able to extract a Restore-type CAR file, you can select it to see its metadata. And you can click the Check button to perform an integrity check on it.
Safe Extraction of a Damaged Archive
Attempting to extract a damaged archive could have unexpected results. For example, if a file's size is not right, the archive's structure could be interpreted incorrectly.
To be safe, you should only extract a damaged CAR inside a partition you don't care about. Copy the damaged CAR file to a partition that you would be comfortable formatting if something goes wrong.
Never attempt to install a damaged Install-type CAR file.
Begin extraction or installation
To begin extracting a general-type archive, click the Extract button. A general-type archive always embeds a single root item, either a single file or a single subdirectory. That root item is always extracted to the same place (same device, partition and path) where the CAR file is found.
To begin extracting an install-type archive, click the Install button. The files are automatically extracted into their proper places in the system directory. If a file already exists in the system directory, it gets overwritten with the one from the CAR file. If a subdirectory in the CAR file already exists at that place in the system directory, the original and its contents are kept and the Installer extracts the files into that subdirectory. If a subdirectory from the CAR file does not yet exist, it is created first. In this way, the Installer performs an overlay installation, merging the contents of the CAR with the files and subdirectories already in the system directory.
An install-type CAR file does not have to be in the same partition or device as the system directory to be installed. For example, if the system directory is on an IDE64 and the install-type CAR file is on an SD2IEC, the files will be extraacted out of the CAR file from the SD2IEC and written directly into the system directory on the IDE64.


While extracting files the button is temporarily disabled and the mouse pointer is hidden to speed up disk access.
A new section appears in the middle of the Installer that says "Extracting…" and below that a field displays the name of the item currently being extracted. When extraction or installation is complete, the Installer closes automatically and the File Manager's current directory is refreshed to show the new content.


Versions and Upgrades
The Installer and install-type C64 Archives are a simple, relatively primitive, way of applying updates to C64 OS and its main Applications and Utilities. It is not a package manager and versions of individual files are not tracked.
C64 OS as a whole has a version number. You can check this version number by opening the About C64 OS Utility. (Choose the Settings Utility from the Utility's menu, then from the general section choose About.) The first commercial release was version 1.0. C64 OS also has a build number, which you can check by viewing the contents of //os/settings/:build.t with TextView.
Described below is the process for installing updates. Officially supported updates can be found at c64os.com/c64os/softwareupdates/. Although community members have the ability to create install-type archives, you should be duly cautious when installing them because they modify the system directory.
Make a precautionary backup
Before installing from an install-type CAR, a safe precaution would be to make a complete backup copy of your system directory first.
This can be easily accomplished using the File Manager. Simply select the system directory and copy it to a backup directory in the same partition, or a different partition on the same device. Copying within a device is faster than copying between devices, but if you lack the free space on the system device you can make a backup copy to a different device.
CAR files of the general-type are much less dangerous, as these are just standard archives that get extracted to the current directory only.
How to install system updates
Officially supported system updates (with bug fixes, patches and new features,) are released and made available for download here on c64os.com. To ensure that updates are applied correctly and that everything continues to work, you must install updates in the order they were released. An update can only be guaranteed to work if it is applied to the version of C64 OS which it is designed to upgrade.
Install updates in order. Don't skip an update or things will probably break.
Each update includes the following information:
- Filename
- Release Date
- Required Version #
- Version #
- File Size
- CRC32 checksum
- Release Notes
Below is a sample of approximately how the release table will look. This sample is just for reference.
| Filename | Release Date | Required Version # | Version # | File Size | CRC32 checksum |
|---|---|---|---|---|---|
| 1.03.update.car | 2022-11-24 | 1.02 | 1.03 | 53 KB, 209 blocks | 348f6c11 |
| Adds a new text editor Application. Adds a new library (tedit.lib) which is the reusable text editing engine, and a new Toolkit class, tktedit, which backends on the next tedit.lib. | |||||
| Filename | Release Date | Required Version # | Version # | File Size | CRC32 checksum |
| 1.02.update.car | 2022-10-15 | 1.01 | 1.02 | 45 KB, 180 blocks | 9e9461cb |
| Fixes bugs in the Toolkit. Adds a new library (memory.lib) which implements realloc. | |||||
Begin by checking your current C64 OS version number. Open the Settings Utility from the Utilities menu, then open About from the general section. The version number is shown at the top of the About C64 OS Utility. This sample screenshot was taken from C64 OS v0.8 beta.


Find the next update you need to apply. The update's required version # tells you what version of C64 OS this update should be applied to, and tells you what version it will bring C64 OS up to after it's installed.
For example, if your current version is 1.01: Find the update that lists its required version # as 1.01. This update can be correctly applied to the version you are currently on. Download the install CAR file and copy it to your C64. The easiest way is to put it on an SD Card using a Mac or PC, and then put the SD Card into an SD2IEC device connected to your C64.
Confirm the CRC checksum
C64 OS v1.06 and CAR v3 format add support for built-in integrity check. The process described below can still be used, but is unnecessary for CAR files with a built in CRC32 checksum. See Integrity Check above.
Instructions differ from v1.03 and up
The Checksum Utility became available in v1.03. Updating to 1.01, 1.02 or 1.03 makes use of a more manual process to confirm the checksum.
//os/utilities/:Checksum (available in v1.03)
You should confirm the CRC32 checksum to ensure that the file has not been damaged or modified getting it from c64os.com to your C64. From the File Manager, select the update CAR file for which you want to compute a checksum. Next, choose Utilities from the Utilities menu. From that list, open the Checksum Utility. Choose CRC32 from the three options in the Checksum Utility and click Run.
Time to calculate CRC32
Depending on the size of the file and the speed of the storage device, computing the checksum may take some time. A CMD HD with JiffyDOS requires ~1 second for every 12 blocks of data.
Compare the result with the CRC32 checksum provided in the software updates table. If these numbers are not an exact match, the update file is corrupt in some way and should not be installed.

PRE v1.03 Checksum Instructions
Switch back to the standard (post v1.03) instructions.
//os/tools/:cksum
//os/tools/:crc32
Using the crc32 tool from the READY prompt
You can check the file's cksum using the cksum tool (which was called crc32 in v1.0.)
crc32 vs. cksum
In C64 OS v1.0 the tool called "crc32" computes an older-style cksum. In C64 OS v1.01 a copy of this tool was renamed cksum. In C64 OS v1.03 a new version of the crc32 tool is included that computes the true/modern CRC32 checksum. The cksum tool has been retained and its internal messaging has been changed to state that it's generating a cksum not a crc32.
In the software updates table the true CRC32 checksum is shown, but the cksum number is also included in the notes for updates v1.01, v1.02 and v1.03. Updates after v1.03 no longer include the cksum because the true CRC32 checksum can be used with the new crc32 tool and also with the Checksum Utility that comes with v1.03.
From the READY prompt, change to the location of the CAR update file. Load and run the cksum (or crc32 in v1.0) tool from the c64tools directory in the system directory. It asks for a filename, type the filename of the CAR file. It prints a cksum and returns to the READY prompt.
Compare the result with the cksum number provided at the bottom of the notes of the software update. If these numbers are not an exact match, the update file is corrupt in some way and should not be installed.
Step by step instructions for cksum tool
Using a Commodore 64 is a little bit complicated with multiple devices, partitions and directories. To keep things simple, let's assume C64 OS is installed on an SD Card and your SD2IEC is device #8. Take the SD Card from the SD2IEC, put it in your PC and copy the install CAR file to it. For simplicity, put it in the root directory of the main partition. Move the SD Card back to your C64's SD2IEC drive. The following commands can be used to perform the checksum.
Without JiffyDOS:
open15,8,15,"cd//":close15
load"//os/c64tools/:cksum",8
run
Or, with JiffyDOS:
@cd//
↑//os/c64tools/:cksum
That first line changes the directory to the root directory. On freshly powering on the C64, the SD2IEC defaults to the root directory. So you don't necessarily need to explicitly change to the root directory. And, of course, if you put the update CAR file into a subdirectory, you'd change to that subdirectory instead of to the root directory.
Install the update
With the correct install CAR file chosen for the current version you're on, and the CRC checksum confirmed, boot into C64 OS and run the install CAR file by double clicking it in File Manager and installing it with the Installer Utility in the process described above.

After installation is complete, reboot C64 OS, and check its new version number. If you were behind by more than one update, repeat this process to install the next update for the new current version you're running.
How to use CAR Search
//os/c64tools/:carsearch
Requires: an SD2IEC
CAR Search is a BASIC program for previewing the contents of a CAR file. CAR files are used to distribute complete C64 OS installation archives, installation overlay archives, as well as general purpose archives. CAR Search can only be run from an SD2IEC. It depends on the ability to scan files, which means to efficiently skip an arbitrary number bytes forwards or backwards within a file.
Load the carsearch program, then make the SD2IEC the default device and change into the directory where the CAR file is located. Run the program. It reminds you that it can only be used on an SD2IEC and asks for the name of the CAR file. Enter the name, and press return. It then proceeds to output the header information, followed by a recursive directory listing of everything contained within the archive. CAR Search supports multiple CAR format versions.
Let's supposed that a CAR file is on an SD2IEC on device #12, in the root directory of partition 1. And let's suppose that C64 OS is installed in partition 1 of device #12. The following commands show how to use it, both with and without JiffyDOS.
Without JiffyDOS (example with SD2IEC on device #12)
open15,12,15,"cp1"
print#15,"cd//"
close15

load"//os/c64tools/:carsearch",12
run
With JiffyDOS (example with SD2IEC on device #12)
@#12
@cp1
@cd//

↑//os/c64tools/:carsearch


In the example above left, when asked for a filename helloworld.car was entered, which can be seen to be in the current directory listing. In the screenshot above right, it outputs the header, indicating that this is a General type archive, the archive format is version 2, and it then gives the date and time when the archive was created, and the note assigned to this archive.
Next it shows the items, starting with a single root item, the subdirectory Hello World. The item types are indicated DIR as "d", PRG as "p" and SEQ as "s". Directories do not have a size but instead specifiy how many children are directly within them. Files have their filesizes listed in bytes.
Last modified: Apr 29, 2026