
Image Search
An internet-powered image search
and conversion Application for C64 OS
Introducing Image Search
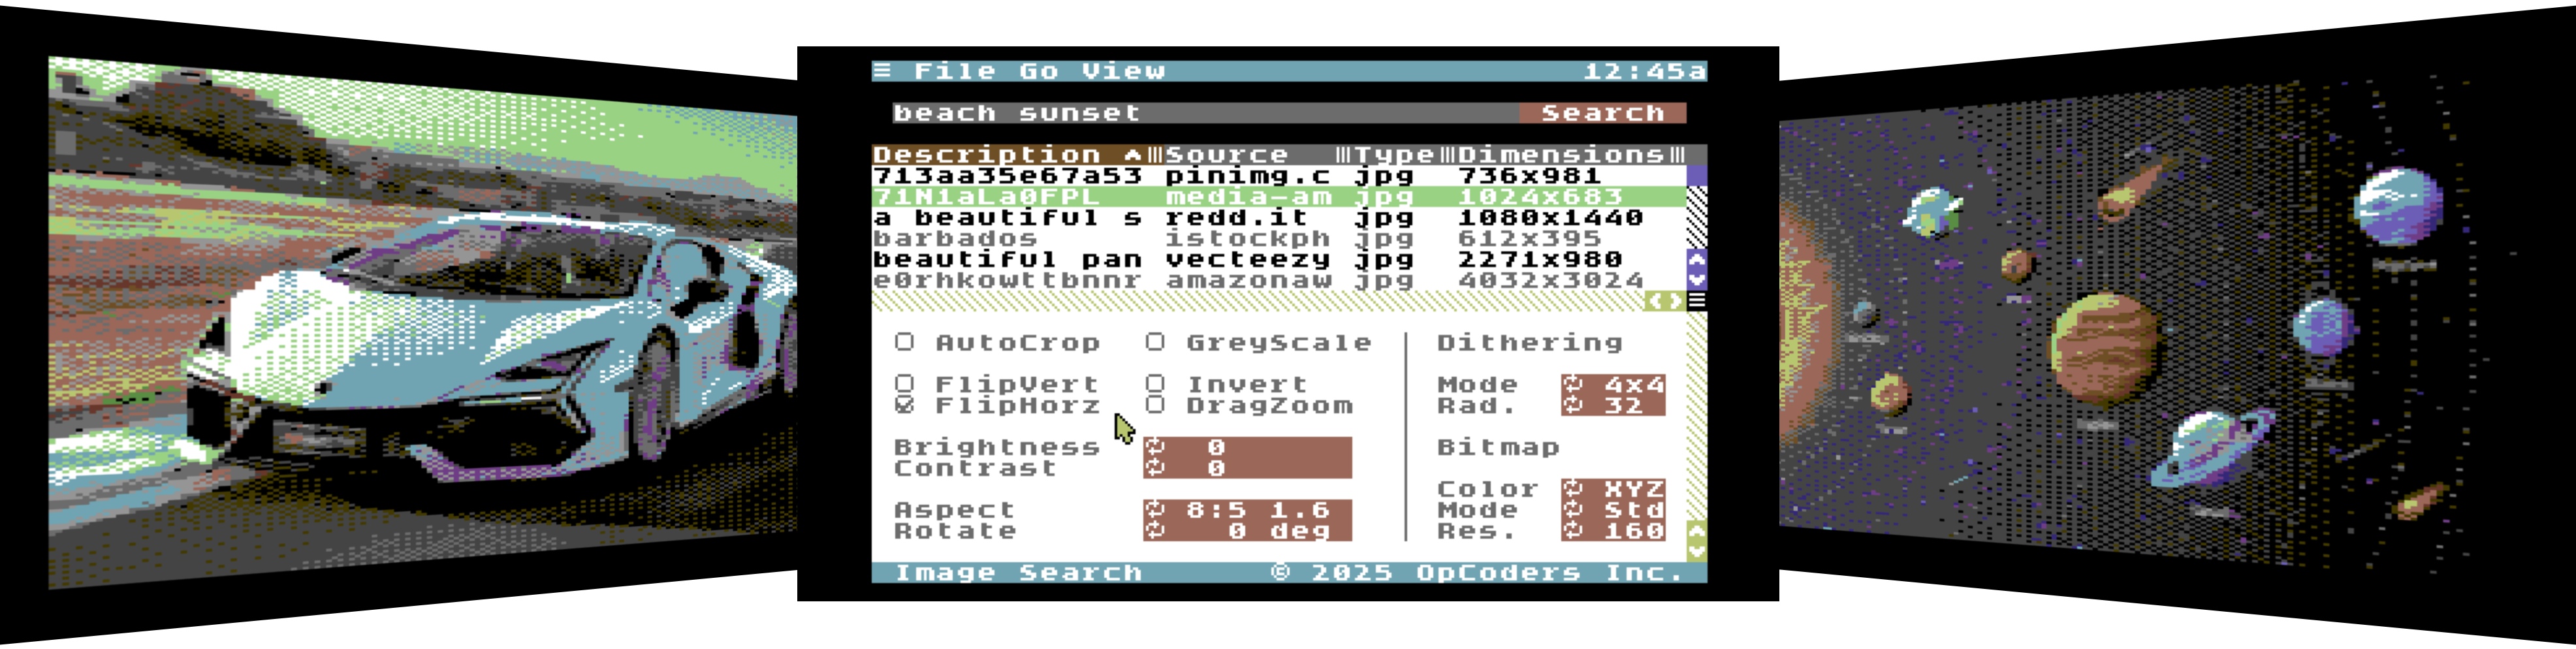
Image Search is an internet-powered Application for C64 OS that lets you search the web for images, pictures and graphics, using ordinary language and backended on a commercial Image Search API. Scroll through a table of search results, and sort by name, source, original image type and resolution.
A rich panel of configurable options let you adjust the contrast and brightness, flip, mirror, rotate, crop and zoom-in on the image. Then download that image, converted on-the-fly to a native C64 graphics video mode: Hi-Resolution or Multi-Color bitmap. Images are downloaded directly into memory where they can be viewed in fullscreen or splitscreen. And when you've tweaked that image until it looks amazing, you can save it to local storage.
Conversion happens in the cloud allowing your C64 to consume massive images in JPG, PNG or GIF formats in just a few seconds. You control the dithering options, the colorspace mapping, the palette and the target C64 format. But even better, with the aspect ratio control you can request images in the correct aspect ratio for your screen; circles will actually look round instead of like ovals. There has never been a program like this in the history of the Commodore 64. And it's free, for C64 OS users.
Image Search puts over a trillion graphics just a few seconds away from being displayed on your Commodore 64.Greg Nacu — 2025 — C64OS.com
Download Image Search for free today. Requires C64 OS v1.07 or greater and compatible network hardware.
Image Search and C64 OS were made for each other.
Image Search is a feature-rich and powerful image search and conversion Application. And yet it was put together in just a few weeks. It makes use of a panoply of C64 OS technologies. Starting with the user interface; it's super dynamic. With your mouse you can drag the splitter bar to divvy up the screen between the search results at the top and the collection of adjustment and conversion controls at the bottom. The search results display in a table with sortable and resizable columns that can be scrolled both vertically and horizontally. The controls in the lower half can be clicked, cycled and scrolled with ease, and the whole region they're in can also be scrolled.
The search field supports full editing and you can copy and paste to and from the clipboard. The Colors Utility lets you customize the color surrounding the search bar. Graphics are displayed in the system-wide splitscreen and fullscreen graphics modes letting you see the main UI and the image you downloaded at the same time.
And speaking of downloading, Image Search makes use of the Commodore Network Protocol's socket API, built into C64 OS starting in version 1.07. This means complete hardware abstraction. If there is a network hardware driver in C64 OS for your ethernet or wifi modem, or smart network adapter, Image Search makes use of it automatically. And as new drivers are added that support new hardware, Image Search comes along for the ride.
Finally, Image Search has a built-in user's guide available by choosing Help from the Utilities menu. Plus you can save any graphic you've downloaded with the system-standard file save dialog box. This lets you navigate your entire file system and all C64 OS supported devices, enter a filename and save the best images. You can view them later or use them in other projects. With an REU, Image Search gets banked automatically with Fast App Switching so you can jump quickly between downloading images, searching Wikipedia, managing your files, or anything else.
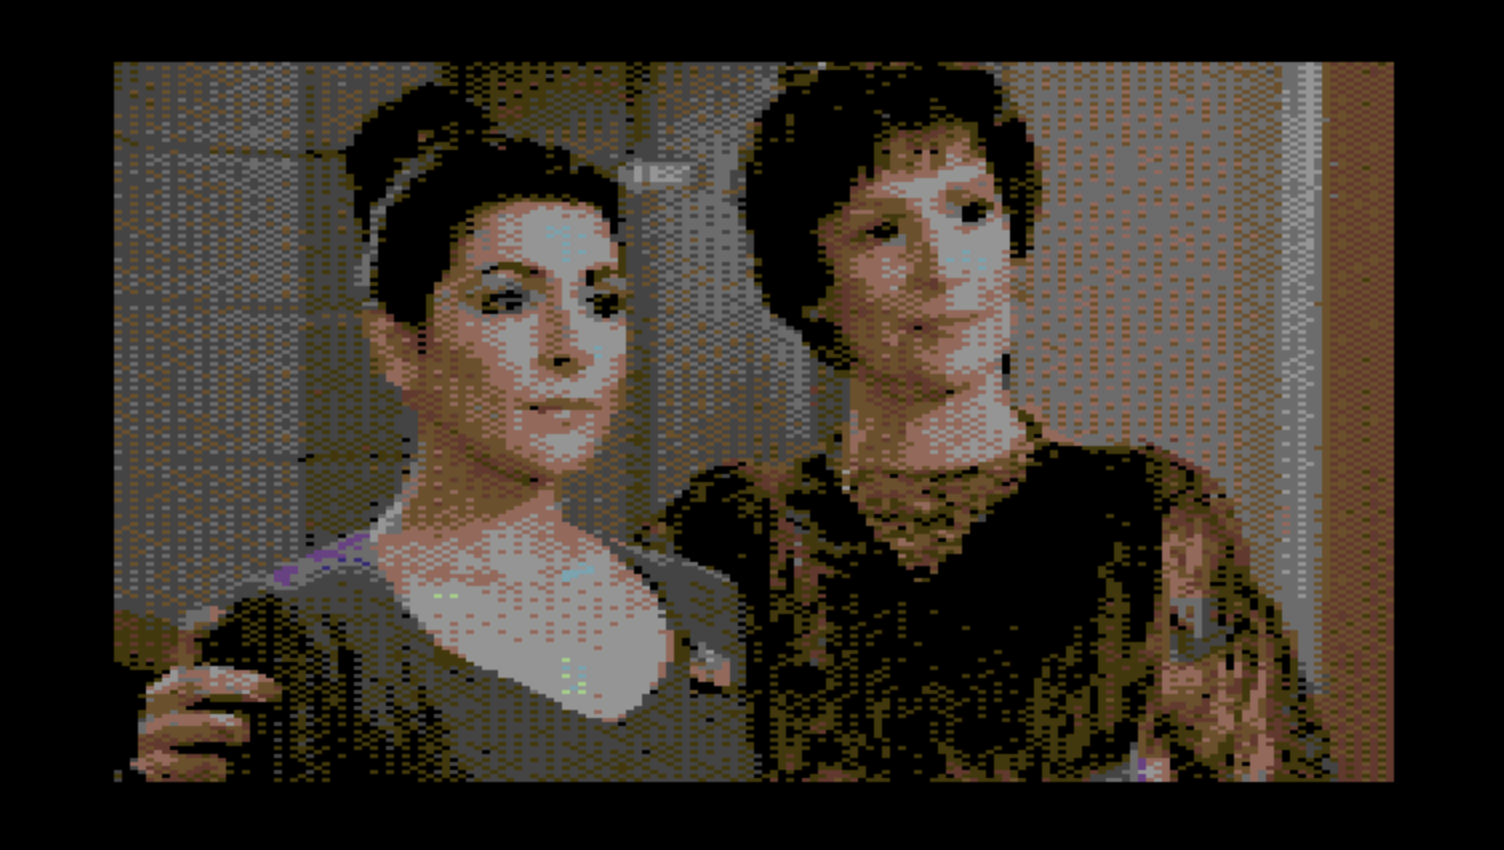
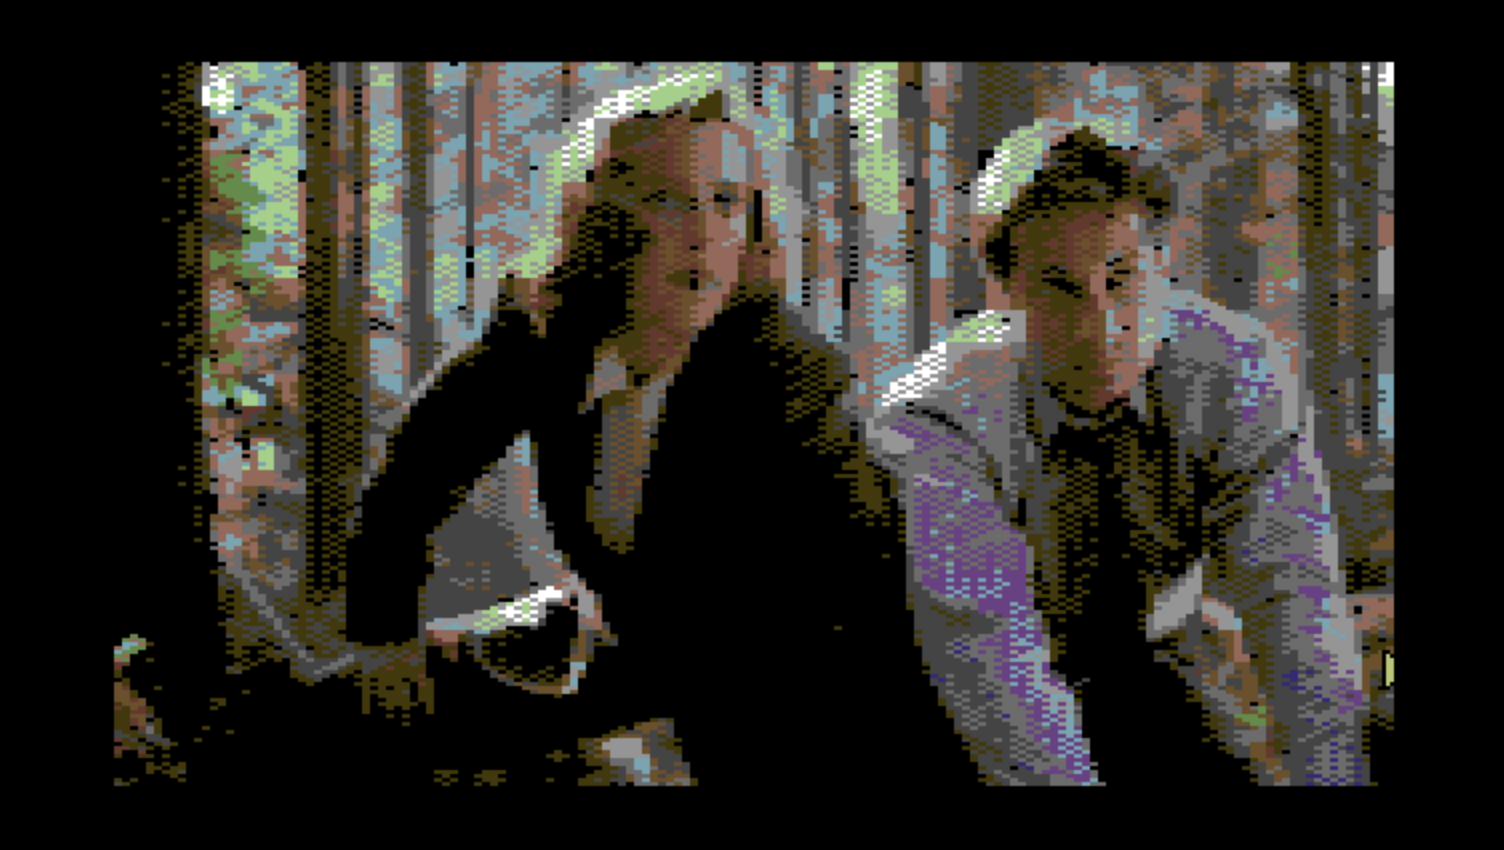
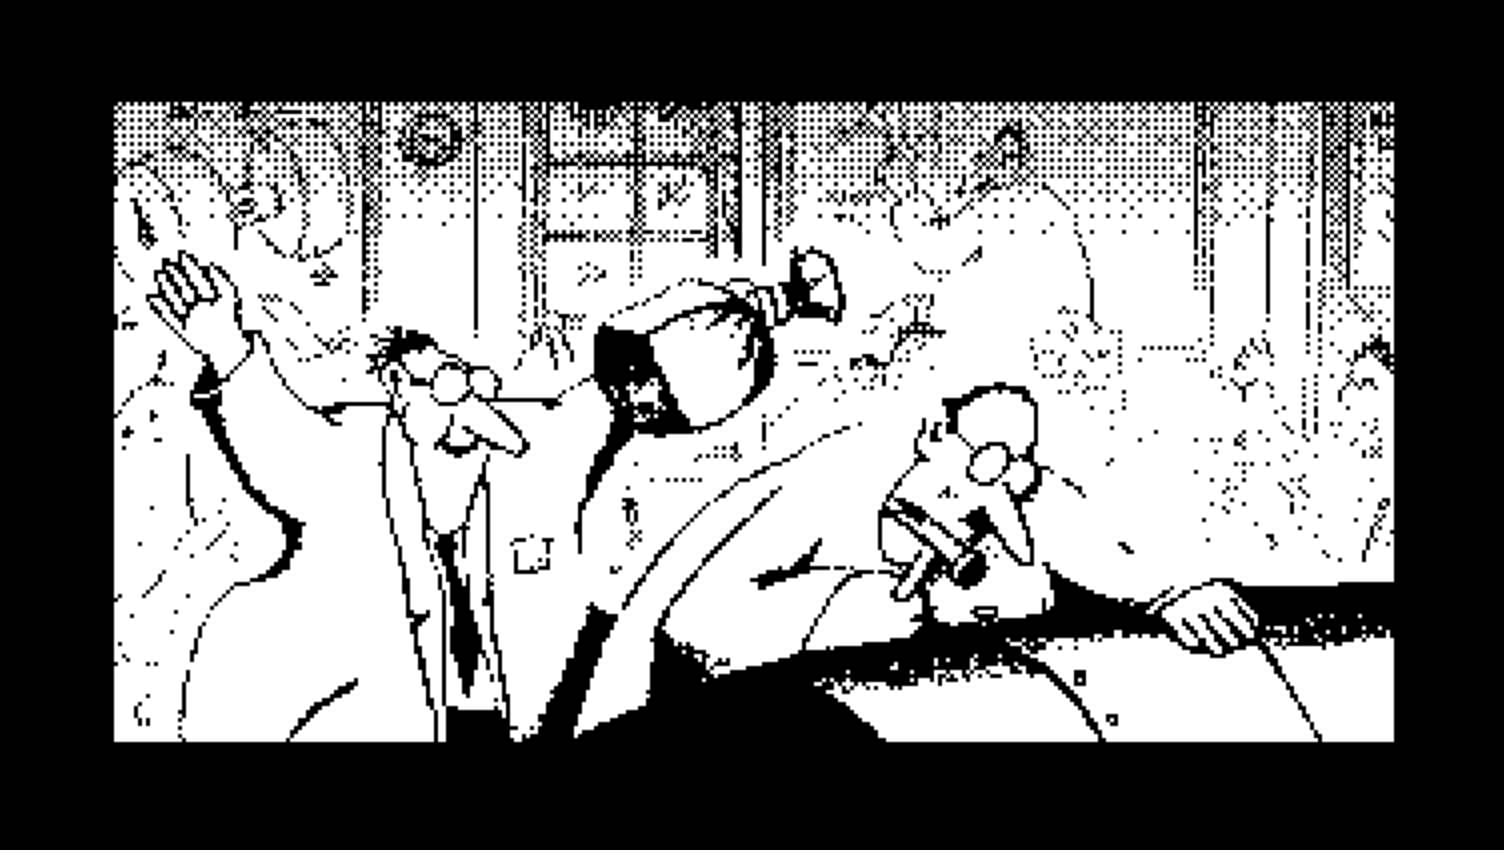
Image Search - Deanna Troi and her mother.
How to use Image Search
First, make sure you're online.
Image Search requires C64 OS to be set up with an internet connection. To learn more about how to take C64 OS online, review the Networking Guide.
Configuration of hardware driver, wifi connection credentials and other network settings are handled by the operating system's networking layer and the Network Utility.
Search for an image
The user interface is split into two halves. The upper half is for performing the search and getting the search results. By default, there is a search field and button visible at the top of the screen. The visibility of the search bar can be toggled using the View → Search Bar menu option or by pressing COMMODORE+B.
Click in the search field, or press COMMODORE+S, to put keyboard focus in the field. Type anything you want to search for. The search field may hold up to a maximum of 80 characters. Press RETURN or click the Search button to the right of the field to begin the search.
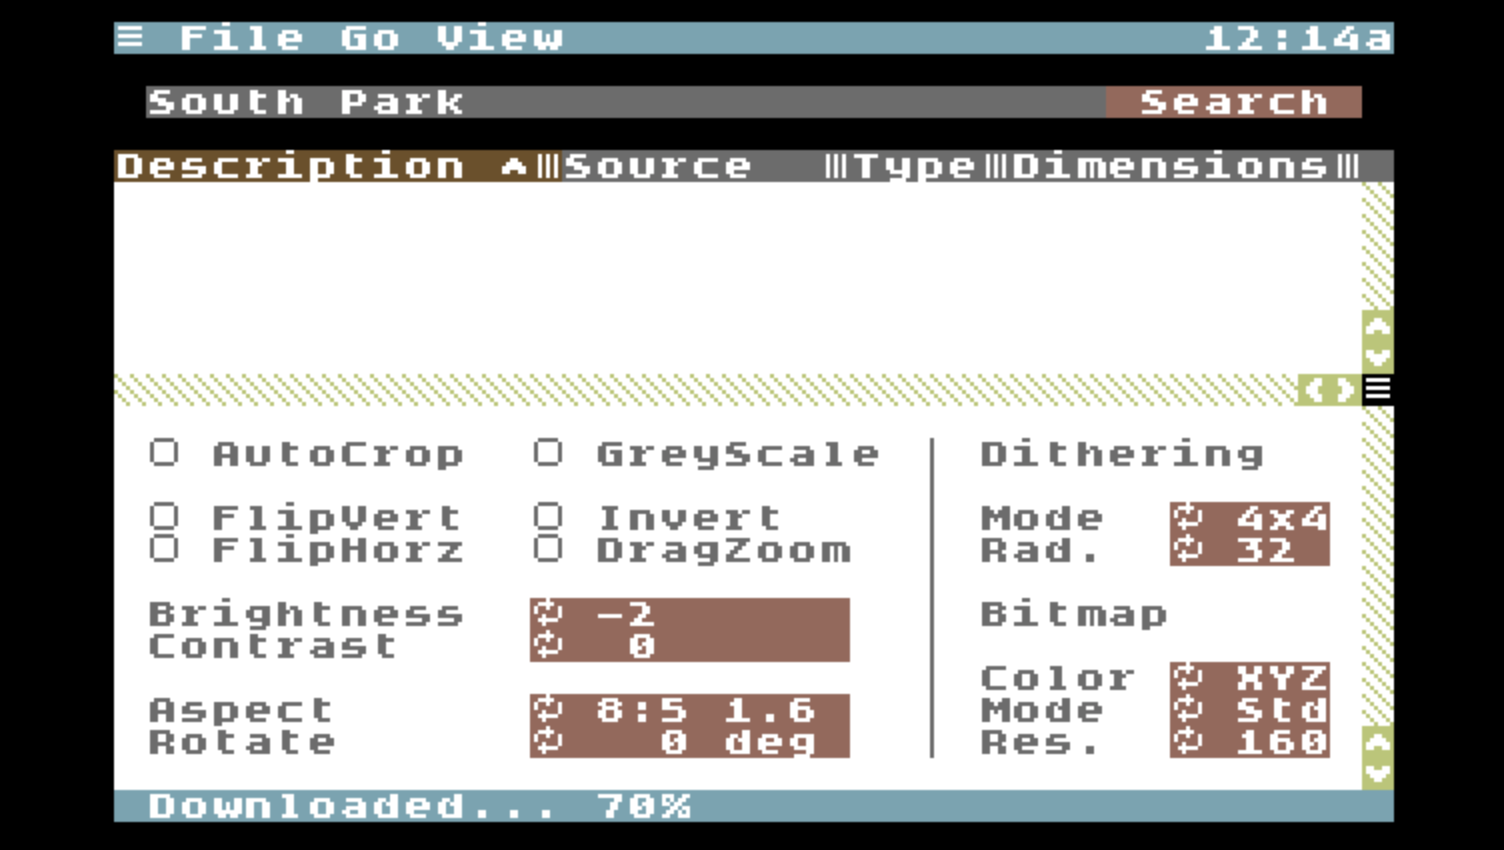
Searching for 'South Park'
As soon as the search term is sent, the system status bar shows the downloading progress as it fetches the search results. If you are offline the search will not be performed and you'll see a system alert, the border will flash.
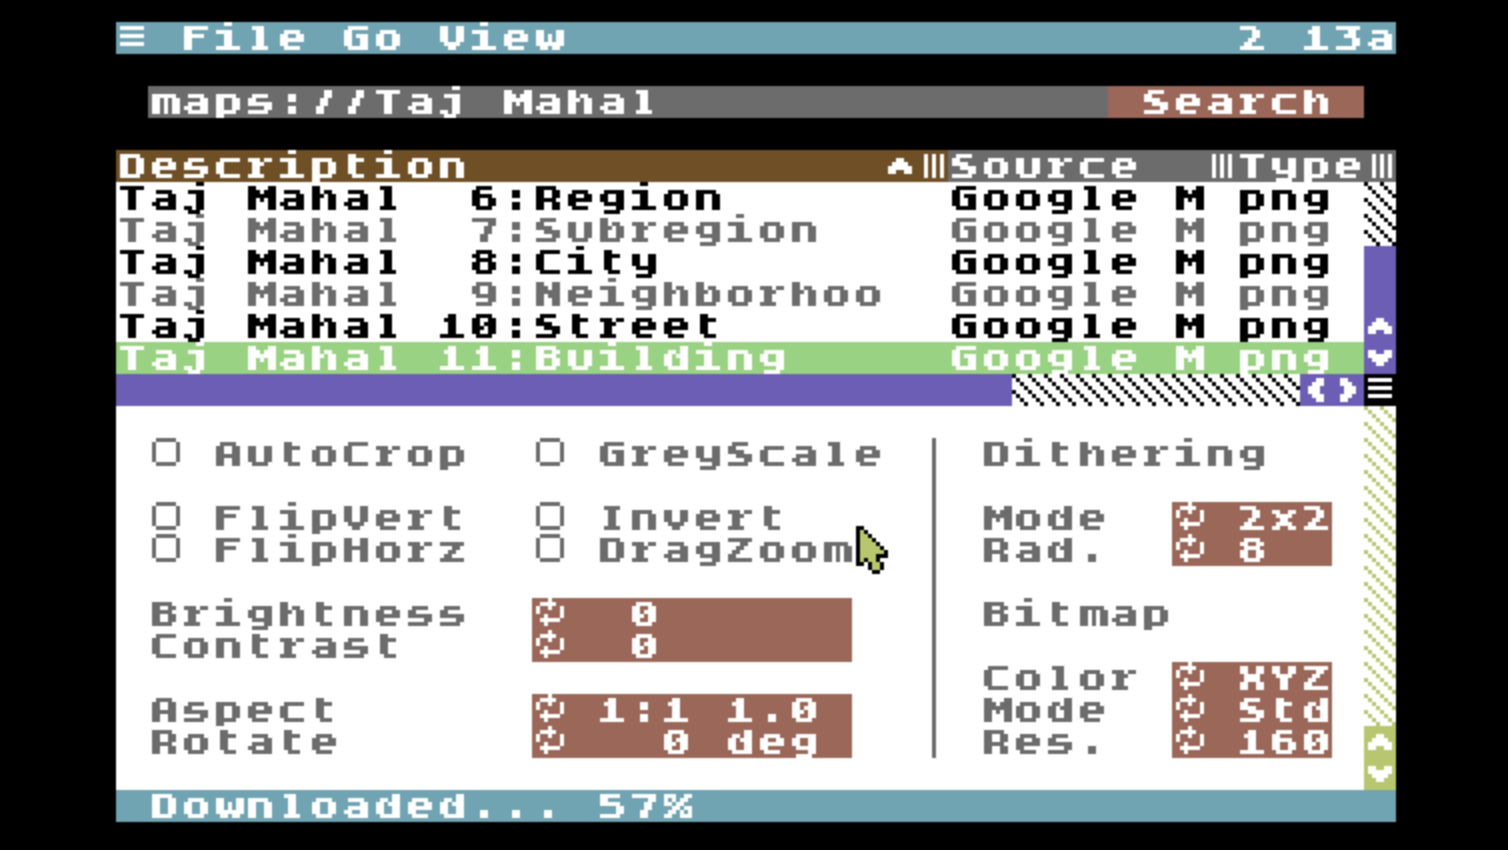
Search results are fast to fetch, and a maximum of 40 matching results are loaded into the search results table. You can click on any row to select it. Use the CURSOR-UP and CURSOR-DOWN keys to change which row is selected.
The table has 4 columns: Description, Source, Type and Dimensions. The description is based on the file's name. This is sometimes useful, although unfortunately not always. Sometimes the name is just random numbers or characters. The source is the domain name where the image is found, such as newyorker.com, wikimedia.org, etc. Type tells you the file type of the original image, JPG, PNG or GIF. And lastly, dimensions tells you the pixel size of the original image, width by height.
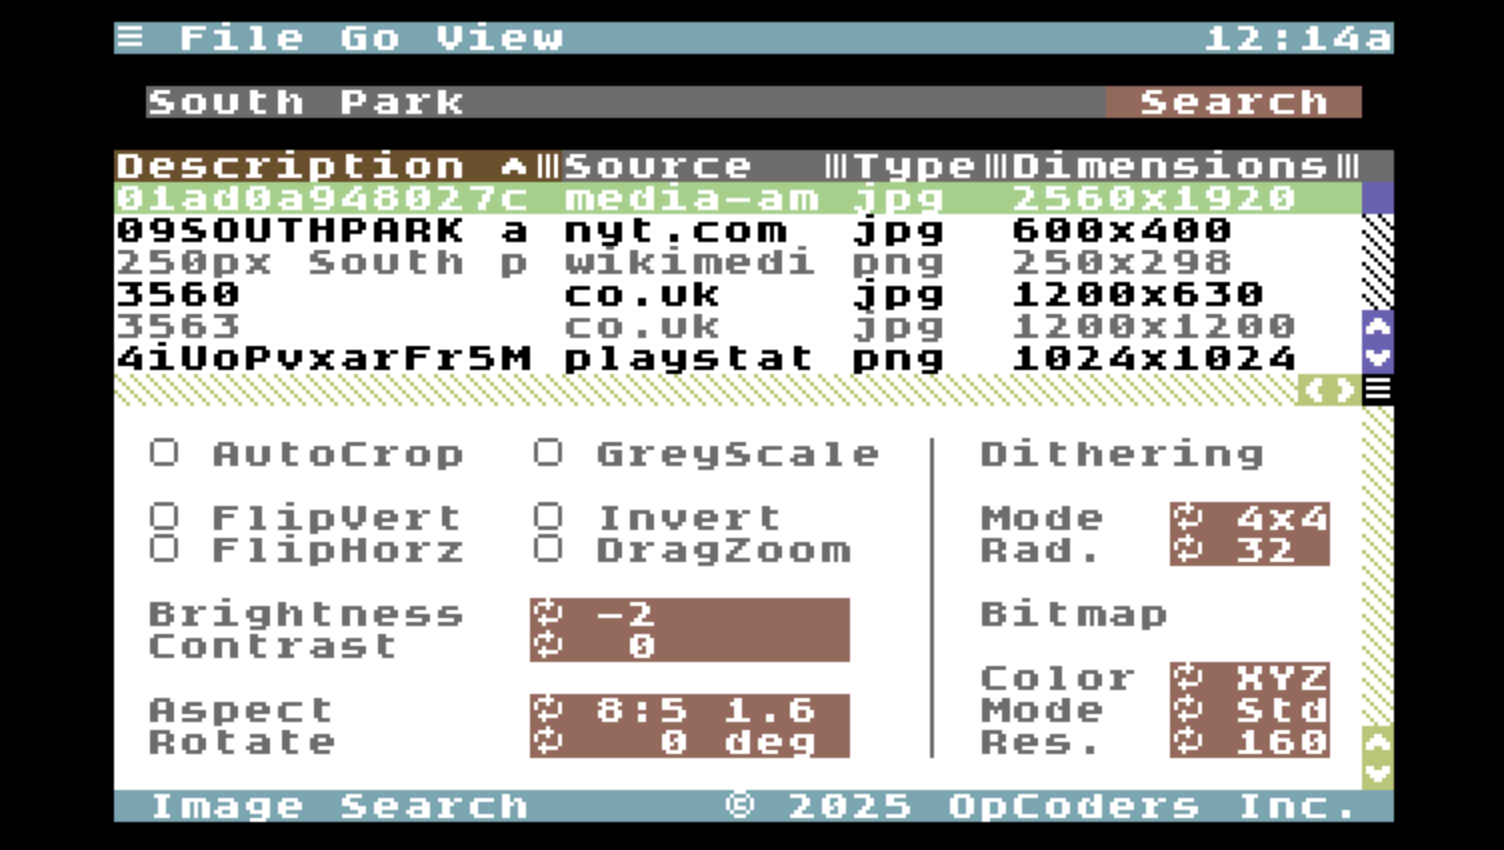
Search results for 'South Park'
To see more search results at a time, you can hide the search bar as mentioned earlier. You can also drag the horizontal splitter down. And as is always possible in C64 OS, you can use the global keyboard shortcuts to toggle the visibility of the menu bar and status bar, CONTROL+SPACE and CONTROL+COMMODORE+SPACE.
Seach for an image by URL
In addition to performing a keyword image search, if you know the URL to an image that is hosted on a webserver, either HTTP: or HTTPS:, you can type or paste this address into the search field. If the image is able to be accessed, a single search result is listed in the table. Everything else proceeds as normal.
Download an image
To download an image, double-click a table row, or choose Refetch from the Go menu, or press COMMODORE+R. The status bar indicates the downloading progress of the image. While the server is fetching and converting the image the status bar shows "Downloading ..." with no percentage indicated. The length of time that this stage requires depends on how long it takes for the image to be downloaded from its source to the image conversion proxy server, plus how long it takes for the image to be converted.
The dimensions of the original image give you an indication of how long it will take to fetch and convert. The larger the image the longer it will take. Due to the nature of the an image search engine, some search results may no longer be available from their original source. You can tell this if the status bar immediately changes from "Downloading ..." back to the standard Application message. This can also happen if a server is configured not to give up an image if the appropriate headers have not been sent from a web browser.
Leave the UI alone while downloading
Under ideal circumstances you should be able to manipulate the user interface, such as open menus, check boxes, scroll the table, etc., while an image or search results are being downloaded.
However, there are some known bugs in the first version of the C64 OS network stack which could lead to a socket connection stalling if the computer is spending too much time updating the screen. It's best to leave the UI alone while downloading is in progress. If it looks like a download has stalled and isn't resuming, choose Stop from the Go menu, or press COMMODORE+PERIOD, and then try again.
Maximum stable network speeds
If you are using an REU, a network connection with a Swiftlink (or emulated Swiftlink) is stable at its maximum speed of 38.4Kbps. However, if you are not using an REU, the connection speed should be reduced to 19.2Kbps. If the C64 is accelerated above 1MHz, this limitation can be ignored.
While an image is downloading you can switch into fullscreen graphics mode, using the global system keyboard shortcut COMMODORE+BACKARROW. The menu option should be avoided while the download is underway, see note above.
In fullscreen graphics mode you can watch in realtime as a black and white dithered version of the image is downloaded. After the bitmap is fully loaded in the color data is downloaded quickly thereafter.
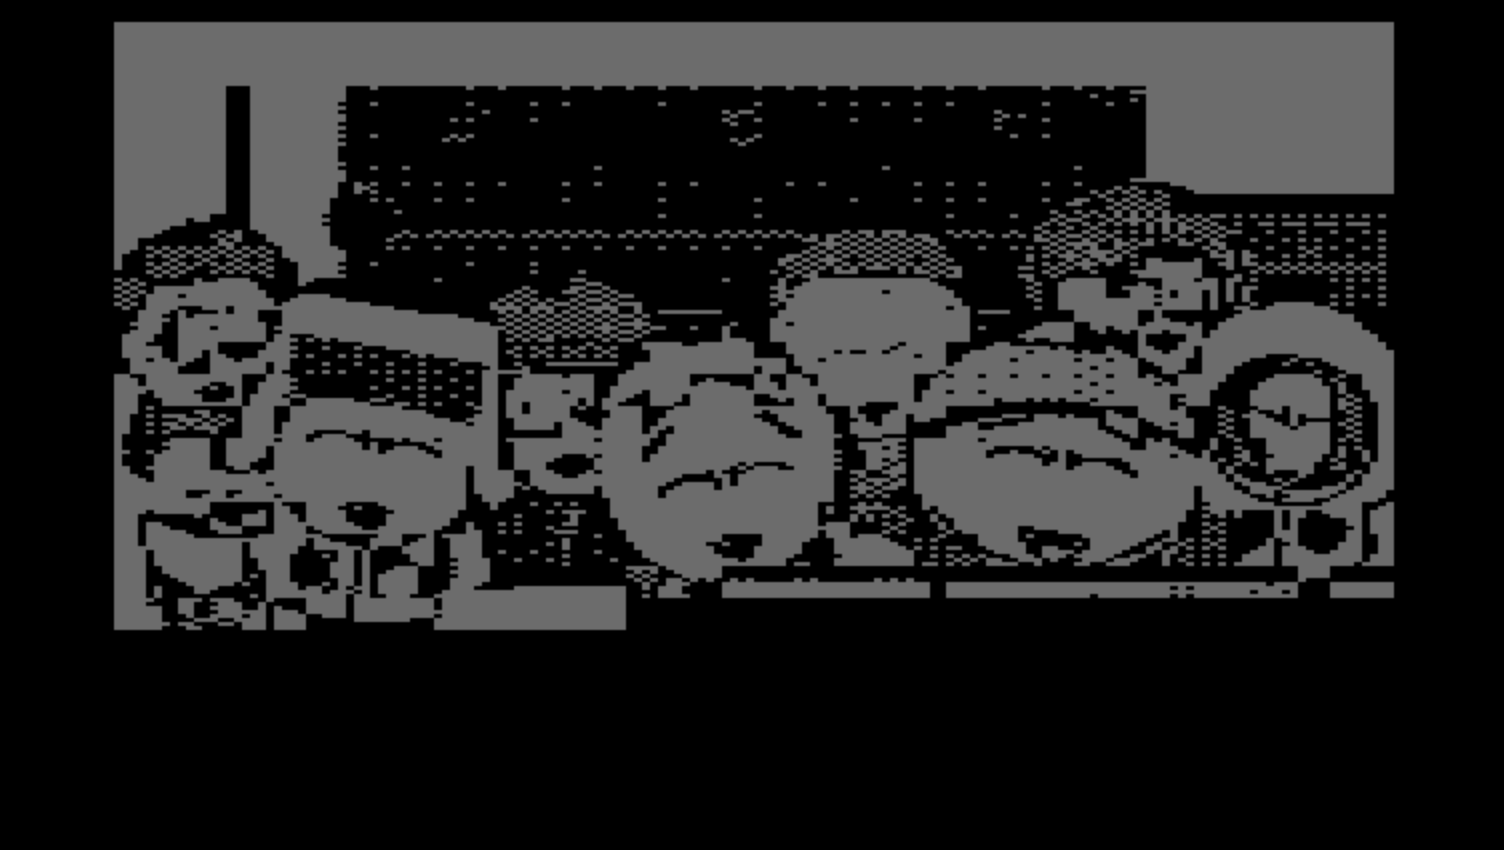
South Park image download in progress
Once the image is fully downloaded it will appear in all of its 16-color glory. But, don't dismay, even the VIC-II's native graphics modes can produce some stunning graphical displays.
Manage Image Adjustments and Conversion
The C64 was released in 1982; its graphics capabilities are limited. It has two native bitmap display modes each with different tradeoffs:
- High Resolution: Pixels are displayed at their highest resolution, 320px by 200px, with the limitation that only two colors may co-exist in the same 8px by 8px cell.
- Multi-Color: Horizontal pixel resolution is halved to 160px by 200px, with the advantage of more color options. Each double-wide pixel may display any of 3 colors assigned to the 4px by 8px cell, or may display the global background color.
Different source images can be converted and represented on the C64's screen with varying fidelity by adjusting them before conversion or changing conversion options such as dithering style and colormapping. Exactly which options are required to get the best results for a given image depends on what the image contains.
The following two sections cover the options available for adjusting the original source image prior to conversion and setting the options to use when converting the image into a C64 format.
Adjustment options
All adjustment settings may be performed prior to downloading an image for the first time. Alternatively, after seeing what the image looks like you can make a change and refetch the image using the new settings by choosing Refetch from the View menu, or by pressing COMMODORE+R, or by double-clicking the same search results table row again. Pressing COMMODORE+R can also be done while in fullscreen graphics mode.
The adjustment controls are on the left side of the controls section. These adjustments are done in the cloud using JIMP, Javascript Image Manipulation Program. Adjustments are performed on the original image prior to conversion.

Adjustment Controls
Automatic Crop
Sometimes an image will be on a solid color background with a large border. This can look nice on a modern computer with high screen resolution, but is often wasteful on the C64 leaving a small low-resolution conversion of the important part of the image surrounded by empty space.
The automatic crop feature removes all the pixels from the outside of an image if they are the same color. This is particularly useful for logos, which are often presented on a solid color background, such as white.
AutoCrop checkbox.
Flip Horizontal and Flip Vertical
These checkboxes mirror the image on its Y and X axes, respectively. These transformations can be applied to correct for a source image that is already mirrored, or for fun or stylistic reasons.
FlipHorz checkbox.
FlipVert checkbox.

Greyscale
There are some images for which color simply gets in the way and they would look better if they were monochromatic. For this we have the greyscale option.
In the section below covering conversion options, we will discuss the role of colorspace in the final output to the C64. Observe the difference first between the original image, below left, and the image with the greyscale option enabled, below right. Each individual symbol is noticeably more uniform in color, but they are not in fact only displayed in shades of grey. This is the result of using the XYZ colorspace.
GreyScale checkbox.

In order to show the output in true greyscale, that is only in shades of grey (black, white, lt. grey, md. grey, dk. grey and brown) you must also select the RGB colorspace. Colorspace is discussed in further detail under the conversion options section below.
Lastly, if greyscale is used in conjunction with high-resolution mode (320px wide), the converter is put in a special mode that restricts the entire image to just two colors: foreground and background. This is covered in more detail under the conversion options section below.
Color Inversion
The invert checkbox does a color inversion, making a photo-negative of the original.
Invert checkbox.
Zooming and Cropping
Automatic cropping is useful under certain circumstances; it removes an outer border area and the result zooms in on the subject of the image. DragZoom is a feature that takes zooming and cropping to a whole new level. There has never been anything like this on a C64, and it is really incredible.
While viewing a graphic in fullscreen graphics mode, you can use your mouse to click and drag a box around any part of the screen. In version 1.0 the box itself is not displayed, but this sets the coordinates of a subregion of the image. As soon as you release the mouse button to set the final size of the box, the DragZoom checkbox is enabled and the image is refetched automatically. But, what you get back is only the part inside the box, zoomed to fill the screen.
The aspect ratio is retained. If you drag a tall and narrow box, the resultant image will be centered on the screen with black bars to the left and right. If you drag a wide and squat box, the image will have black bars to the top and bottom. The following example shows a brilliant use-case for this feature.
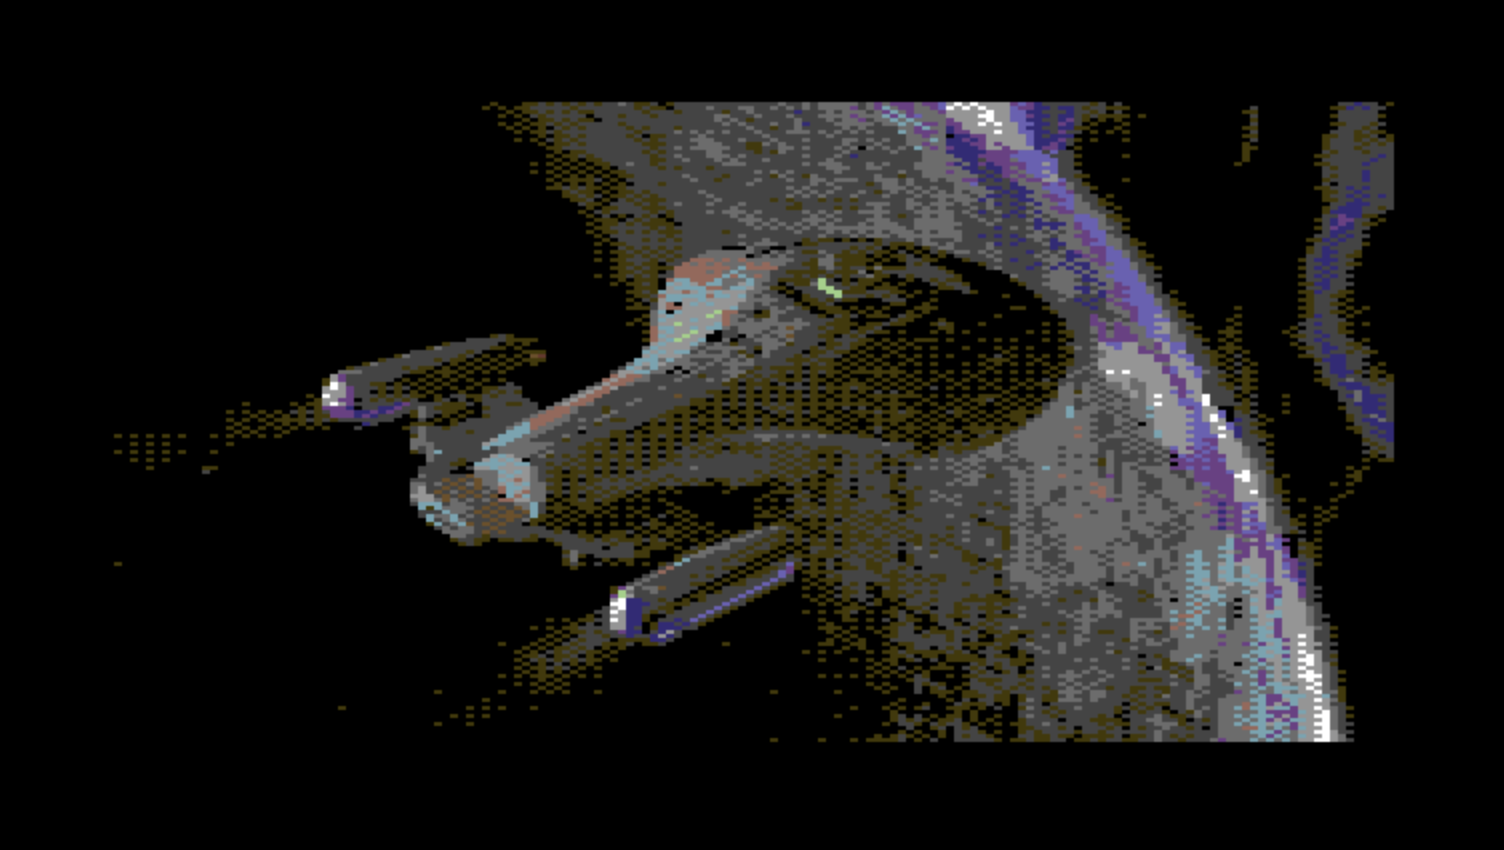
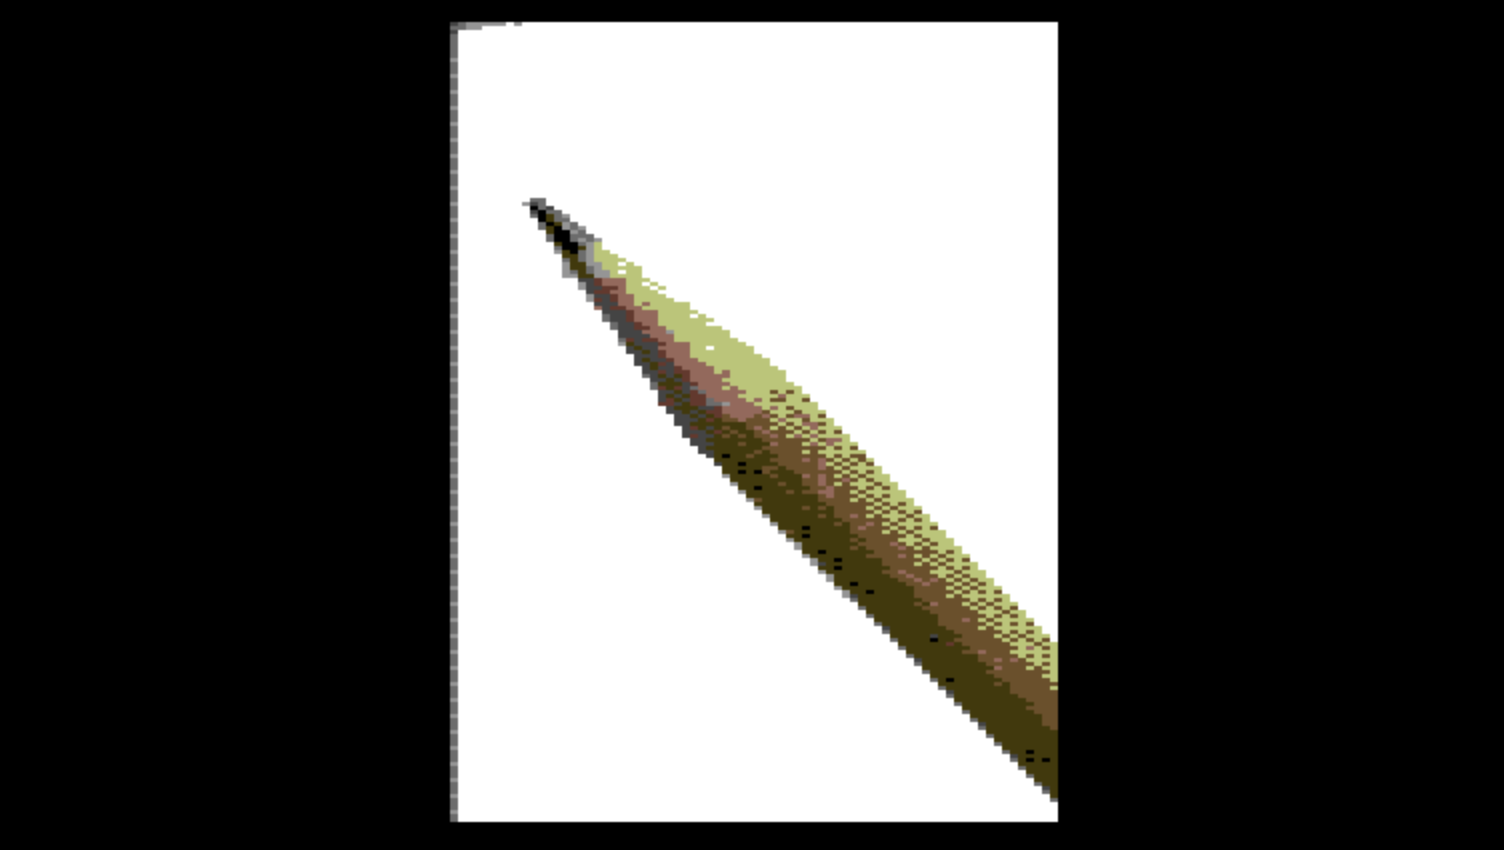
The image is of the entire ensemble cast of Star Trek: Deep Space Nine. It consists of 9 characters surrounding the station and the USS Defiant. It looks great, but the resolution available to each character is limited. In the three following examples, a box has been dragged around pairs of characters to zoom in and see them in much greater detail.
DragZoom checkbox + drag a box in fullscreen graphics mode.
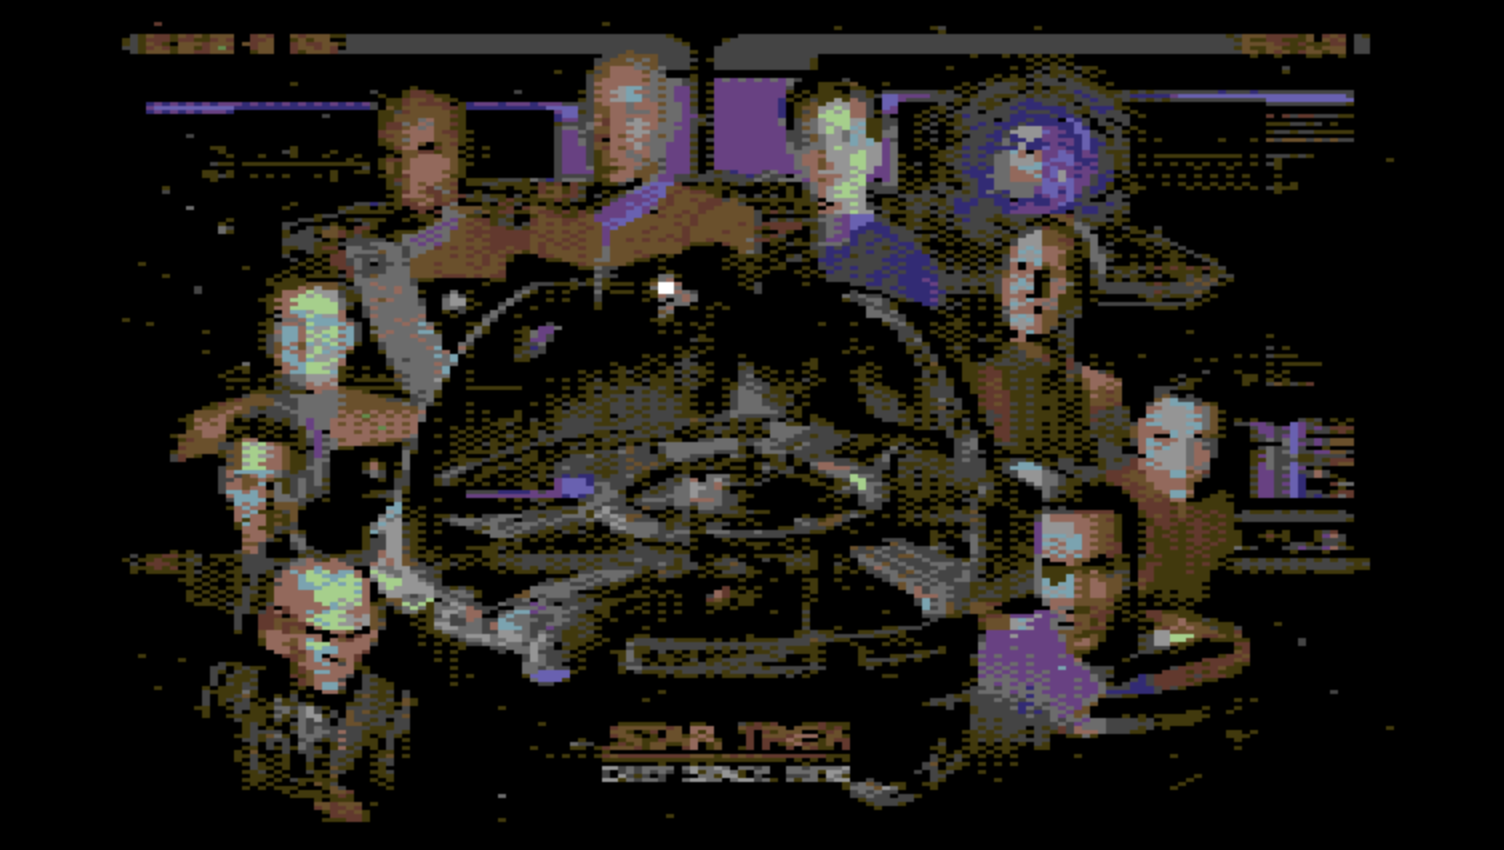
The ensemble cast of Star Trek: Deep Space Nine

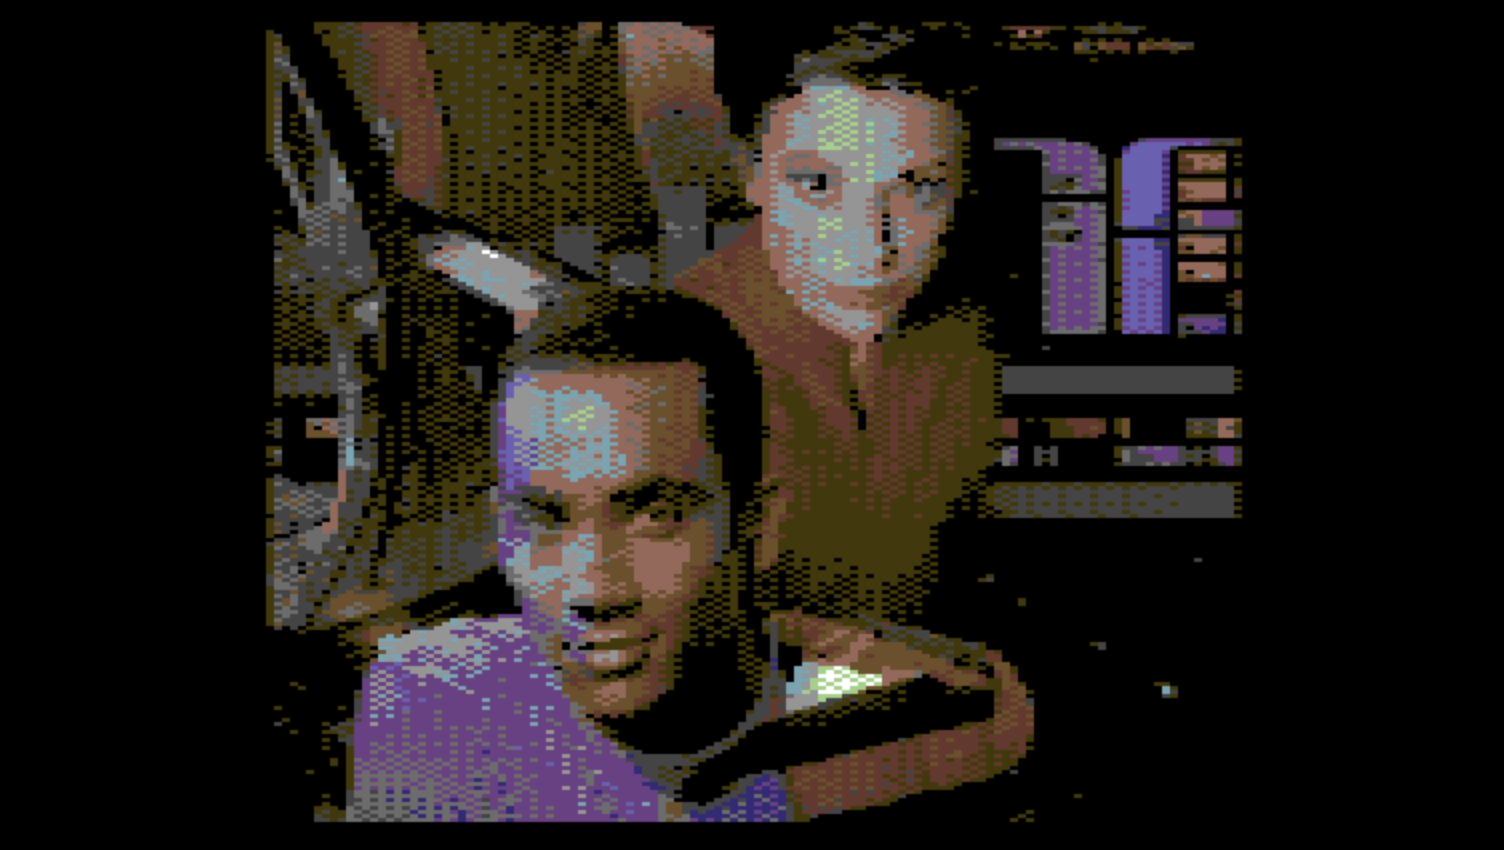
While DragZoom is enabled, a single click anywhere in fullscreen graphics mode turns off DragZoom and refetches the full image. DragZoom is also automatically disabled when a different image is selected from the search results table.
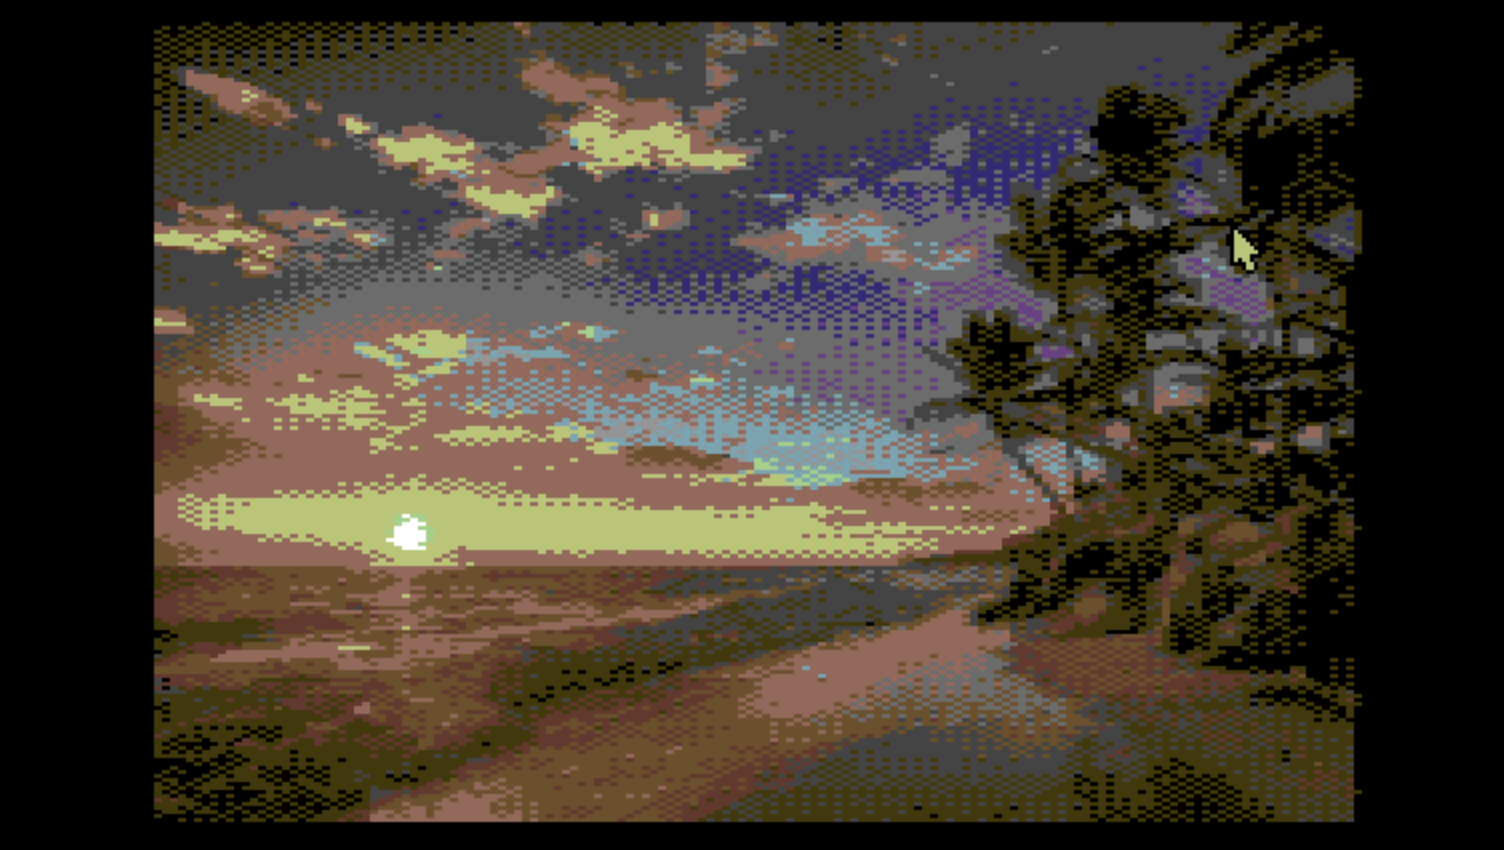
Brightness
It will happen that you find a great image but it is either too bright or too dark. If it's too bright the colors may be predominently white, yellow or light green when converted to the C64 since these are bright colors. A lot of definition may be lost rendering the image hard to discern.
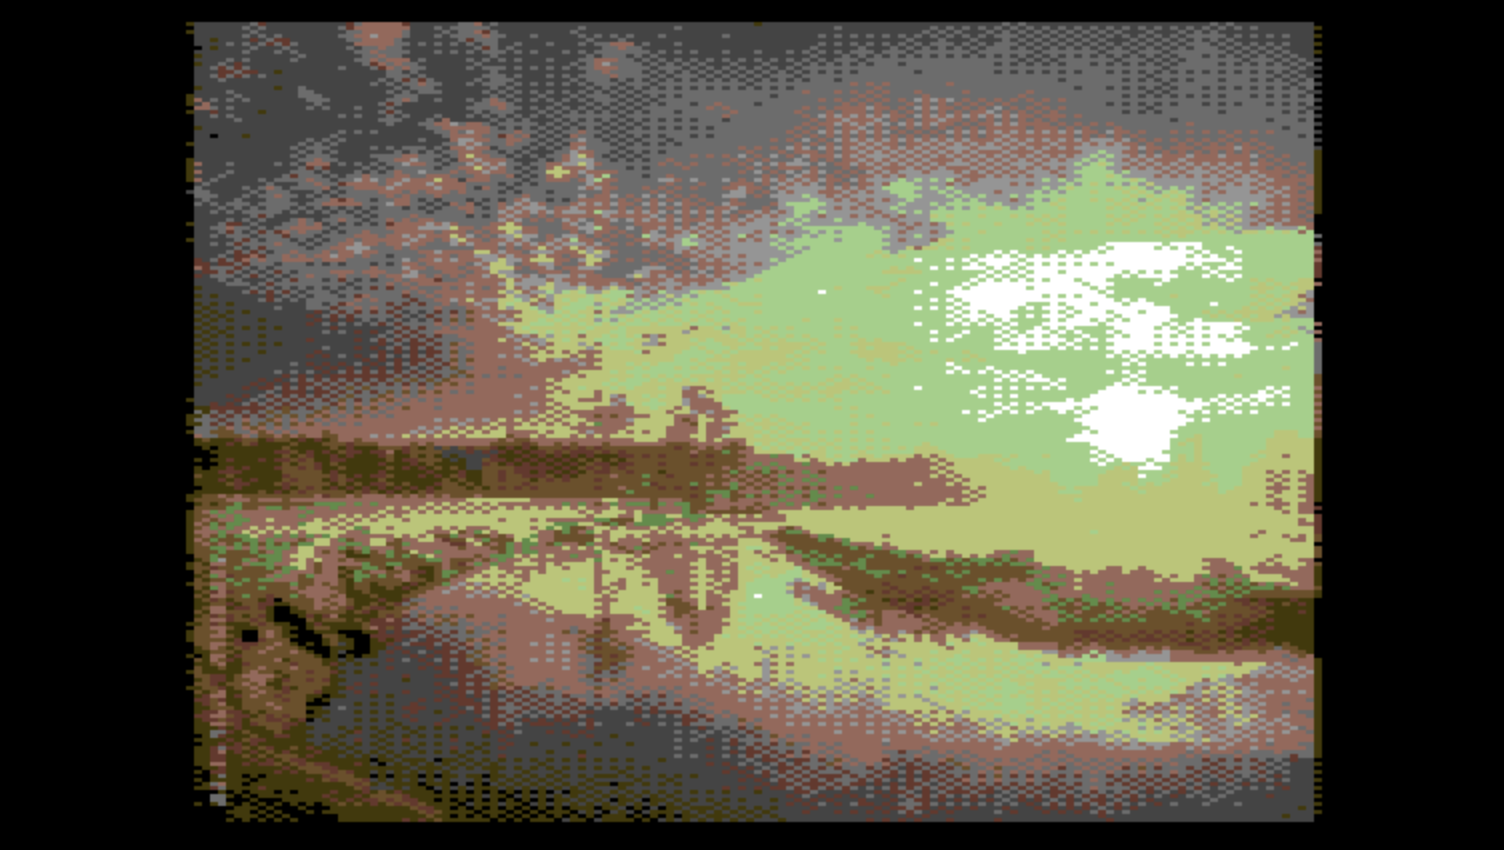
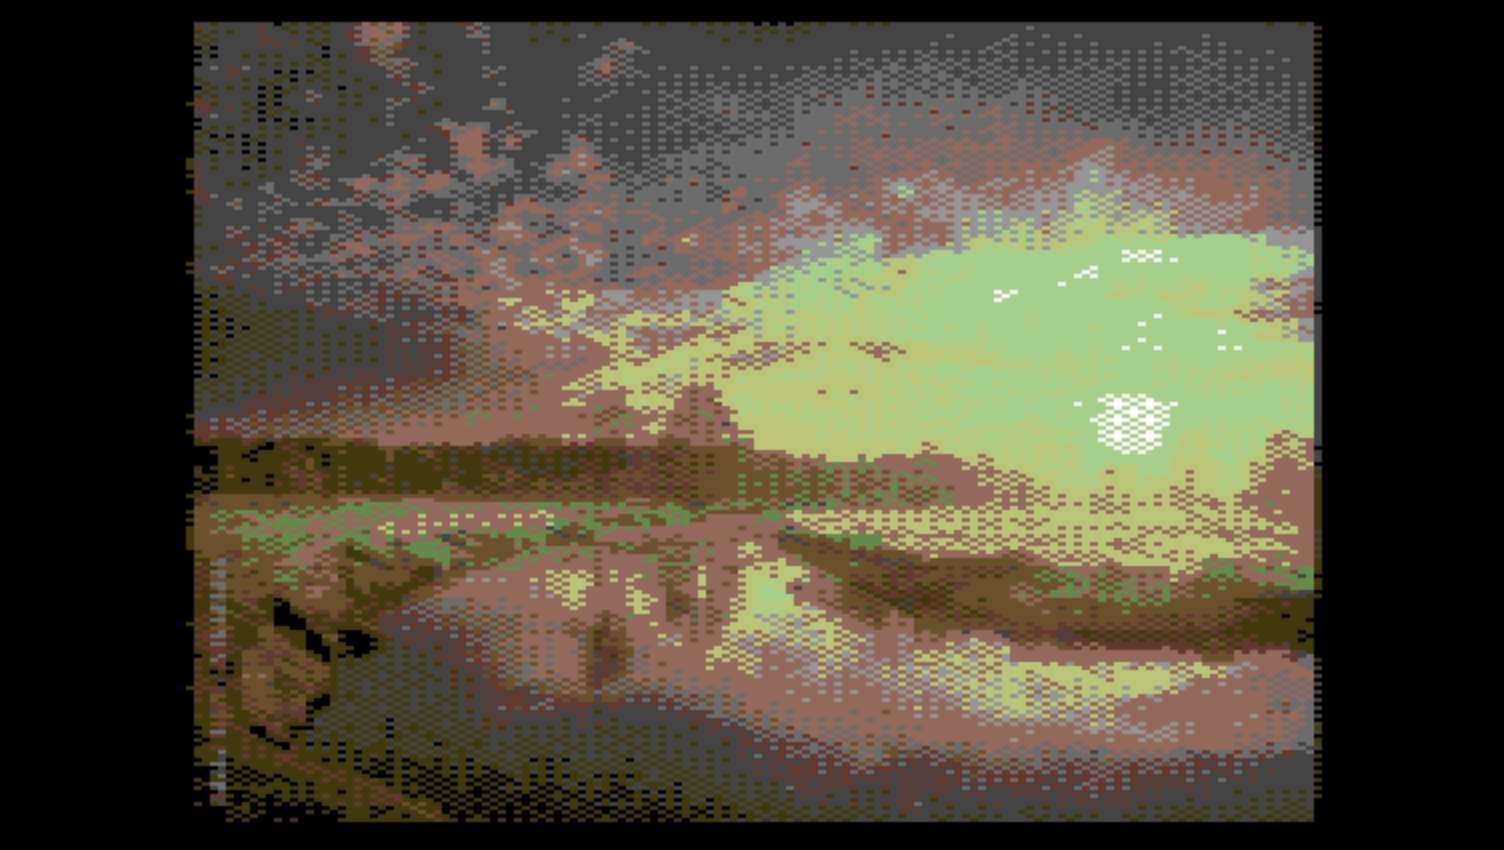
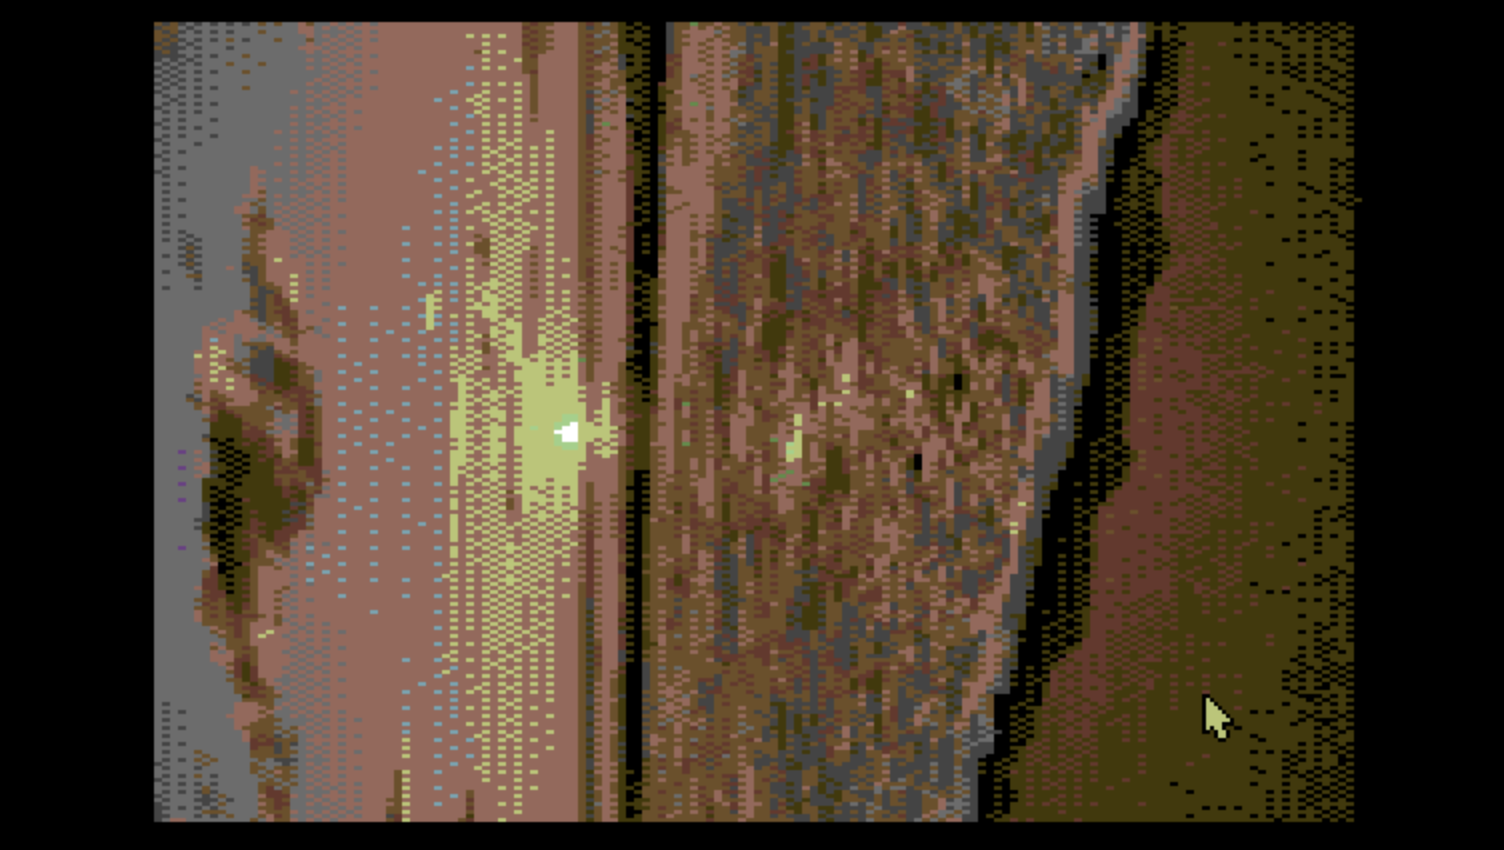
These images can be improved to turning the brightness down, less than zero, by a few notches. In the example below, a small brightness decrease exposes more definition in the horizon and the shoreline.
Brightness cycle button, dialed negative.
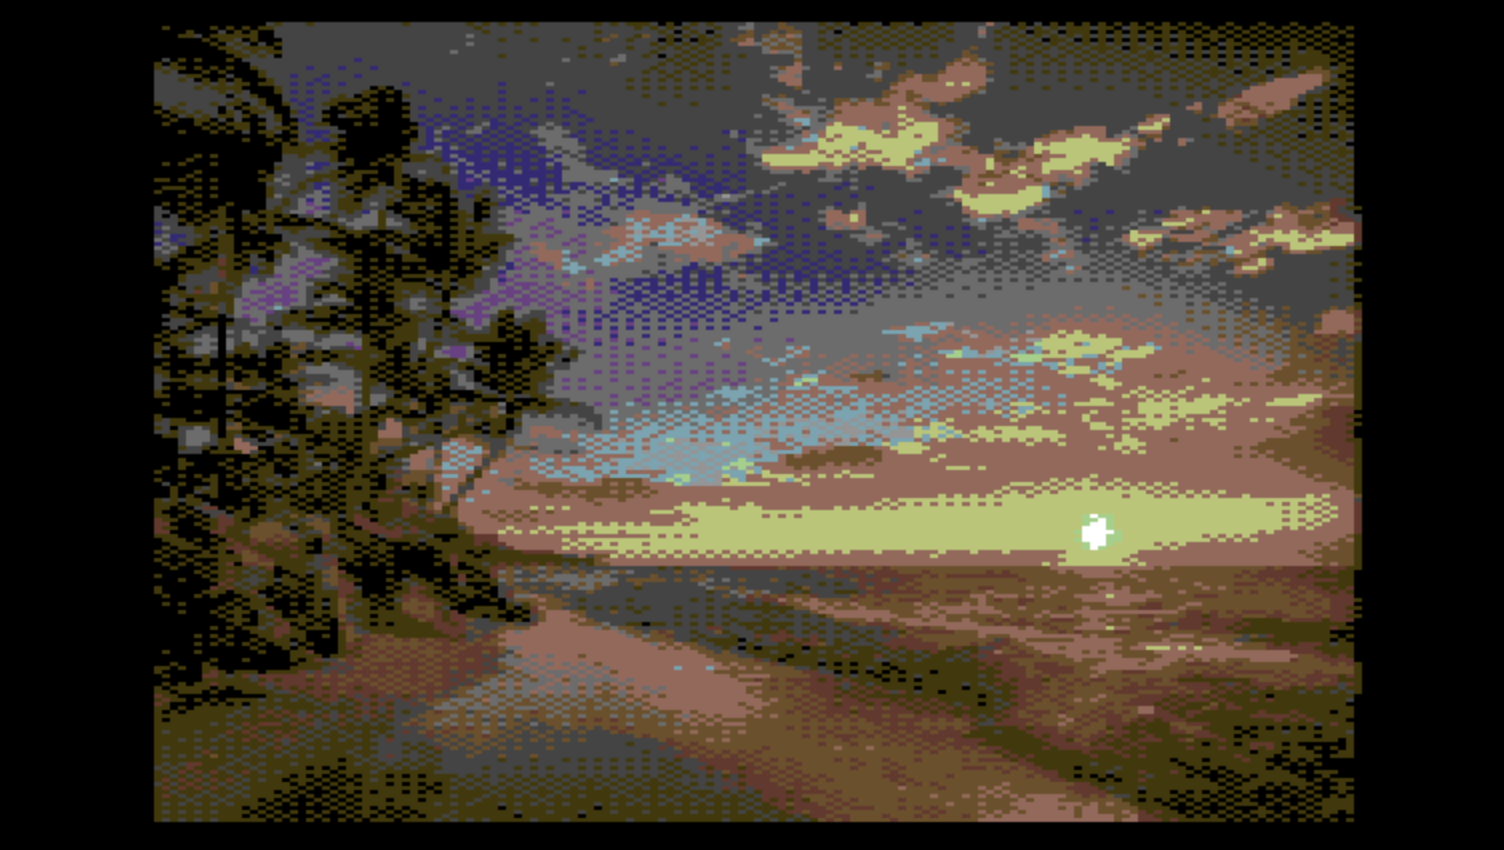
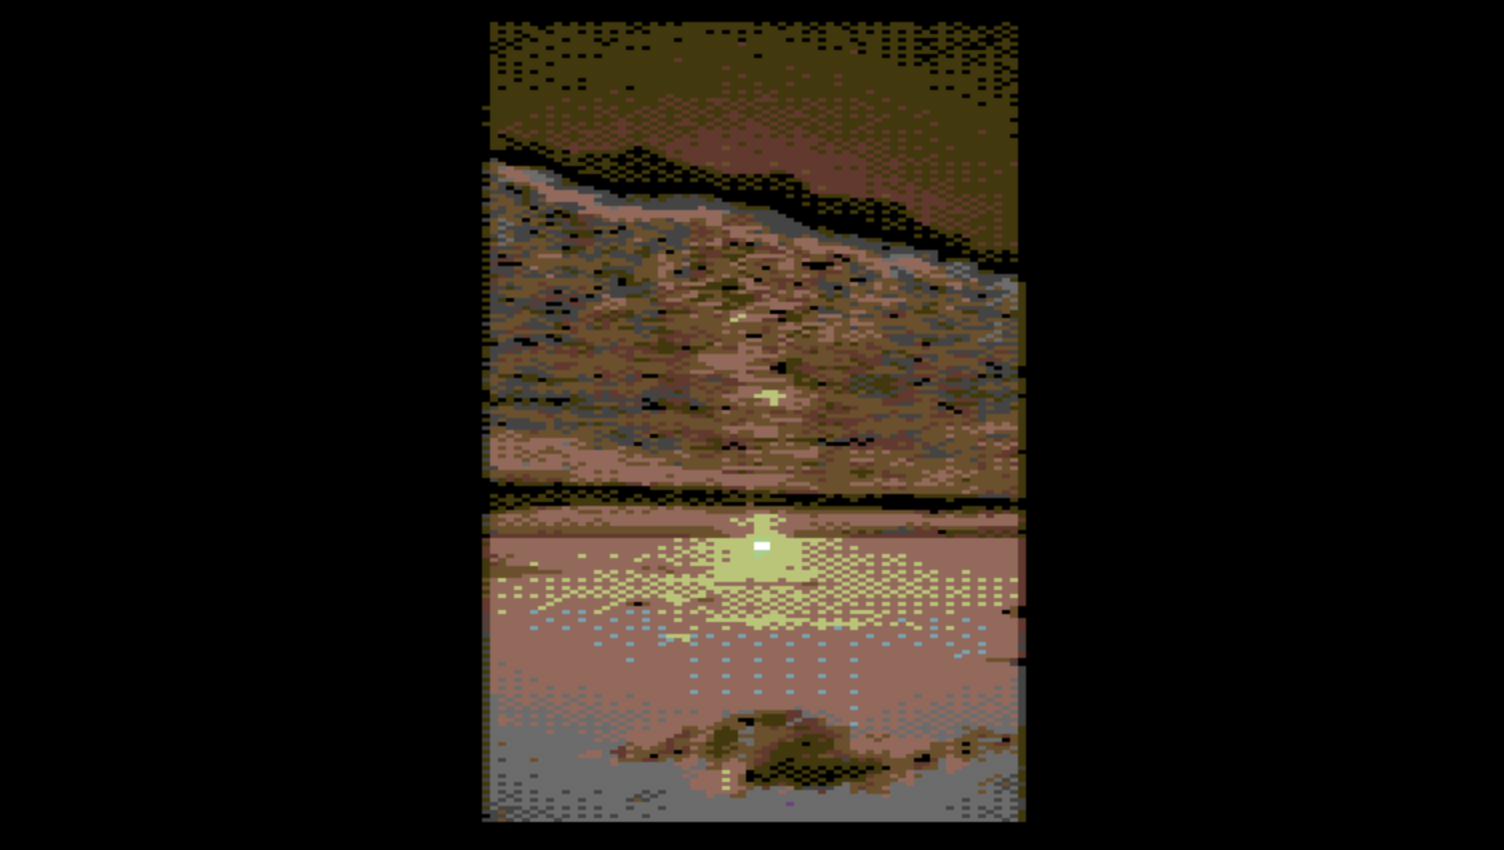
Alternatively, some images may be too dark, such as scenes from a movie where the room is dark or the lighting is low. The same problem exists when converted to the C64; the colors may be predominently black, brown or dark grey since these are dark colors. This can be equally difficult to make out with lots of definition lost.
These images can be improved to turning the brightness up, greater than zero, by a few notches. In the example below, a small brightness increase and suddenly the two vertical wooden posts pop out with a front surface and a shadowed surface.
Brightness cycle button, dialed positive.
Contrast
Sometimes an otherwise interesting image will have too much contrast giving the image a jarring juxtaposition of discordant colors when converted. And sometimes an image will have the opposite problem. If the contrast is too low, similar colors may convert to the same color on the C64 and the visual distinction is washed out.
In the example below, you can see the difference between the original image and the contrast turned down a notch or two. In this example, more dithering is noticeably applied. This is the result of simulating intermediate colors that the C64 cannot display.
Contrast cycle button, dialed negative.
In the example below, you can see the difference between the original image and the contrast turned up a notch or two. In this example, the colors have changed. This is because the higher contrast has resulted in closer matches to different C64 colors that have a different level of brightness.
Contrast cycle button, dialed positive.
Aspect Ratio
Correct aspect ratio is not one of those things that the Commodore 64 has historically done well. In contrast, even the first Macintosh had a sharp 512x342 display and perfectly square pixels. This was very important to its focus on WYSIWIG desktop publishing. If you saw a circle on the screen, you could be confident that what came out on the printed page was also circular.
The problem for the C64 is that from the beginning it was meant to be hooked up to whatever television you had available. Standard Definition TVs are roughly square but they could be stretched and squished on both axes using analog controls. The C64 has a resolution of 320x200 pixels, but if you squish 320 pixels of width into roughly the same height as 200 pixels each pixel tends to be taller than it is wide.
This has always been annoying when designing sprites or icons using grid paper. The grid lines are evenly spaced filling the page with square "pixels." When you transcribe your designs to the C64 they look distorted; circles look like tall narrow ovals and squares look like rectangles. This problem is further exacerbated by differences in the aspect ratio between NTSC and PAL displays.
The bottom line is that Commodore just didn't have the same level of control over what the final output would look like and so worrying about such minutia was just not their priority.
The natural variation in aspect ratio is not that big a deal for games and demos or even for most productivity or utility software. However, whenever the C64 has displayed graphics converted from other platforms, especially if those graphics depict known subjects, like cars, logos, people's faces, etc., the incorrect aspect ratio becomes very noticeable.
Since Image Search is focused entirely on porting graphics from other platforms to be displayed on the C64, it takes aspect ratio seriously. There is no one-size-fits all for C64 users. However, you can tailor the results to the specifics of your C64's monitor.
Measure your screen
Use a ruler or tape measure and measure the actual width and height of your screen. You want to measure the width and height of the bitmapped area, this is the width and height of the dark blue screen inside the light blue border when you first power a C64 on.
My Commodore 1084s CRT monitor has the following physical measurements: 8.5" wide by 7" high.
Divide the width by the height to get the ratio as a decimal number to one. 8.5 ÷ 7 = ~1.214
Click the Ratio cycle button in Image Search to set it to a value that is as close to your actual aspect ratio as possible. The options are: 1.0, 1.2, 1.25, 1.33, 1.5 and 1.6. For my 1084s I should choose 1.2. All the settings are remembered automatically, so you only need to set this once.
I used an Ultimate64 connected to an LCD TV via HDMI to find and convert the images for this guide. However, the screen captures themselves were taken on a Mac by streaming the VIC-II over ethernet to the U64View program. And incredibly, but also proving the point, the aspect ratio of the U64View program and the LCD TV are not the same! And neither of them is the same as my 1084s CRT monitor.
The U64View program is measured as 8.5" wide by 5 3/8" high. 8.5 ÷ 5.375 = ~1.581 This is closest to 1.6, so that's the aspect ratio I chose when taking the screenshots for this guide. See what a difference 1.0 (tall narrow pixels) to 1.6 (square pixels) makes to the final result.
Aspect cycle button.

Rotation
Sometimes a photo is rotated in an obviously incorrect way. This can happen, for example, when a phone takes a photo but its gyroscope has not properly recognized the phone's orientation. Using the rotate feature Image Search can correct for source images that start off incorrectly rotated.
Depending on the image content, such as something abstract, it can also sometimes be fun or useful to rotate an image just to see it in a different way. Image Search has 4 rotation options, 0 degrees is the default, no rotation. 90 degrees, 180 degrees or 270 degrees, rotating counter-clockwise.
Rotate cycle button.
Conversion options
Conversion from a full 24-bit color, original resolution, image to a C64 graphic data format is the final step after adjustments have been performed. Image conversion is done in the cloud using RetroPixels by Michel De Bree. If you can, buy this guy a cup of coffee.
The conversion controls are found on the right side of the controls section in the lower half of Image Search. Conversion consists of the following general areas: dithering, color mapping, and C64 video mode. In addition to these controls, the color palette can also be selected under the View → Palettes menu.

Conversion Controls
Dithering Mode
RetroPixels supports 3 dithering modes. Bayer2x2, Bayer4x4 and Bayer8x8. These can be selected using the Dithering Mode cycle button, as 2x2, 4x4 and 8x8. 4x4 is the default because it usually yields the best results.
Exactly which mode will produce the best result, of course, depends on the content of the image. In the following examples a color gradient is rendered using all the same settings, but varying only the dithering mode employed. You can see that the Bayer8x8 is the most complex dithering algorithm and yields the closest approximation to the color gradient. However, it also introduces noise to the image which may obscure fine details.
Dithering Mode cycle button.


Dithering Radius
Each dithering mode may also be varied by changing the dithering radius. The radius is the distance in pixels around the current pixel which are looked at by the dithering algorithm while it is performing its calculations. Setting the radius to zero disables all dithering, regardless of which dithering mode is selected.
To activate dithering, the radius can be set from 1 to 64. The default is 32 as this usually yields the best results. But, as always, depending on the content of the image changing the radius up or down may yield a superior output.
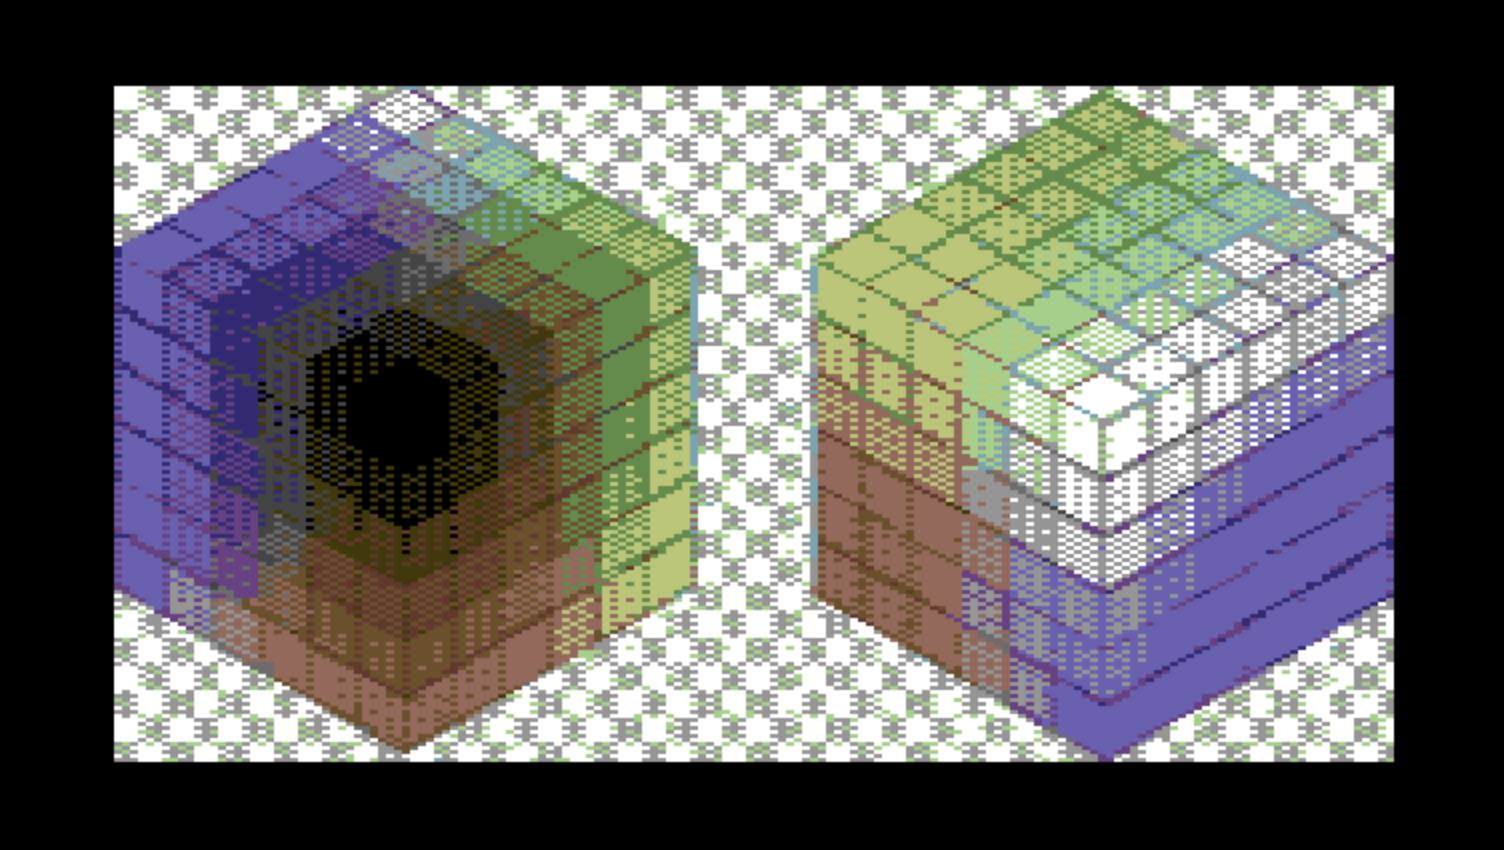
The following 5 examples use all the same settings: Bayer4x4, XYZ colorspace, Multi-Color video mode. The only property that varies is the dithering radius. Left to right, top to bottom, the examples use 12, 24, 36, 48 and 64 pixels of radius.
Dithering Rad. cycle button.


Bitmap Colorspace
RetroPixels supports 4 colorspaces. A colorspace is a technique for mapping colors from the original 24-bit color image to the C64 colors. However, while simply calculating the mathematically closest color match may seem like the most obvious thing to do, in reality it often results in images that look drab and poorly defined. If several colors in the source image are too close together they'll end up all mapping to the same C64 color and a lot of the definition is lost.
This is a common problem with image viewers that run natively on the C64, such as VGIF+. The C64's 1MHz CPU probably lacks the speed to perform complex dithering and color mapping calculations in a reasonable amount of time. It can be done, for example, JuddPEG not only decodes JPEGs on a C64, it also dithers and color maps admirably. The only problem is that it takes 5 and a half minutes to decode one image and can only operate on JPEGs that are already very small.
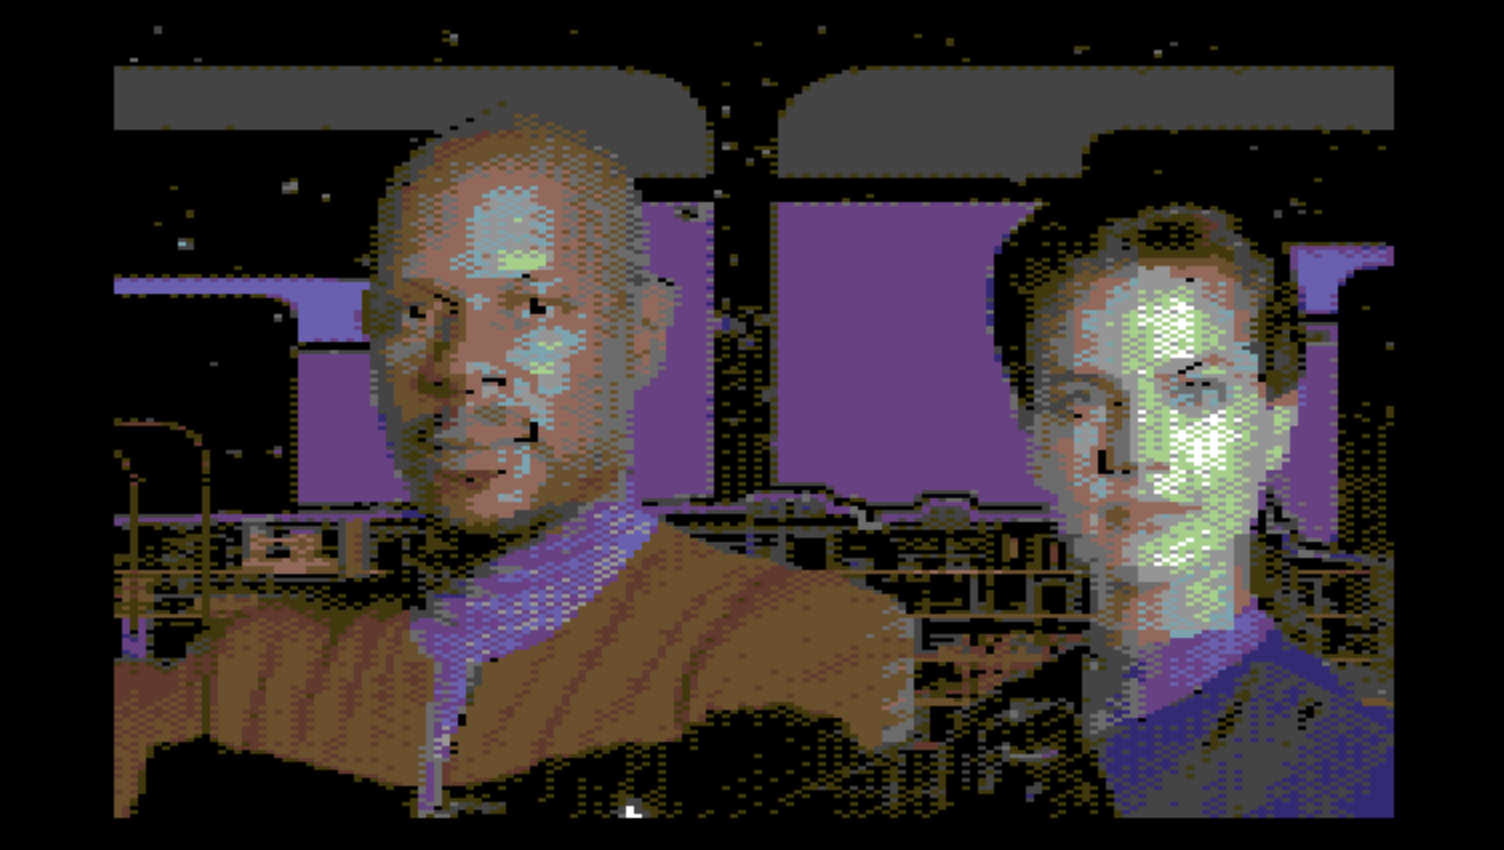
Running RetroPixels in the cloud frees us from these limitations. Not only does it scale down large images and apply complex dithering, but it can use alternative colorspaces for mapping the colors. By default RetroPixels uses XYZ. This results in "false colors," such as light green, light blue, and yellow being mixed into skin tones. But this is a trick that pixel-editing C64 graphic artists have used by trial and error for a long time. XYZ is based on a mathematical model of how human vision works that was worked out in 1931. The result makes the images look better and more realistic, even though putting blue and green on someone's face sounds counter-intuitive. Witness this picture of Dana Scully and Fox Mulder.
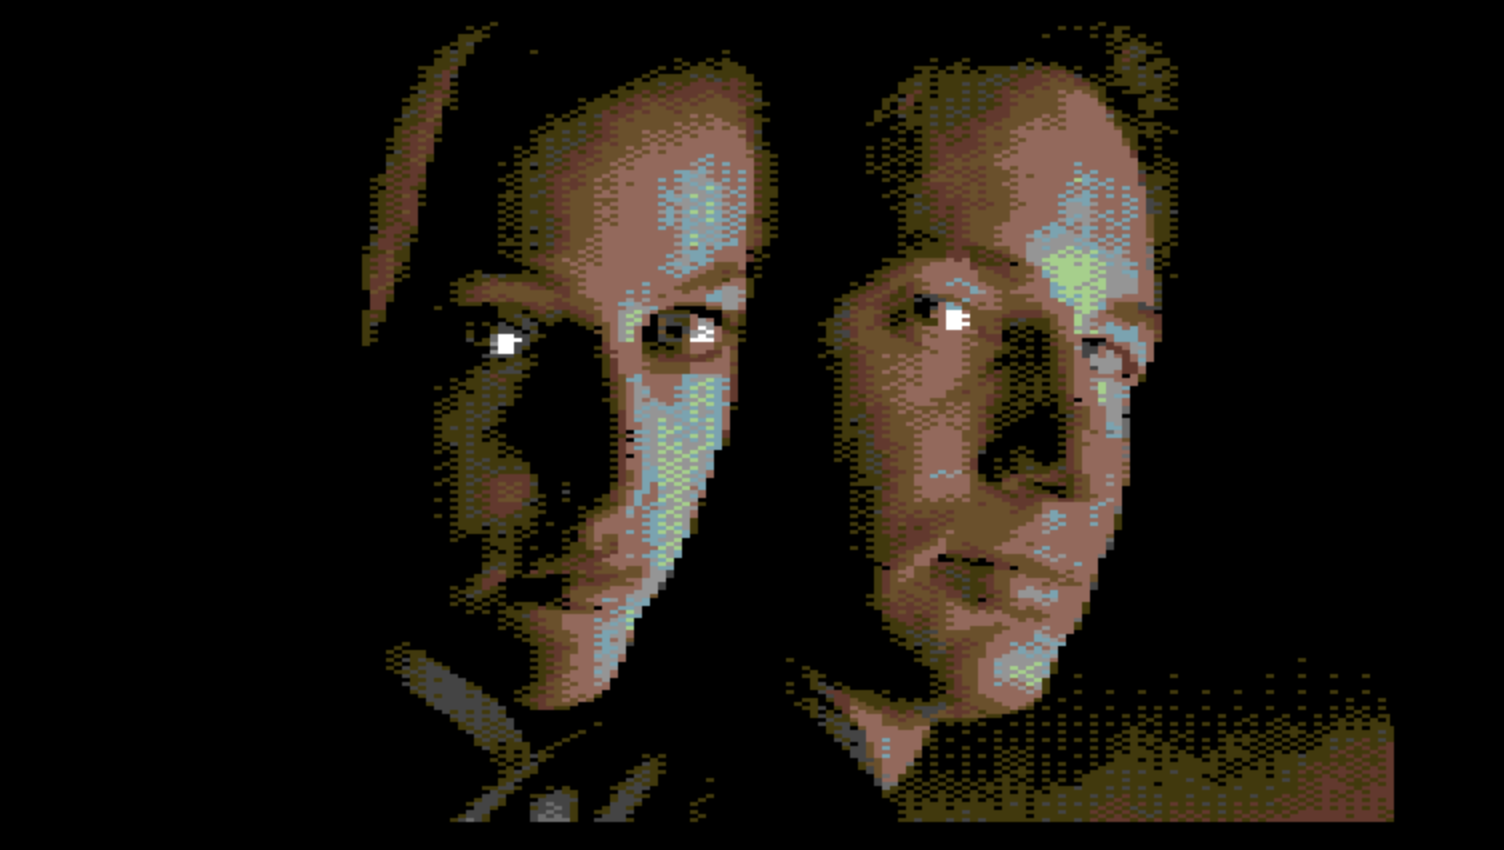
Scully and Mulder - XYZ colorspace
Remember also that all of the images shown in this online guide look better when viewed on a blurry CRT monitor.
If you don't want this false color effect, then there is an RGB option. See the discussion above about the greyscale option. If the XYZ colorspace is in combination with the greyscale checkbox, the original image is converted to greyscale but RetroPixels then does false color mapping during conversion. To get a true greyscale it is necessary to also use the RGB colorspace.
RetroPixels also supports the YUV colorspace, which has its own rich history from the PAL television industry. In my experience, YUV produces results closer to straight RGB but with a tendency to mix more yellows and browns into skin tones.
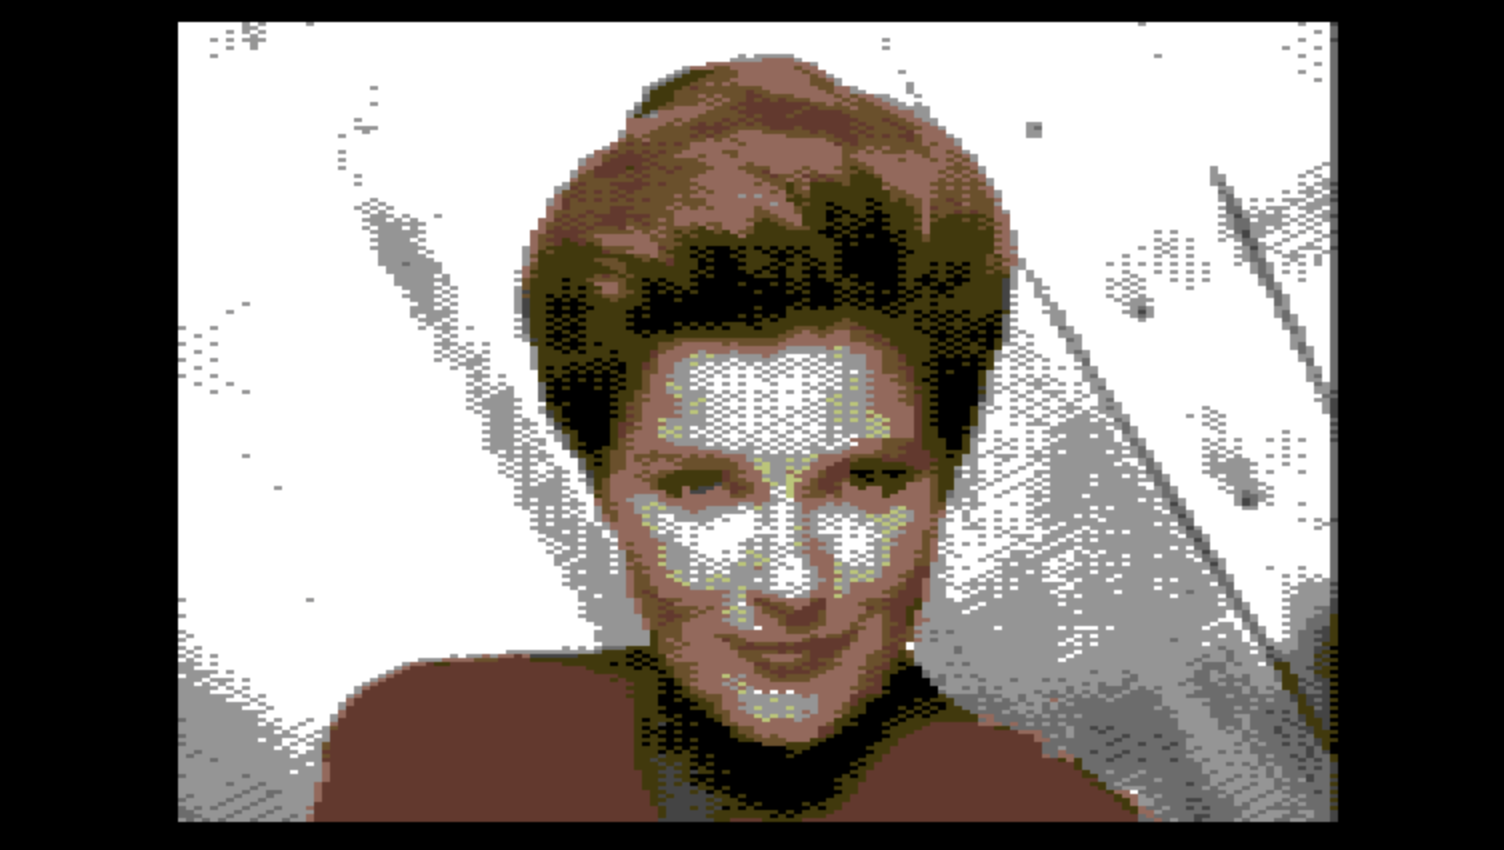
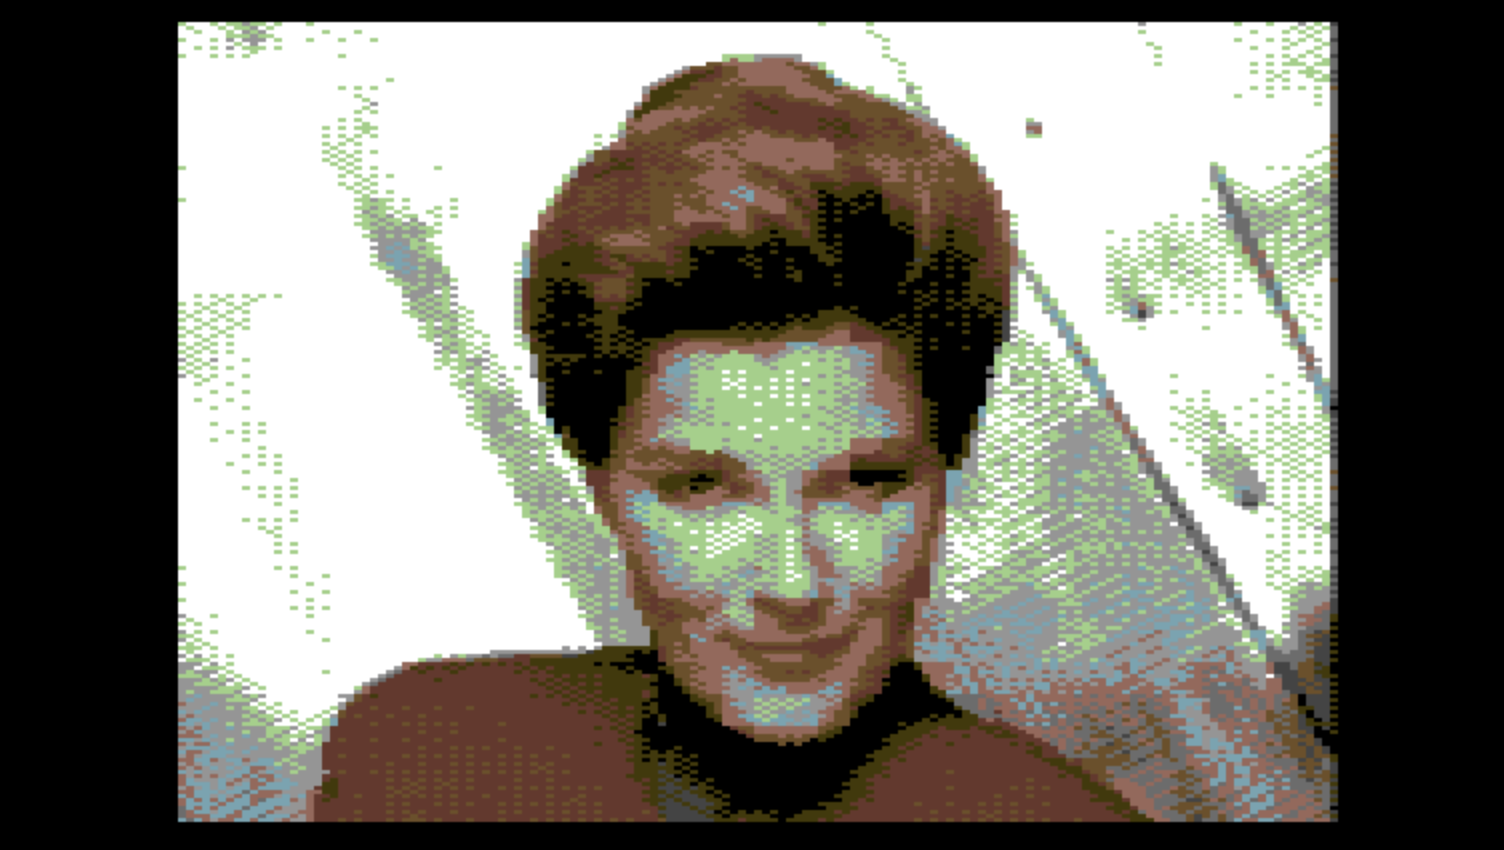
The following three examples show Captain Janeway using RGB on the left, then YUV and XYZ on the right. Notice how similar RGB and YUV are, but there are more yellows on her face in YUV. XYZ has noticeable false colors, her face is prominently more green with light blue and even purple mixing in towards the edges. On the other hand, it looks more full. The background also looks much more interesting, and the background and her uniform both have a lot more detail. Your preference may not agree, but that's why the different colorspace options exist.
Bitmap Color cycle button.

Bitmap Mode
RetroPixels has the ability to produce FLI and AFLI images.
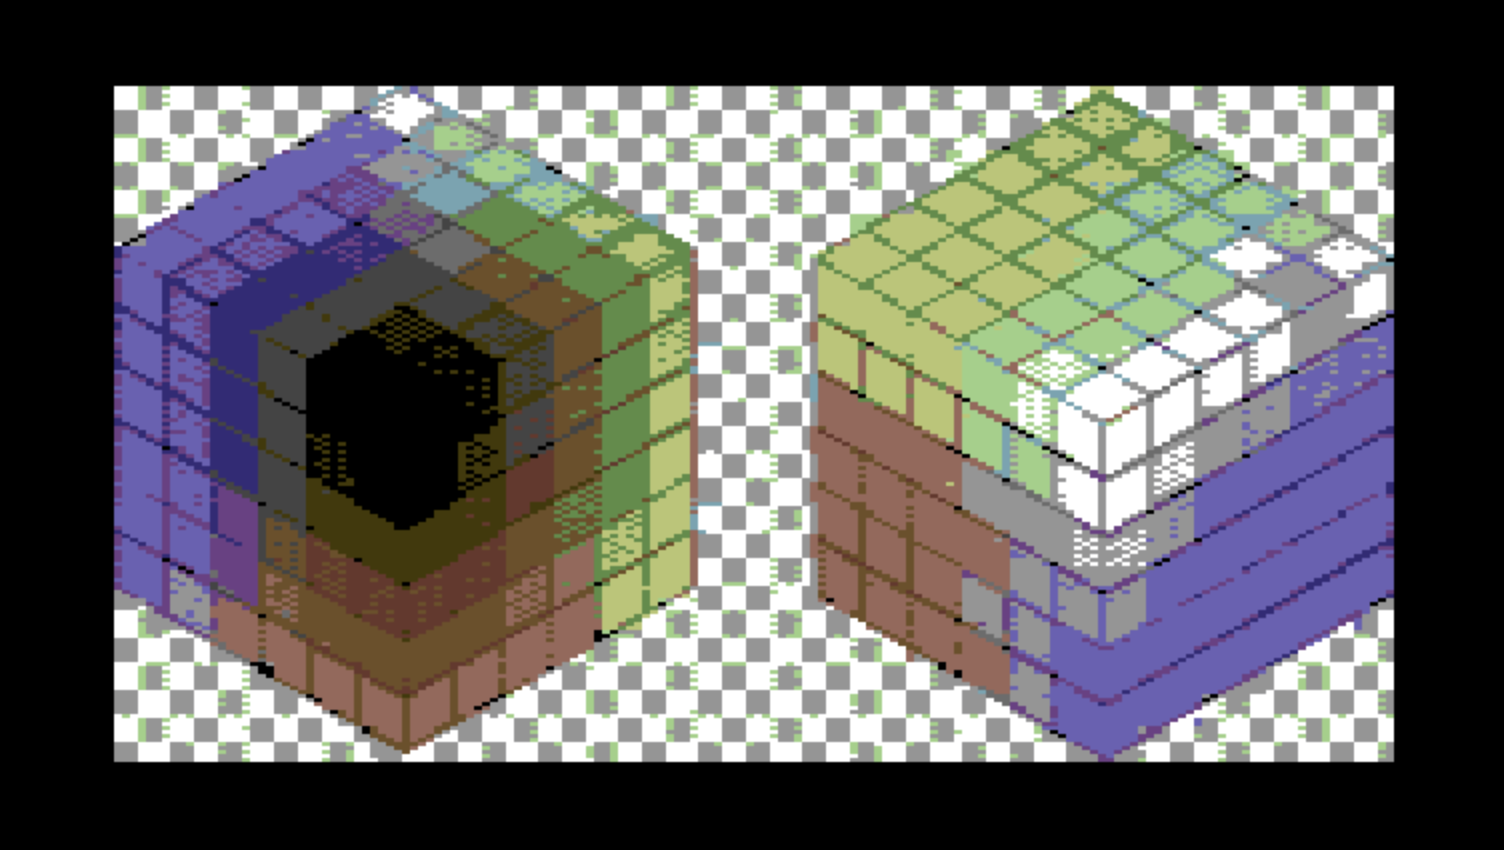
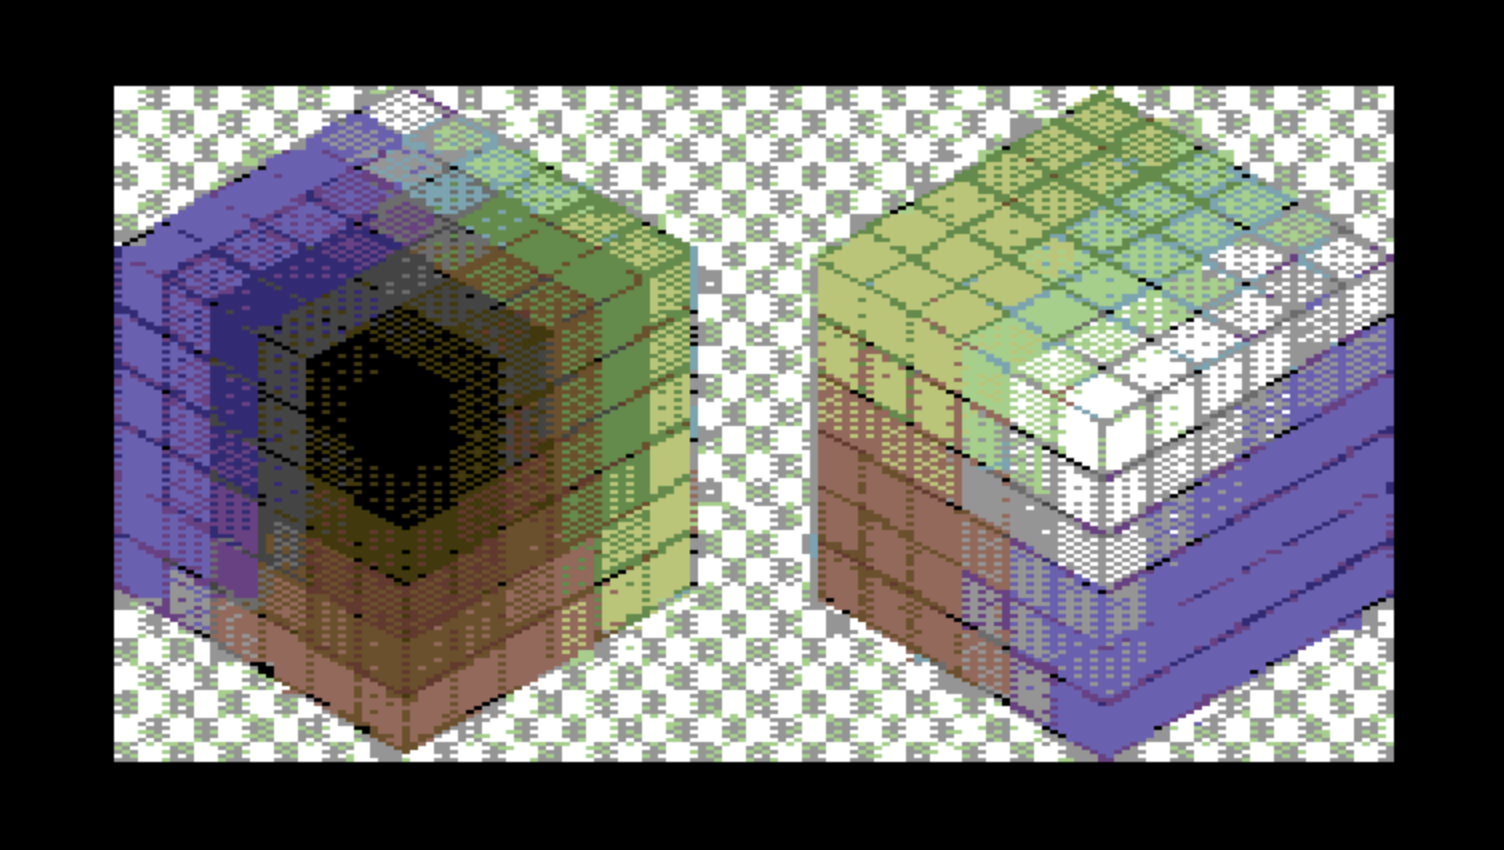
FLI is Multi-Color, 160px of horizontal resolution, but instead of 1 screen memory, 1000 bytes holding 2000 color values, there are 8 screen memories, 8000 bytes holding a whopping 16,000 color values. The screen memory bank is rotated on every rasterline dramatically increasing the number of colors displayable in a 4px by 8px cell to one selectable color for the whole cell, one color for the whole screen, and two freely selectable colors per 4px by 1px within the cell. This allows for all 16 colors to be visible at once in the same 4px (double-wide) by 8px cell, with some restrictions.
AFLI is High-Resolution, 320px of horizontal resolution, with the same 8 screen memories as FLI. However, these screen memories hold all of the colors for the whole image, as hi-res does not use the background color or the extra color memory chip at all. This allows for 2 freely selectable colors per 8px by 1px cell. Colors are more limited than FLI, but in exchange for higher resolution.
Version 1.0 of Image Search does not support A/FLI mode. Selecting it with the cycle button has no effect. To display FLI or AFLI graphics requires a routine which carefully times the CPU to update VIC-II registers in realtime. It cannot be used with the system's splitscreen or built-in fullscreen graphics modes. This feature will be added in the future when C64 OS has a library with a stable and reusable FLI display routine.
Bitmap Mode cycle button.
Bitmap Resolution
The bitmap resolution option offers 320 or 160, which correspond to the horizontal resolution of the screen. 320px is high resolution, but with a limit of only 2 colors per 8px by 8px cell. 160px is multi-color, the resolution is halved in exchange for greater color density.
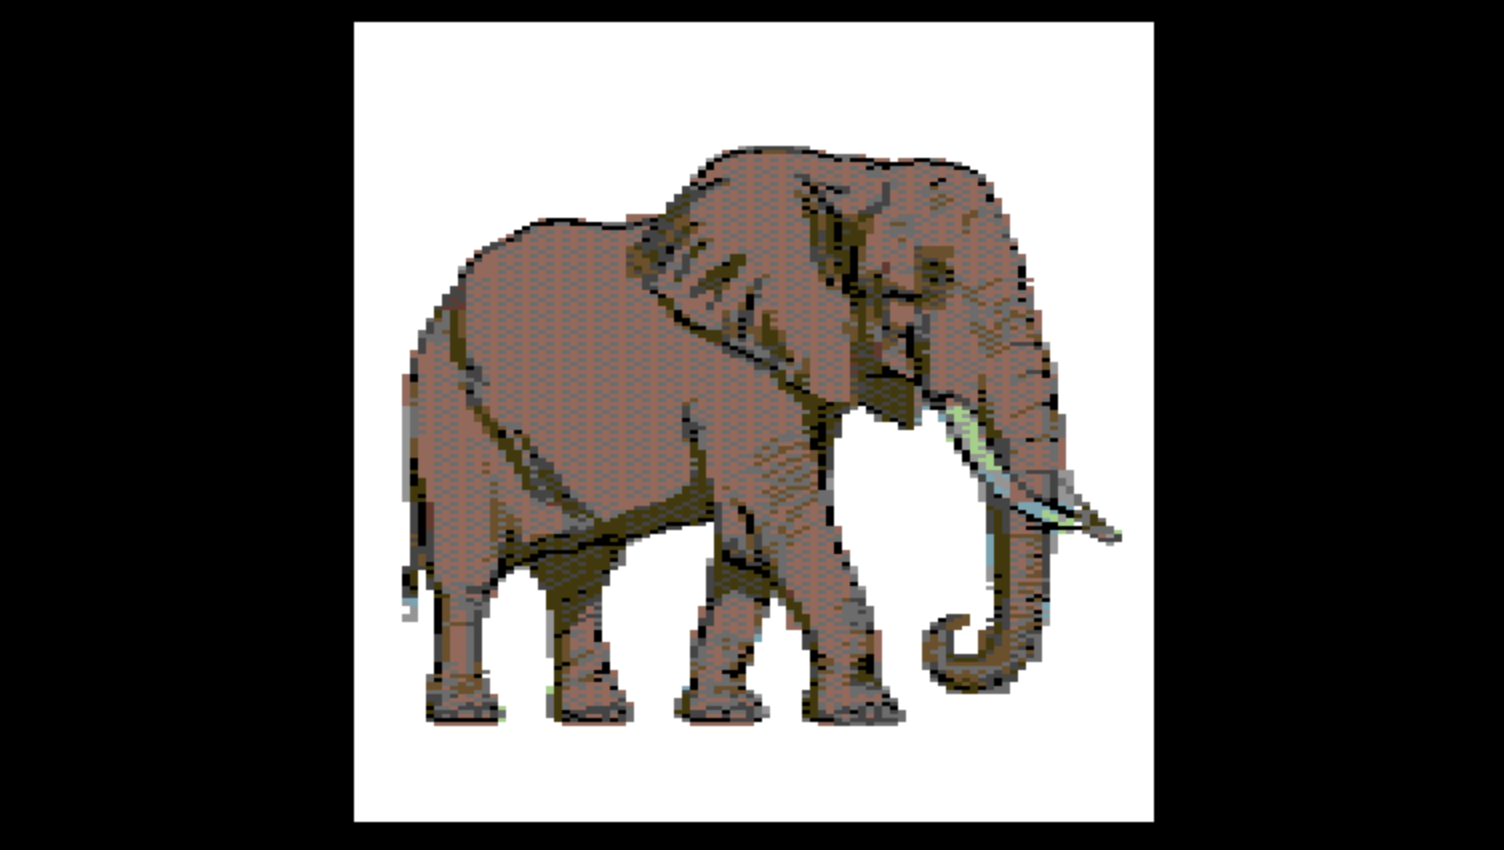
In practice, most images convert better to multi-color (160.) Most of the examples shown in this guide so far have been in 160px resolution. However, there are some instances where using hi-res, especially when combined with the greyscale option, can yield crisp and fresh results. These line drawings are a great example. The high resolution, black and white renders would also print out very nicely to a dot matrix printer.
Bitmap Res. cycle button.

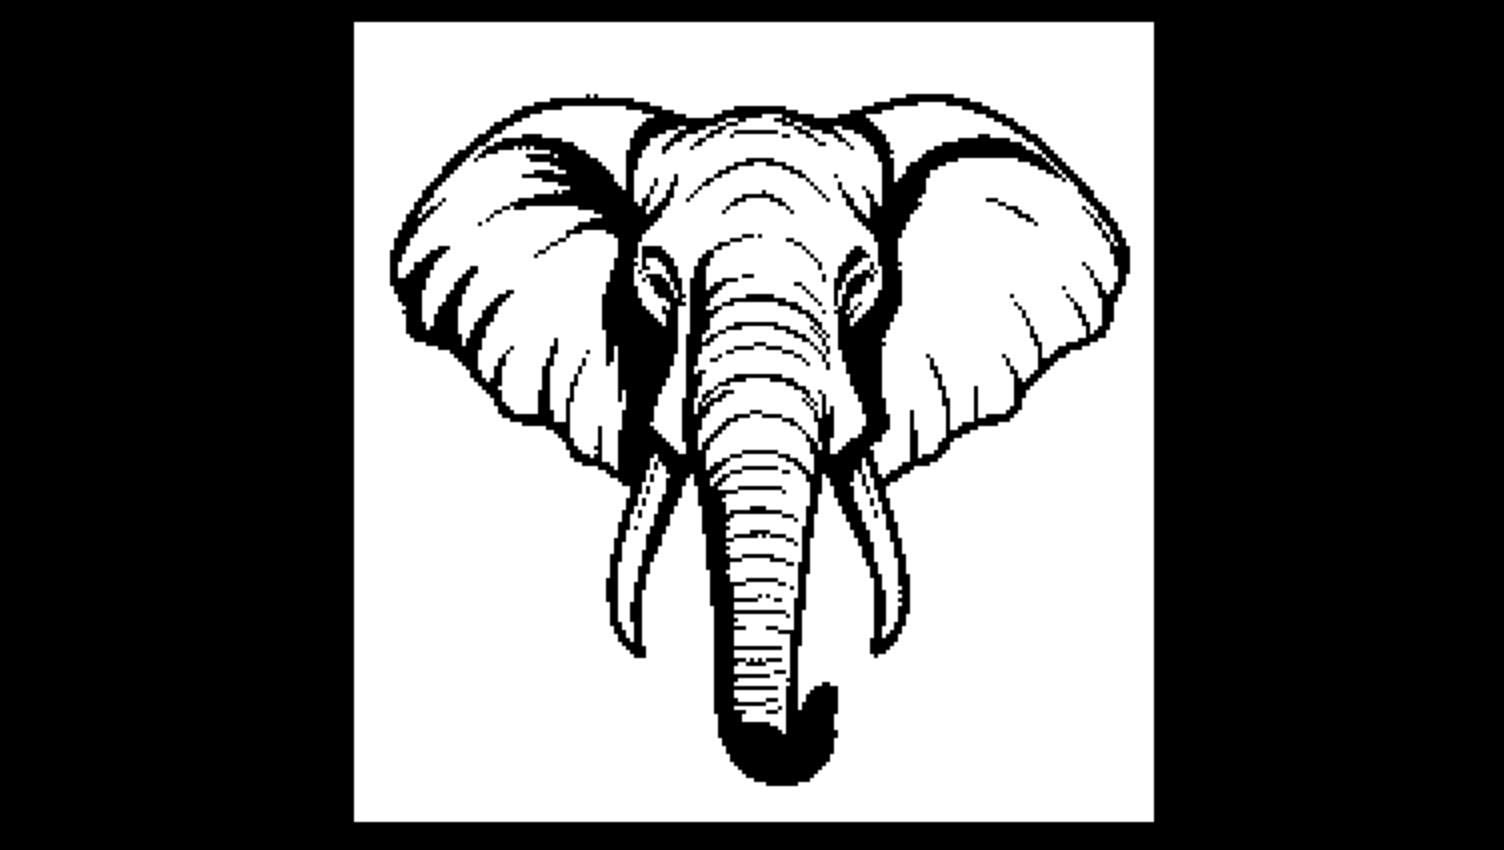
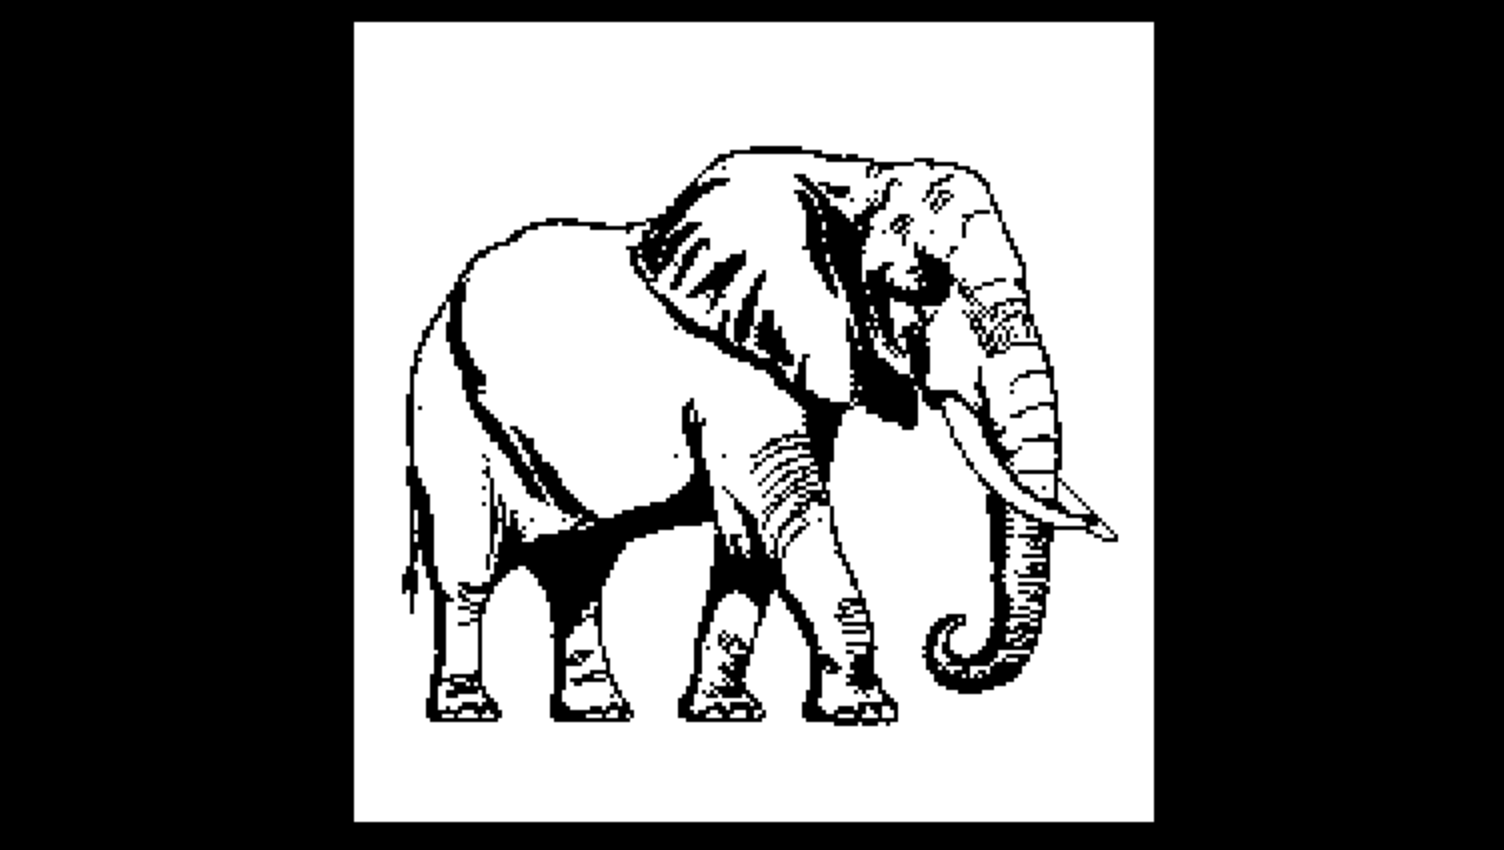
There is nothing particularly wrong with how these elephants look in multi-color, but they do lend themselves very well to being rendered crisply and sharply in hi-res.
In the following example, again the source is a line drawing. In this case it's a The Far Side cartoon panel (© Gary Larson.) Once again, the multi-color one isn't bad at all, but the high-resolution one is also a compelling alternative.
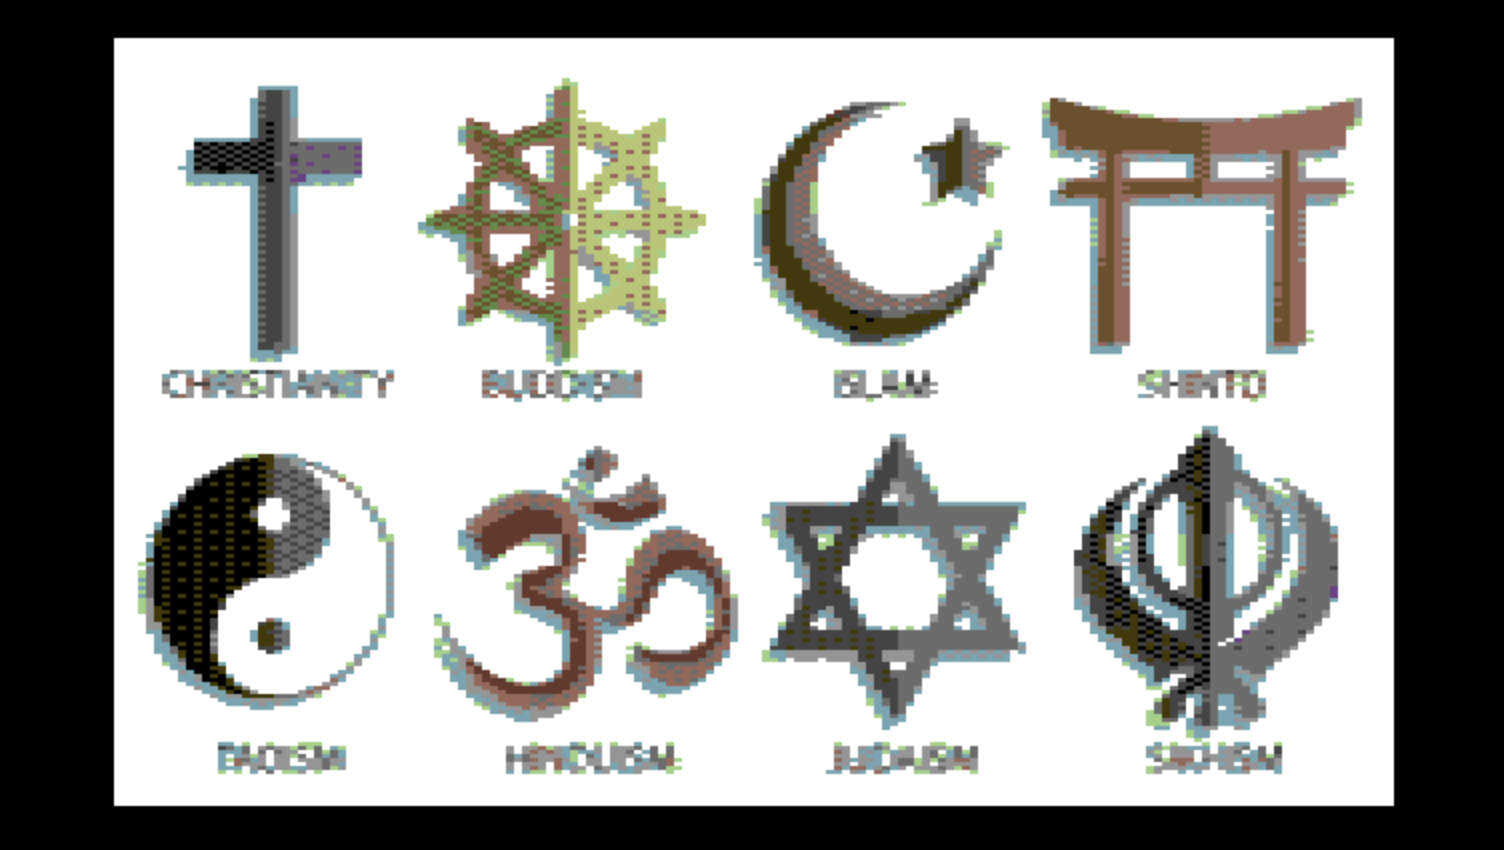
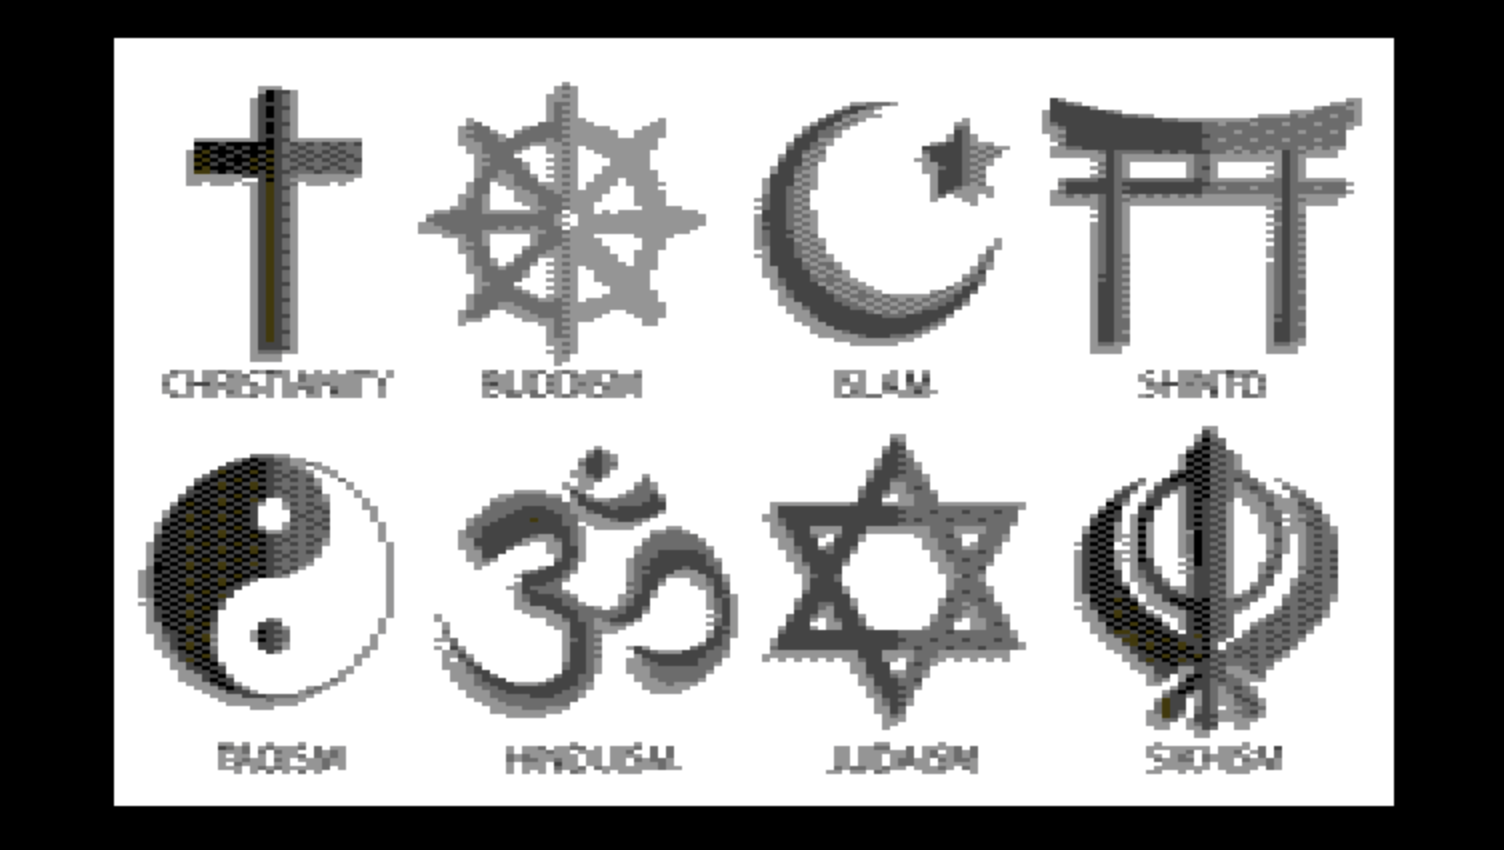
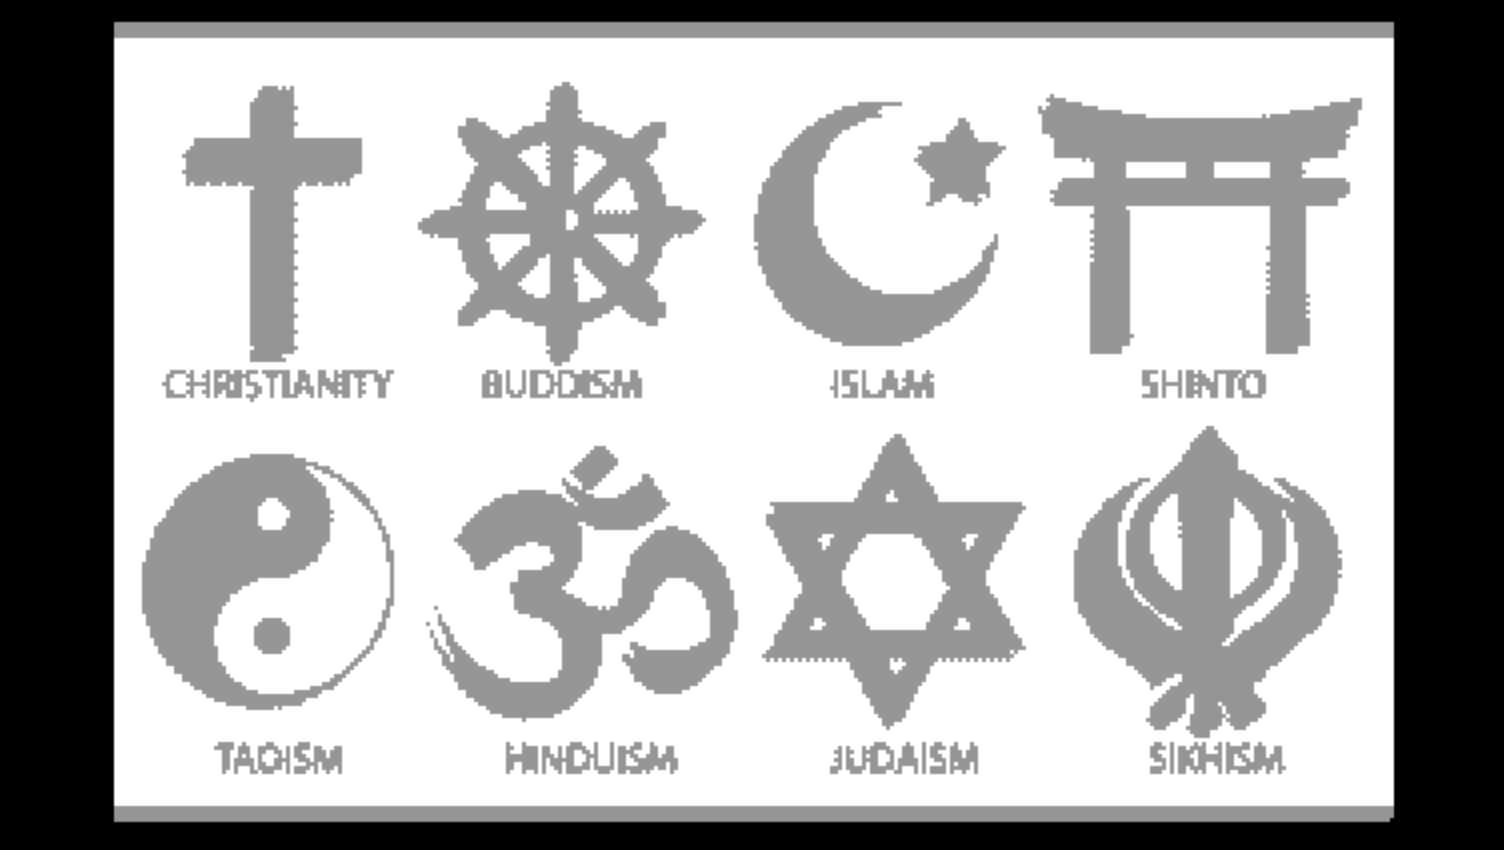
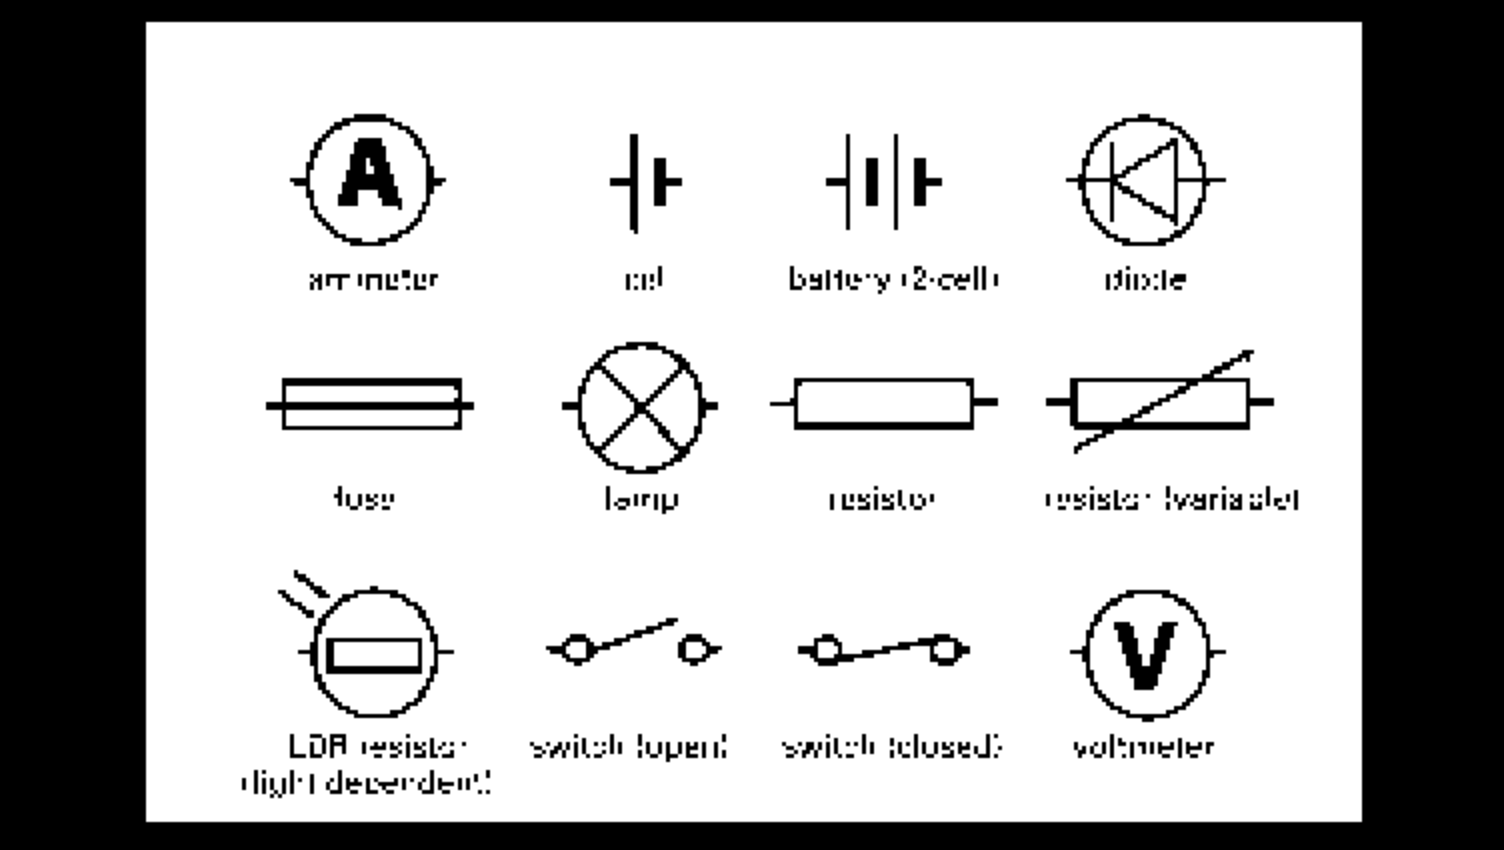
Another use for high-resolution is for schematics, line graphs, bar charts, black and white symbols and text. The following example is a diagram showing a set of different electronic schematic symbols and their names. Combined with DragZoom you can zoom in on just one or two symbols and see them clearly and read their text too.
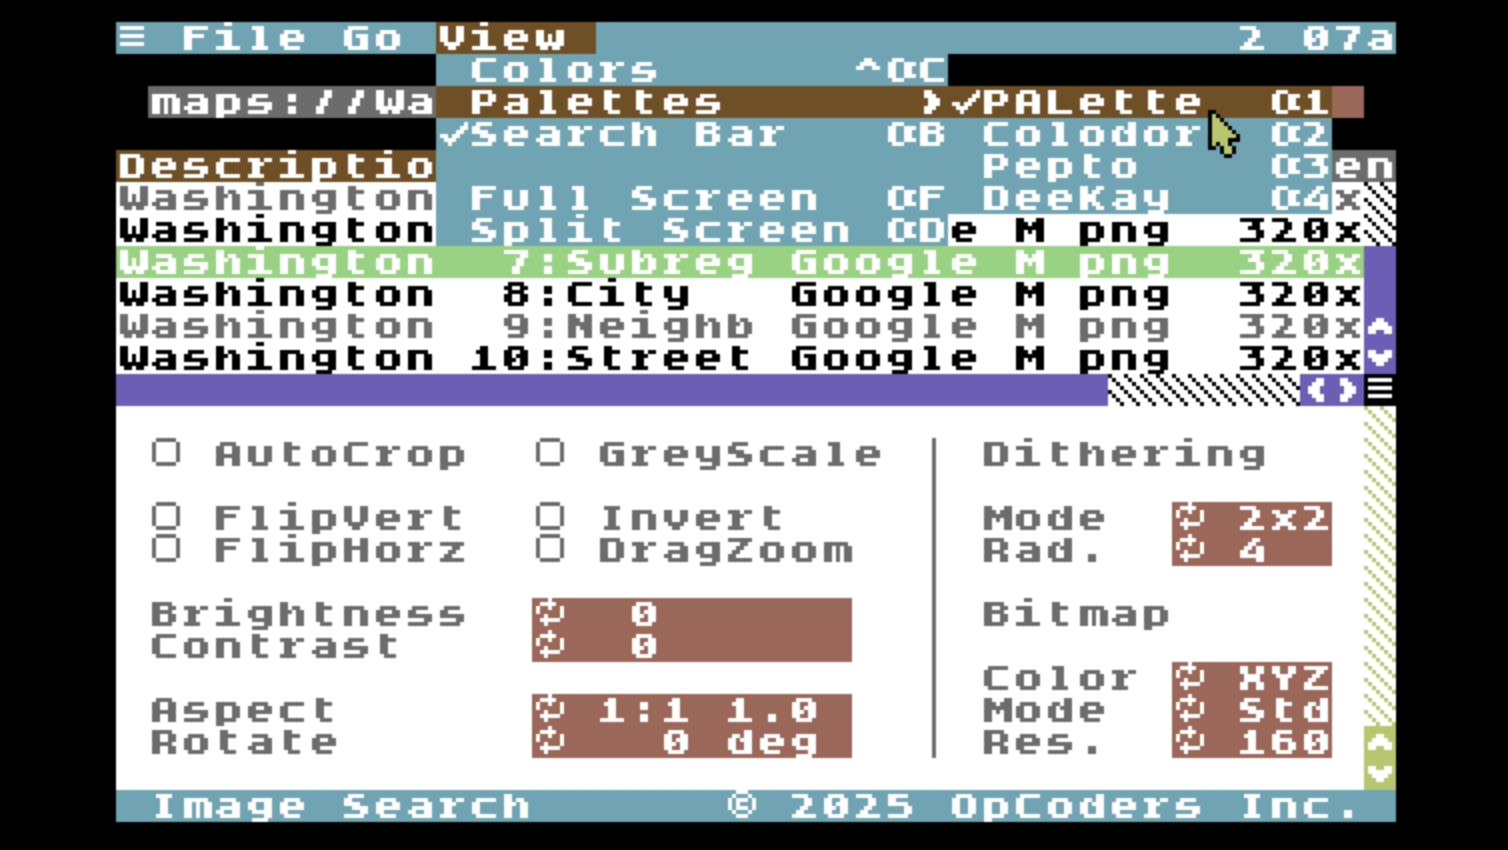
Color Palettes
In addition to colorspace mapping, RetroPixels can also use different palettes. The palette is a set of 16 color values that the C64 can display. The appearance of the 16 colors on the C64 can vary a lot, depending on the monitor you're using, and also because VICE and the Ultimate64 can explicitly use different palettes. The palette specifies what 24-bit color is represented by each of the C64's 16 colors.
By changing the palette the dithering and colorspace mapping will settle on different outputs. Depending on the content of the source image, choosing a different color palette can yield a better conversion result. The color palettes supported by RetroPixels are:
- PALette
- Colodore
- Pepto
- DeeKay
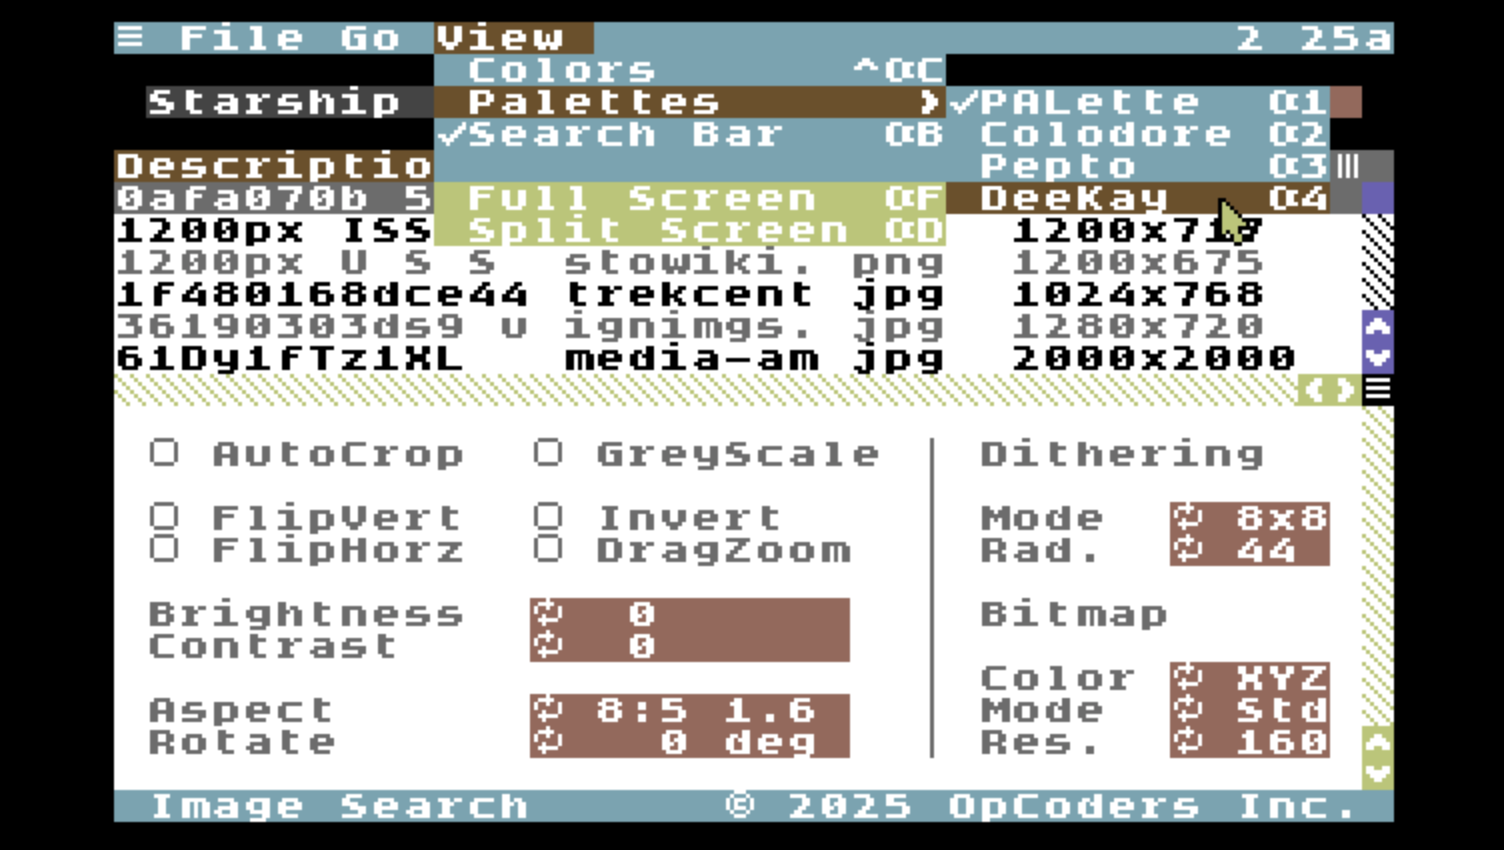
View → Palettes menu
These are selected using the View → Palettes menu. You can also change these with COMMODORE+1 through COMMODORE+4. Conveniently, this allows you to stay in fullscreen graphics mode, change the palette, press COMMODORE+R to refetch, and watch the image change to the new palette.
View → Palettes. menu option, or COMMODORE+1 through 4.


In this particular case, I prefer Pepto. Both the sky and the trees look more natural to me in Pepto. This is not always the case though. Some experimentation with the palettes is necessary to find the best results for any given image.
Computer Vision
There was a product in the 1980s for a few computer families, including the Commodore 64 and 128, called COMPUTEREYES by a company called Digital Vision. They made a product, a hardware interface that connected to the user port, and accompanying software for capturing digital images from a variety of analog video sources, including what looks like an analog security camera.

COMPUTEREYES Product - by Digital Vision
A camera, connected to a computer, which can capture images in a digital format. In the 1980s this was a novelty. Today we'd just call it a camera, since almost all cameras are digital now. But the concept was still very clever; it allowed you to import images of things in the world around you directly to your C64, which you could then use in documents, print out, or just save to a file.
This product and what it could do for the C64 inspired Computer Vision, a service provided by OpCoders Inc. and an addition to the Network Proxy Services suite.
What is Computer Vision?
We no longer need a fancy hardware device that lets the Commodore 64 read and digitize information from an analog security camera. Almost everyone already has a digital camera in their pocket, on their smartphone.
Computer Vision is a web-based application and server-side proxy that makes it a snap to use your smartphone's camera to capture images which can be accessed using Image Search.
iPhone and Android
The instructions are for iPhone. Android support is still being tested and may not work as expected.
To begin, scan the QR-Code below with your iPhone's camera. Tap the link to open
Computer Vision in the Safari web browser. Or open the following address in Safari on your
iPhone:
http://services.c64os.com/computervision/

Adding Computer Vision to your home screen is optional, but it's convenient and offers the best results. Tap the share icon in the middle of the toolbar at the bottom of the screen. From the sheet that slides up, choose Add to Home Screen. An icon of a digital eye is added to the home screen.


You may use the app from inside a Safari browser tab if you do not want to add it to the home screen. However, launching from the home screen hides the browser's address bar and tool bar giving the app a more streamlined and native look.
Terms of Service and Privacy Policy
There is a Terms of Service link at the footer of the page. Please read the Terms of Service. By using Computer Vision you are agreeing to be bound by these terms of service.
The bottom of that page also includes our Privacy Policy. Please read the Privacy Policy. By using Computer Vision you are accepting the risks and limitations outlined by the privacy policy.
Both are short and easy to understand; please read them.
How to use Computer Vision
The top of the interface has a text field which says "Privacy Code." Tap this and type in a code that is private to you. This code is used to connect Computer Vision with your C64. A privacy code may be up to 12 characters and may include upper and lower case letters, numbers, and the minus and underscore characters. Any other character will be removed when you capture or upload an image.
Images you capture or upload are associated with this code. It is important to choose a code which is sufficiently random that it won't be guessed by other users. Take care to ensure that only you know your code.
You may use more than one code and you may change the code you use at any time.
Save a code as a default
There is a hidden feature, which, if you are so inclined, you may use. Instead of opening the base URL in Safari on your iPhone, instead open the following:
http://services.c64os.com/computervision/?password=privacycodehere
Immediately save this page to the home screen. Every time the app is opened anew from the home screen the privacy code you supplied will be filled into the Privacy Code field by default.
Tap the button "Digital Eye" to open the camera. Take a picture. You can use either the rear camera, or the front camera for selfies. It can be in either portrait or landscape orientation. As soon as the picture is snapped, the camera sheet slides away and the message "uploading" appears below the two blue buttons.
Depending on the size of image your camera captures and the speed of your internet connection this may take a few seconds. When the image is fully uploaded, it is scaled down to within 1024x1024 pixels and displayed in the main area of the screen.

Above the preview of the picture is a custom address in a very short format. It consists of:

Type this address into the search field in Image Search for C64 OS. It returns a single search result. This is similar to entering the HTTP: or HTTPS: URL of an image into the search field, but the image search service recognizes the CV: scheme as Computer Vision and knows where to find the image based on your privacy code.

Image Search - Searching for the Computer Vision short address
From this point on, everything else proceeds just as you would use Image Search for any other image on the web. You can enable full screen graphics mode to watch the black and white version of the image as it downloads.
Once downloaded, we see the same image as previewed on the phone in Computer Vision, with the same aspect ratio, but scaled and converted to fit our Commodore 64. Settings can be adjusted to improve the conversion results, and the same image can be downloaded from the Computer Vision service any number of times for up to 24 hours. As seen below, you can even use DragZoom to zoom in on a section of the image.


Computer Vision is the fastest and easiest way to get images captured on your smartphone straight onto your C64's screen.

Here is another example showing a picture of an Amiga 2000, and in just seconds it's displayed on the C64.


Computer Vision Optional Features
Before the 24 hour period elapses, you may explicitly remove an upload to Computer Vision by tapping the "Remove Upload" button below the image preview.
In addition to taking photographs using the Digital Eye button, you may also upload a graphic file stored on your smartphone. Tap the Select File button. Navigate the phone's menus and screens to find and specify the graphic file to upload.
Supported file formats include: JPG and PNG. There is a maximum file upload size of 16 MB. The file size cap also applies to images captured with the camera.
Google Maps
The search bar in Image Search is capable of more than just searching for images generally found on the web. By means of a URL-like prefix, Image Search can tap into alternative search APIs. One example is how Image Search is able to integrate with Computer Vision by using a prefix of:
cv://
Image Search is integrated with Google Maps via the maps prefix:
maps://
Following the maps:// prefix you may specify a place, a town or city, by name. The name is looked up from a very large database of tens of thousands of place names from around the globe. If there is ambiguity because two cities have the same name from different countries, you may follow the city name with a comma and the two-letter country code. For example:
maps://London
maps://London,CA
maps://London,UK
In some larger countries, such as the United States, a city name may appear more than once within that country. In order to disambiguate these places, you may follow the country code with a dash the two-letter state or province code. For example:
maps://Houston
maps://Houston,US
maps://Houston,US-AK
maps://Houston,US-TX
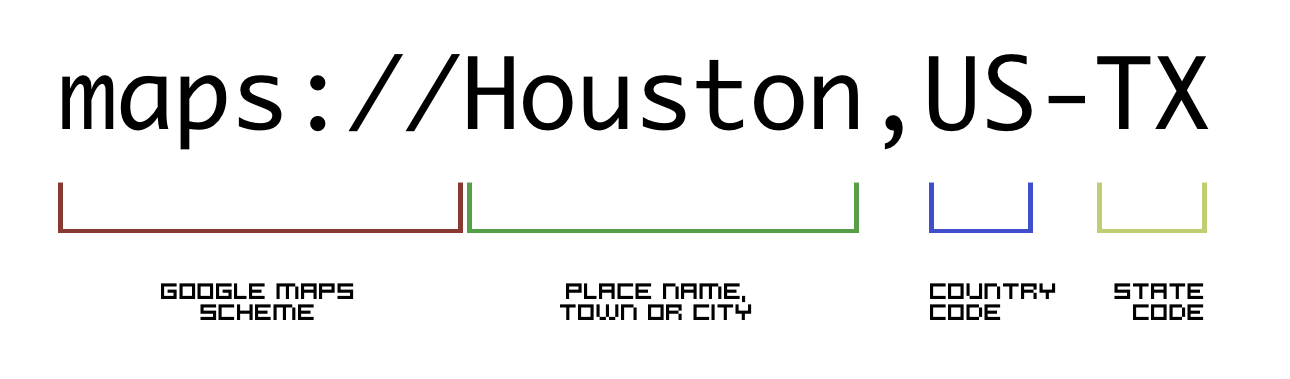
Capitalization is not relevant, however there should be no spaces left between the parts separated by comma or dash.
Center and Zoom levels
When you search for a place, the geographical center of that place is centered on the map.
The search results are all of the same place but offer 10 zoom levels plus a bonus satellite view. The descriptions of the zoom levels are not precise terminology, they just provide a general feel for what will appear within the frame. The zoom levels are:
- World
- Continent
- Country
- State
- District
- Region
- Subregion
- City
- Neighborhood
- Street

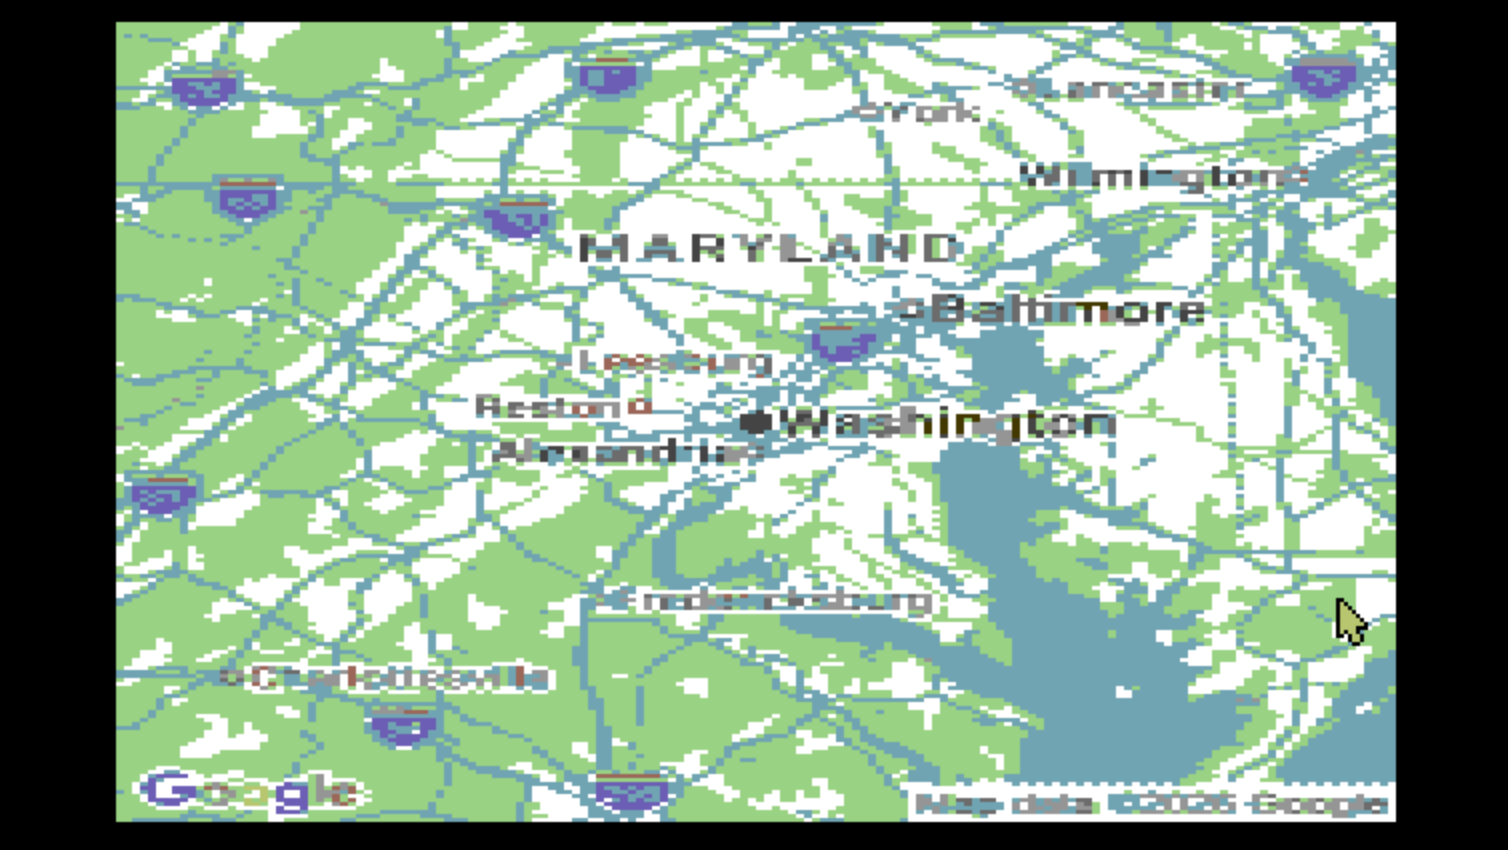
Looking first at the state level, you can see the general location of the place you searched for relative state borders. At this level you cannot make out the size or shape of the country.
Zooming in to the subregion, you can see some characteristic geography such as rivers, highways, and national parks. Zooming in a bit further you can see the marks for certain landmarks, airports, etc. At any of the selectable zoom levels, you can use the DragZoom feature of Image Search to zoom in on a portion of one of map zoom-levels, for example to read a highway number or other text label.

Points of Interest
In addition to the names of places, such as towns and cities, the database also contains the names of thousands of points of interest from places all around the world.
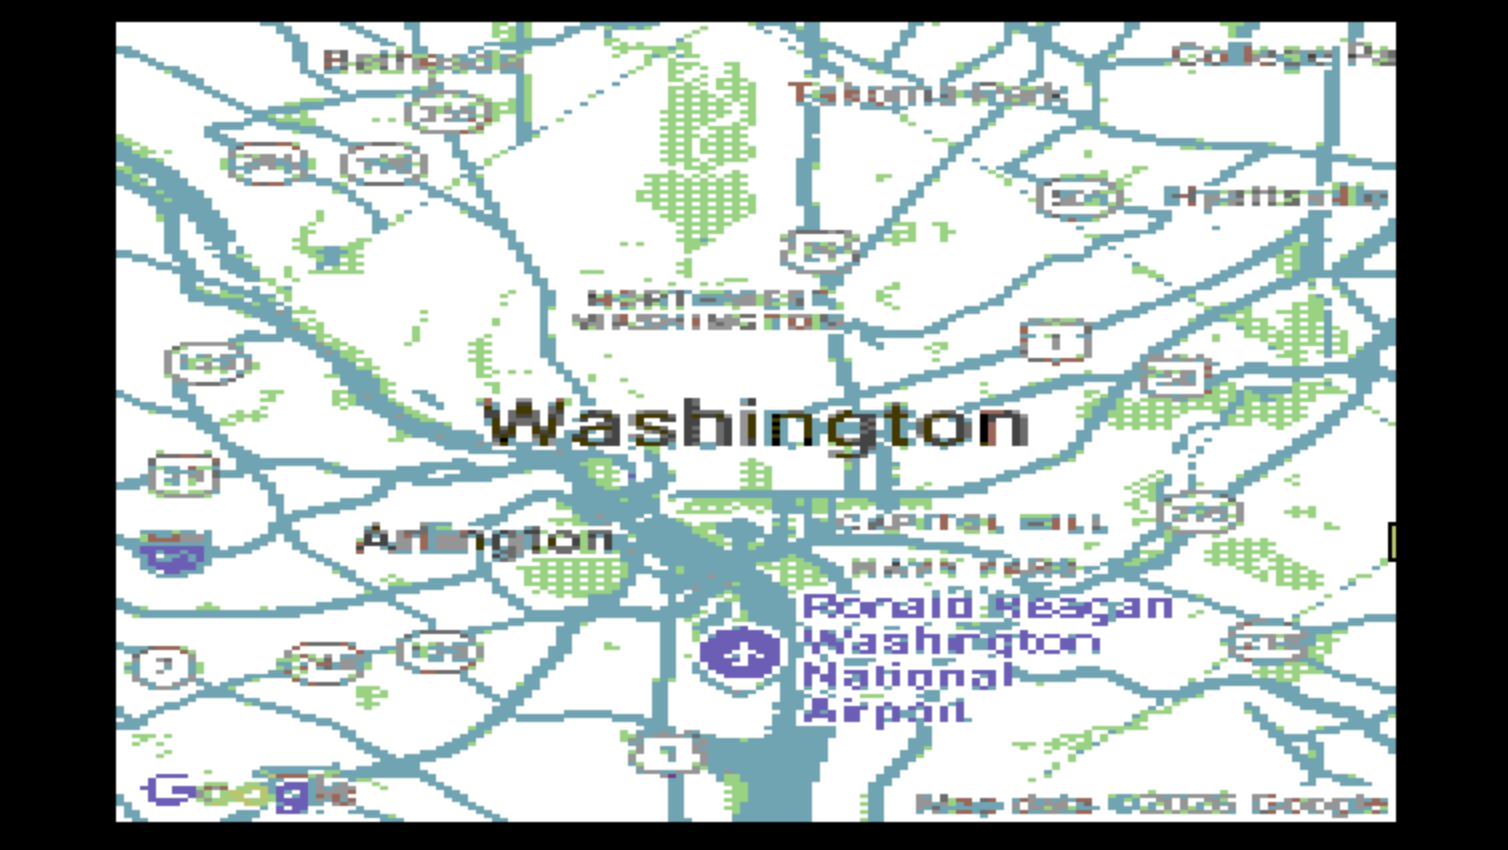
When you search for "Washington,US-DC" every zoom level is centered so that the graphical center of the city appears at the center of the screen. However, if you see a label for something of interest within the city, such as the Lincoln Memorial, you can search for that directly. That then becomes the center of every zoom level.
Let's try a search for something we've heard of, but maybe we aren't quite sure where it is, the Taj Mahal. By starting at the world zoom level, we get the widest possible context. With a broad view of the Old World, India appears to be right in the middle of the screen.
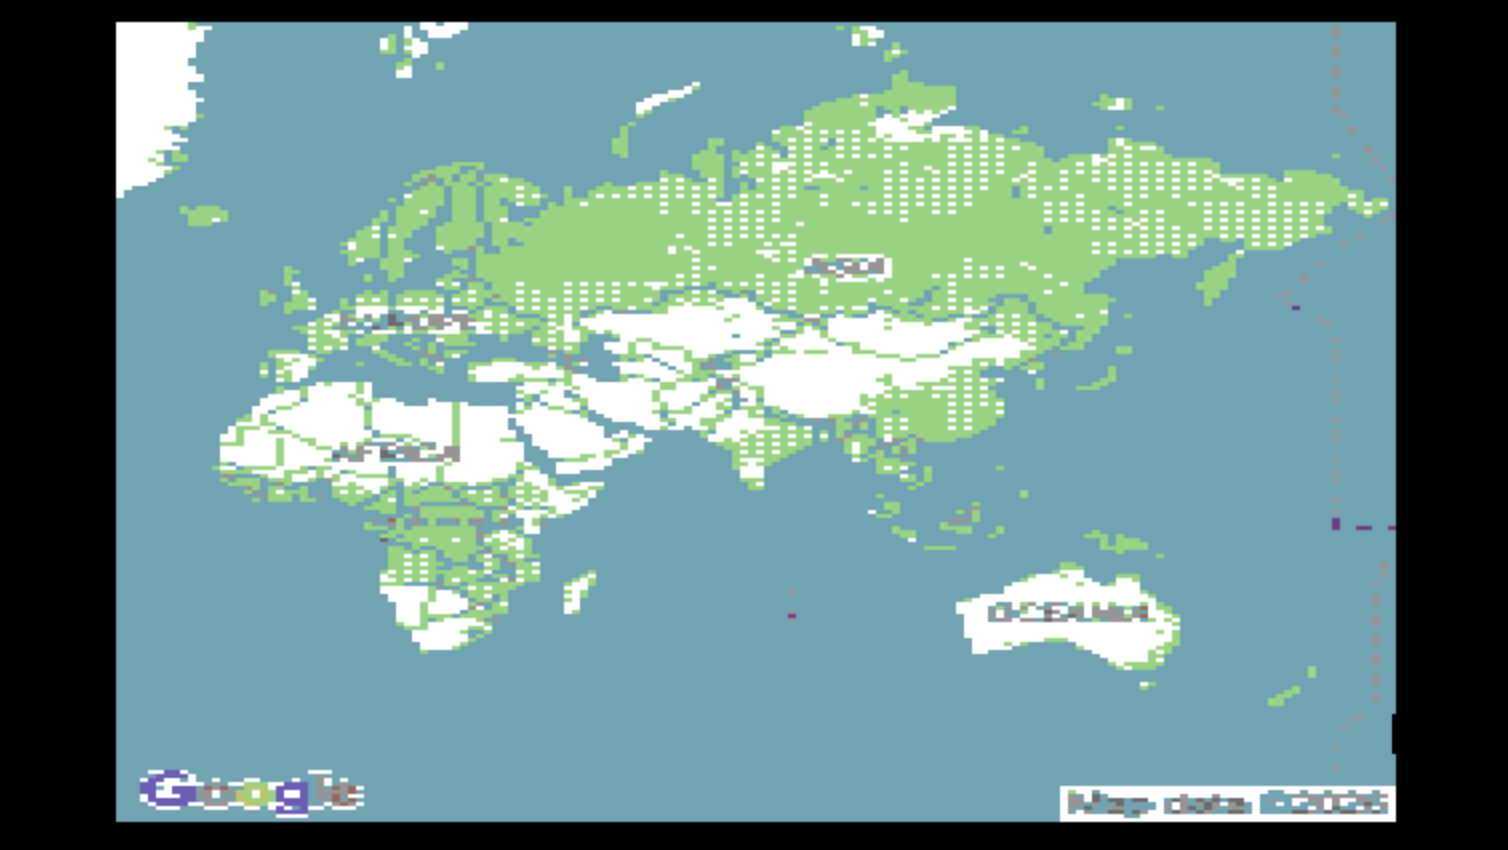
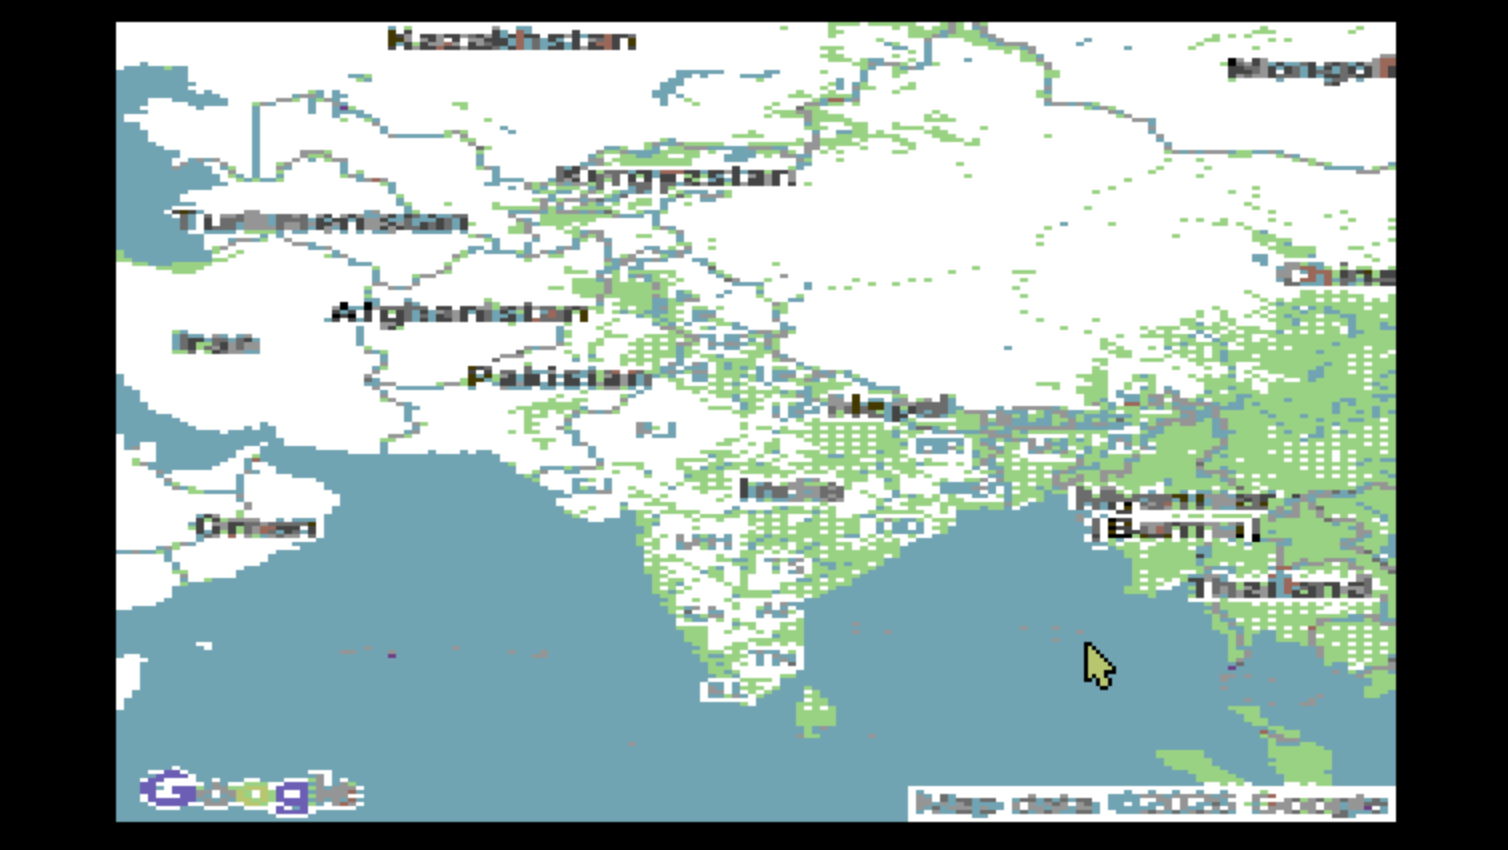
Next, zooming into the continent level, we can see the names of countries neighboring India.
- Iran
- Oman
- Afghanistan
- Pakistan
- Nepal
- Myanmar
- Burma
- Thailand
And zooming right into the neighborhood, we can see the major river upon which the Taj Mahal is situated and parks, roads and nearby buildings.
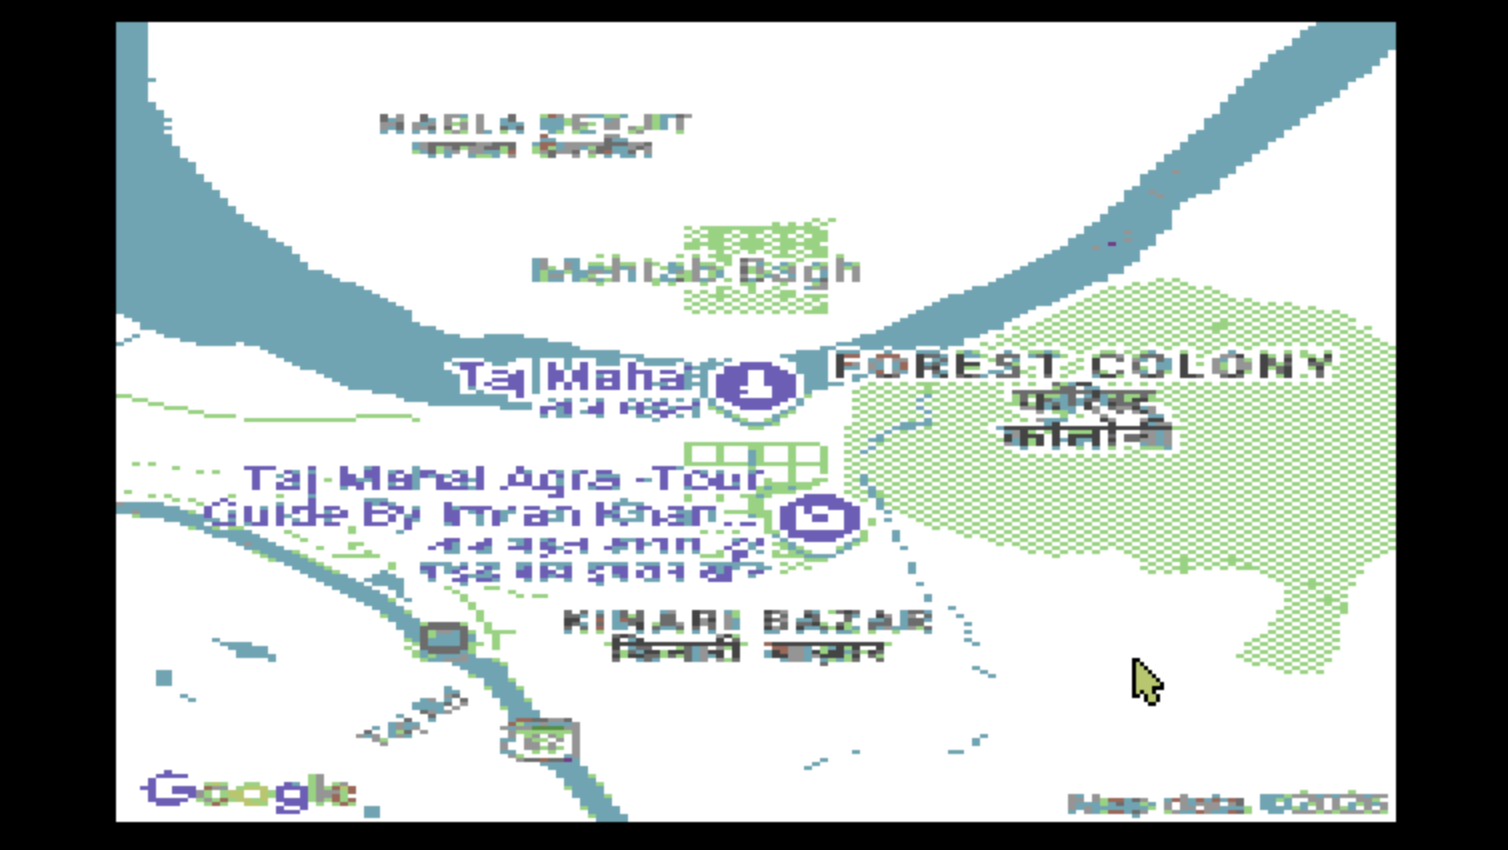
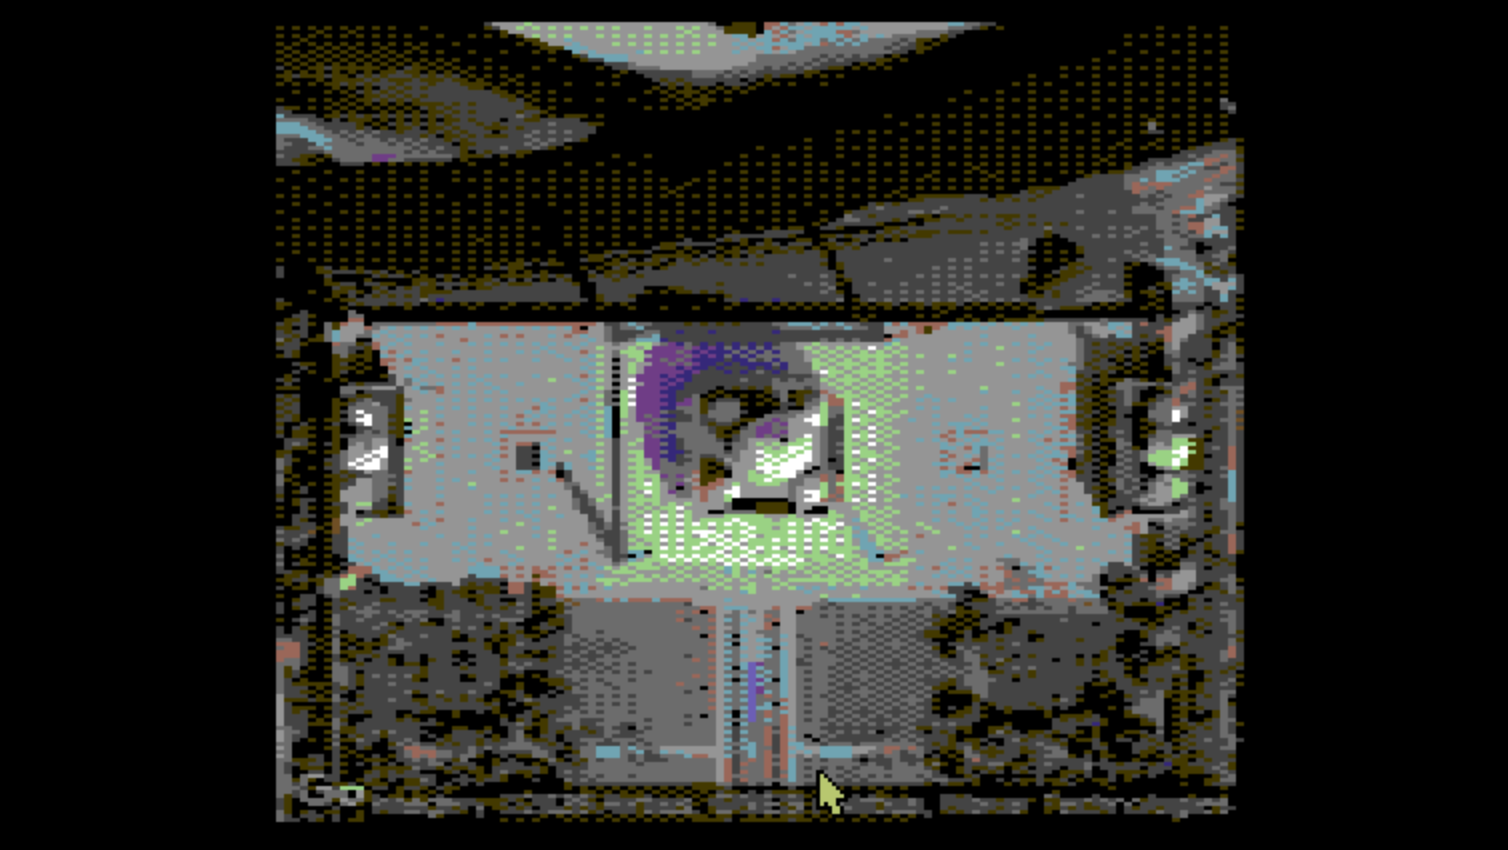
At the bottom of the list of zoom levels is a special 11th option. This zoom is called the building level, but it switches to satellite imagery.
At last, we can see what the Taj Mahal looks like from the air above it. Satellite view is interesting, but it may not give you the best perspective on a landmark if you really want to see what it would look like if you were there. But now that you know where a place is, you can perform a standard image search by simply entering "Taj Mahal" into the search field.
Let's look at one more example of a point of interest. We know the Eiffel Tower is in Paris, France, but we can get a look at exactly whereabouts in the city it's located and some of the surrounding landmarks.
By looking up the Eiffel Tower, we notice Arc de Triomphe and could choose too focus on that next.
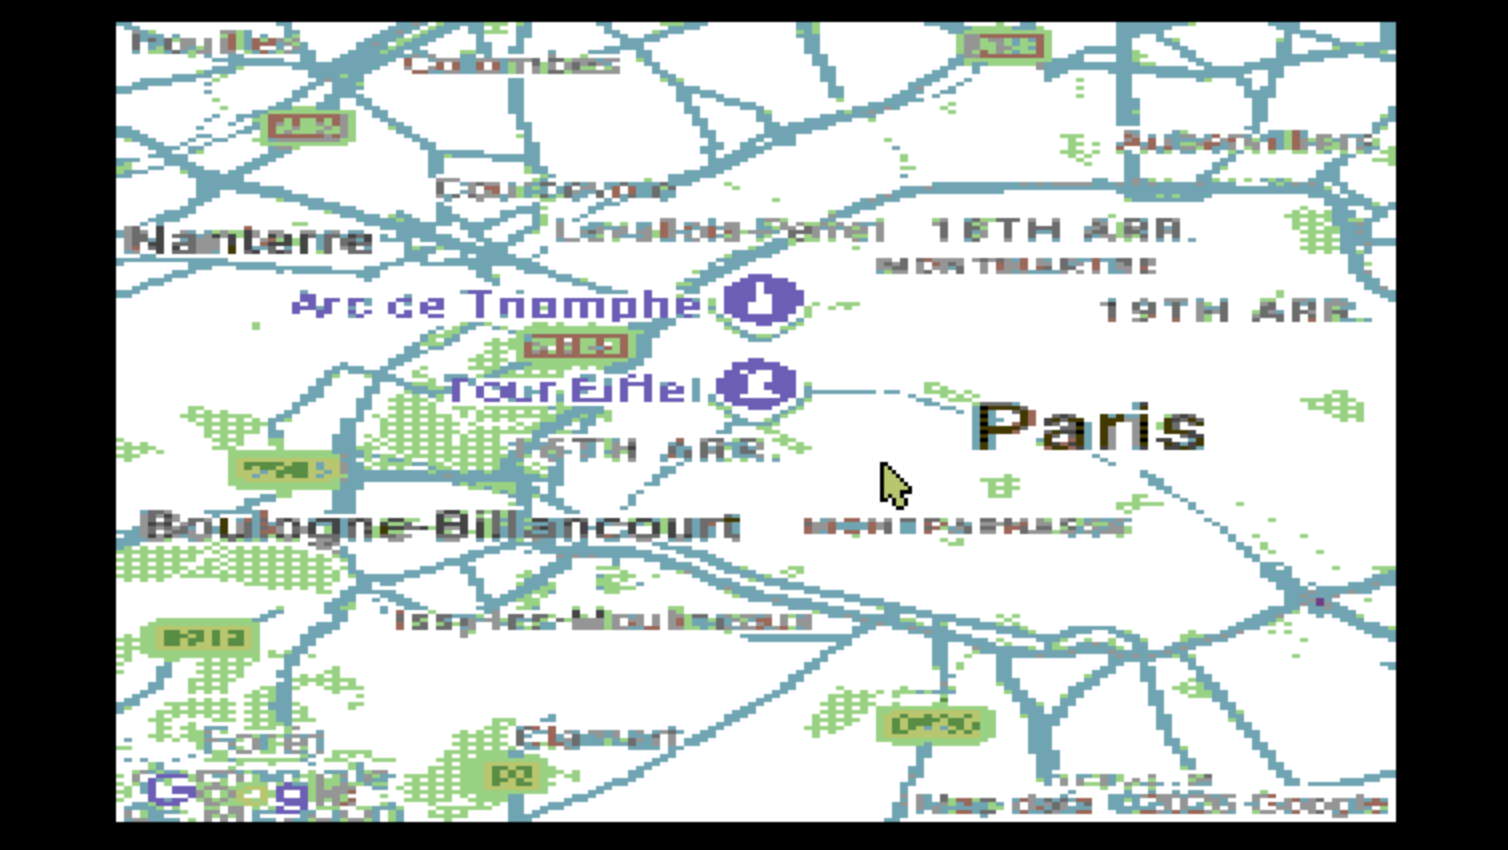
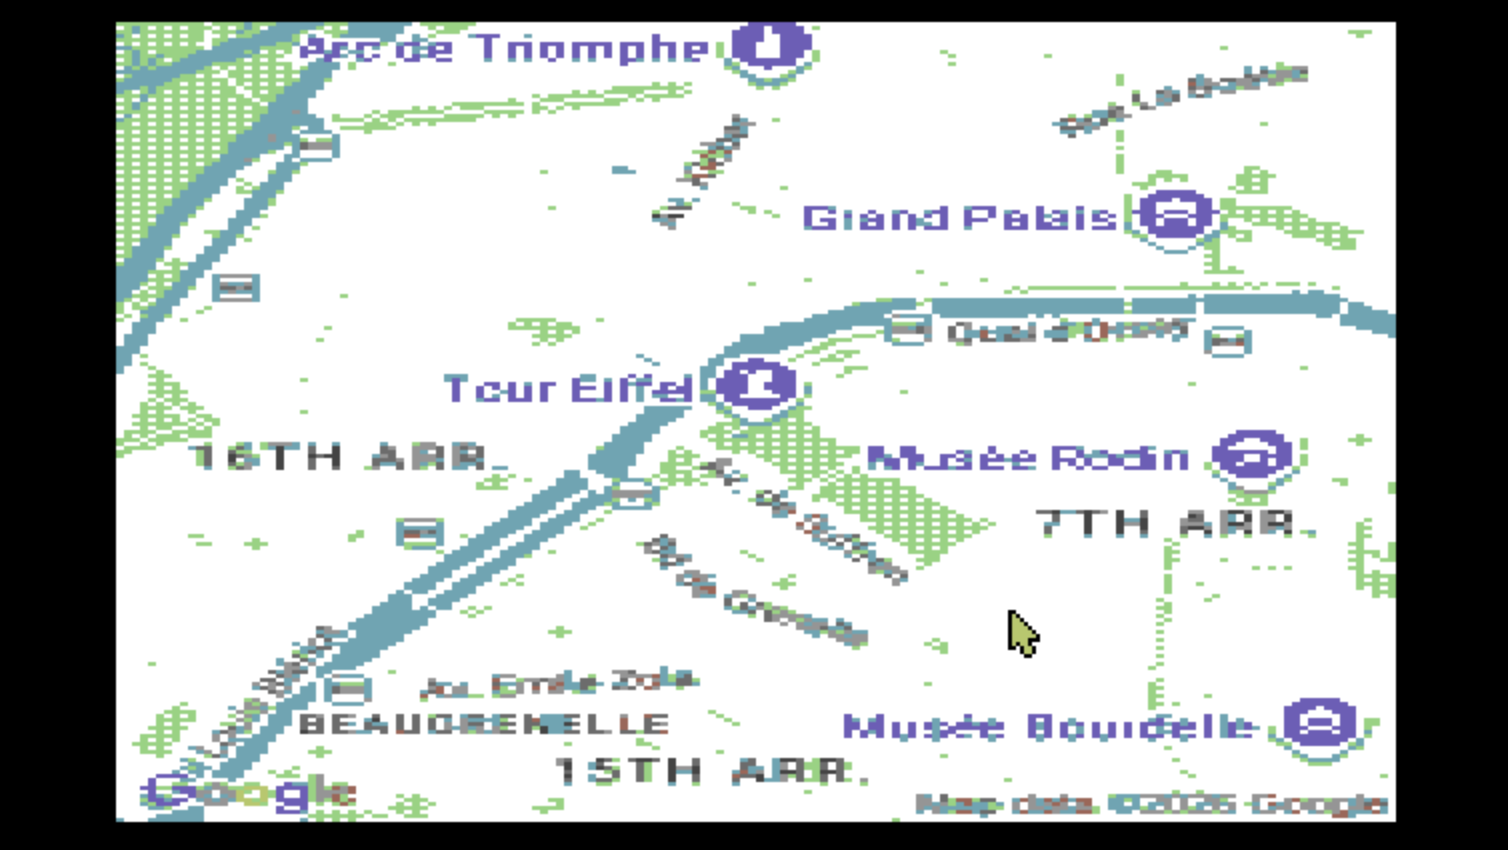
But first, we want to see the famous Eiffel Tower with a satellite view. Once again, Satellite view may not be the best representation of the monument. You can also lookup Eiffel Tower directly with the search field and find images from many perspectives, times of day, etc.
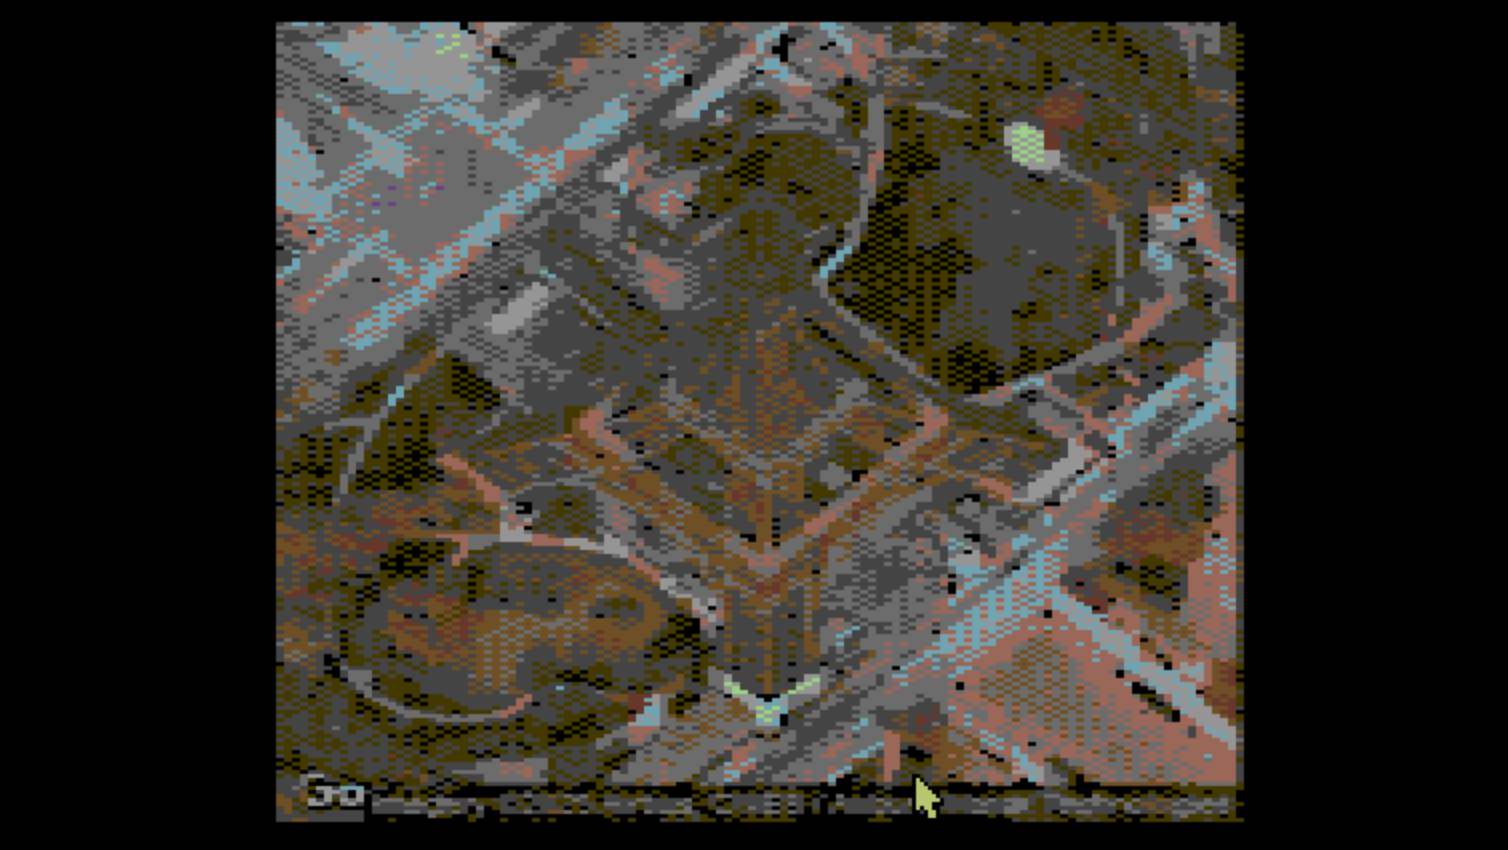
Aspect ratio corrected, image appears correctly as a square
Additional Options
Because searching Google Maps is built into Image Search, we still have access to all of the image conversion options to tweak the appearence of the map.
Aspect ratio
For regular pictures, such as of people, cars, logos, etc. adjusting the aspect ratio can be a great way to see circles appear circlular and faces to not looked stretched. However, all maps images are returned at 320x200 native resolution. If you adjust the aspect ratio so that a circle actually looks circular, then that native resolution will be condensed to a square.
To view a map with a bit of stretching but filling the screen, as the examples show above, set the aspect ratio to 1.0.
Dithering and color palette
As with all images, the color palette can be changed by choosing from Palettes menu under the View menu, or by pressing COMMODORE+1 through 4.
You may experiment to see which you prefer, but our crack testing team has found that PALette often shows the most detail, and the best distinction between blue and cyan for water and greens and white for land masses.
Dithering can also be adjusted. Our testing has found that lowering the amount of dithering leads to greater legibility. The 2x2 mode with a dither radius from 4 to 8 works quite well, although some textures of the landscape are lost.
Increase the dithering to get a better and richer texture to land masses, at the expensive of some legibility of text labels.
For the greatest legibility, but at the expense of seeing some color artifacts, consider switching from the 160 resolution (Multi-Color) to 320 (Hi-Res.)
Save an Image to a File
You find that perfect image, one that looks brilliant in conversion on the C64, and you've tweaked it with a number of custom settings; a little brighter, zoomed in on a section of it, adjusted dithering settings a bit, and the right colorspace and palette to show off the maximum detail in stunning colors.
You don't want to just lose this image; you may never find it again. That's the nature of a free form search field and a search engine with results that change daily. Good news, you can save the image in the current graphics buffer using the File → Save As… menu option.
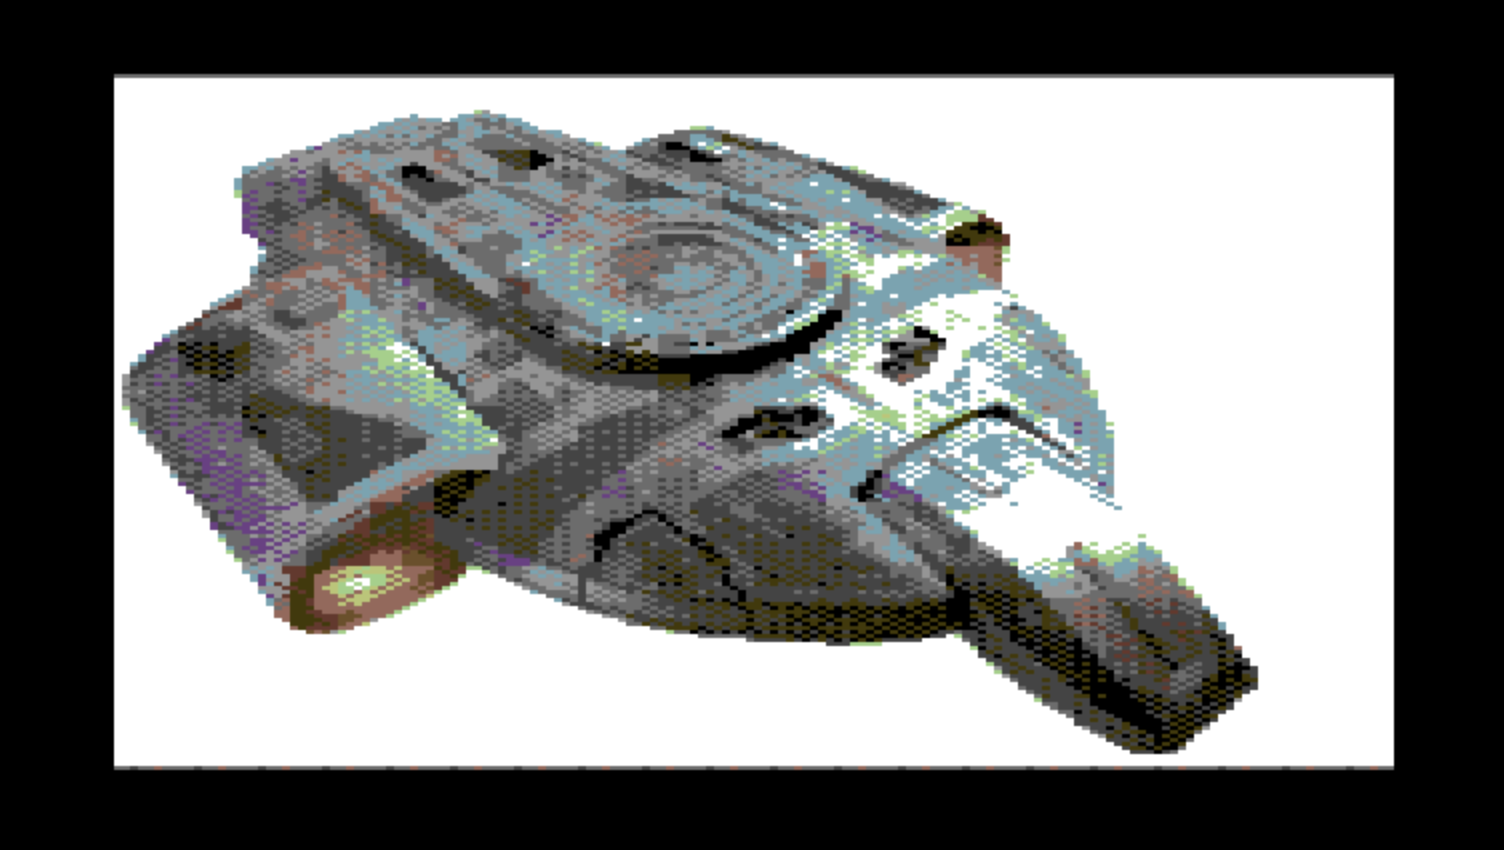


Here I've found a totally excellent picture of the USS Defiant from Star Trek: Deep Space Nine. It's got the right palette, the right colorspace, and I've adjusted the dithering options until I really like how it looks.
Choose Save As… from the File menu, or press CONTROL+COMMODORE+S. There is just one problem. With the application logic of Image Search, plus its complex Toolkit user interface with several custom classes, the whole network stack, the search results, AND the memory-swallowing bitmap graphics data, there is no more room in our beloved beige friend's 64KB of RAM to also load in the Save Utility, plus the file system directories.
When you first choose Save As… the current image is immediately saved to a temporary file. Next, several things are expunged from memory: the search results and the graphic data itself. Then the Save Utility opens. You can use it to navigate around all of your devices, their partitions and subdirectories until you find where you want to save the file.
Enter a filename in the "Save As:" field. The field allows you to enter a name up to 12 characters long. Then press RETURN or click the Save button. The Save Utility closes and the temporary file is moved to the save location with the new name.
High-resolution images are saved in the Art Studio format and have an extension of ".art" automatically appended. Multi-color images are saved in the Koala format and have an extension of ".koa" automatically appended. Both of these file formats can be opened later in the Image Viewer Application included with C64 OS.
A great feature of Image Viewer is the ability to configure a graphic as the C64 OS boot screen. Read more about that here. Now with Image Search you can find an amazing image that you truly love, save it to local storage, and with Image Viewer configure it as your C64 OS boot screen.
Additional Features
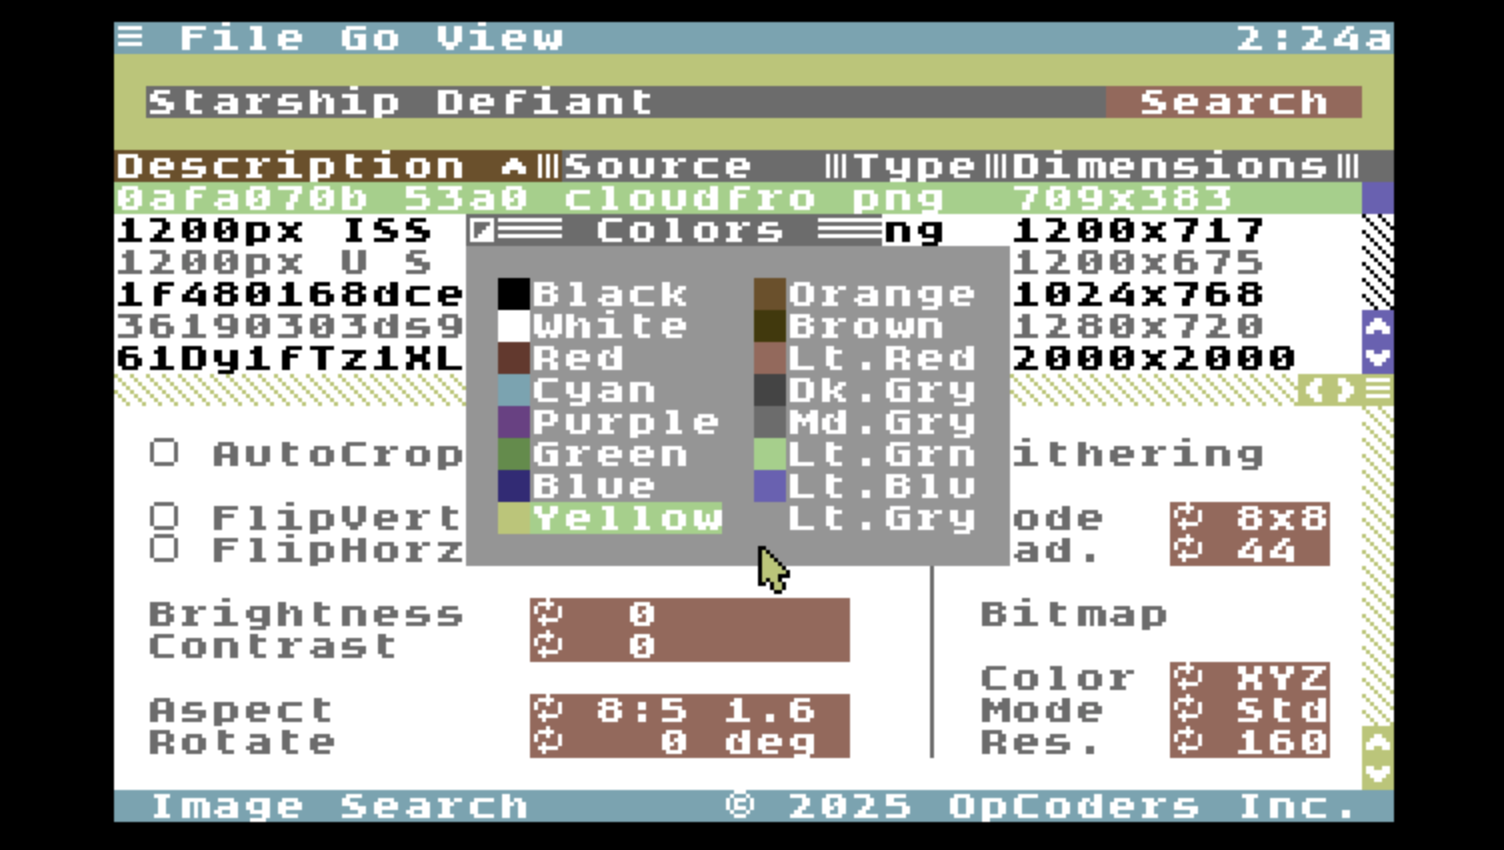
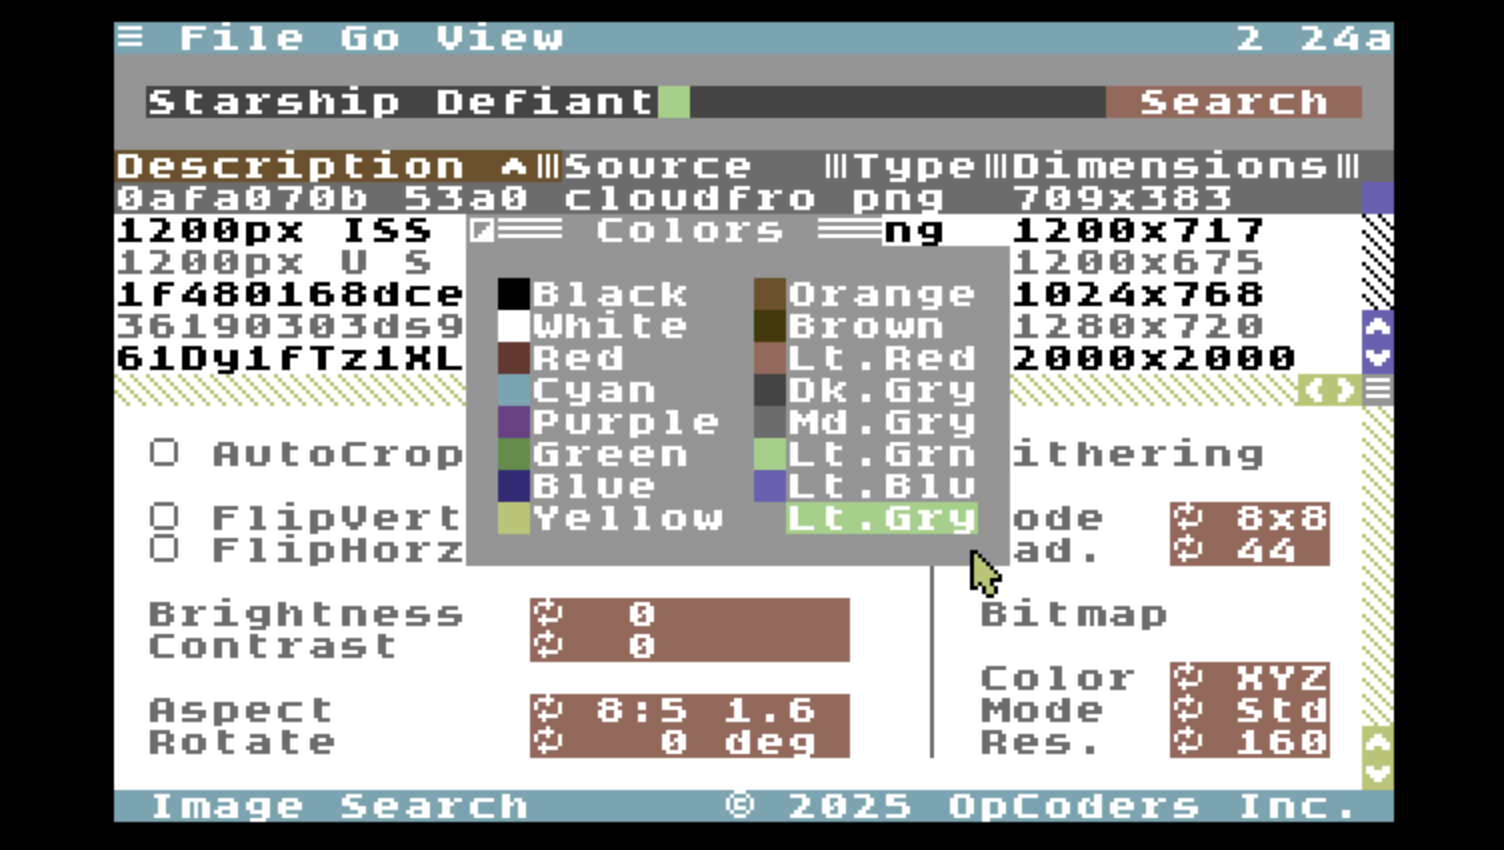
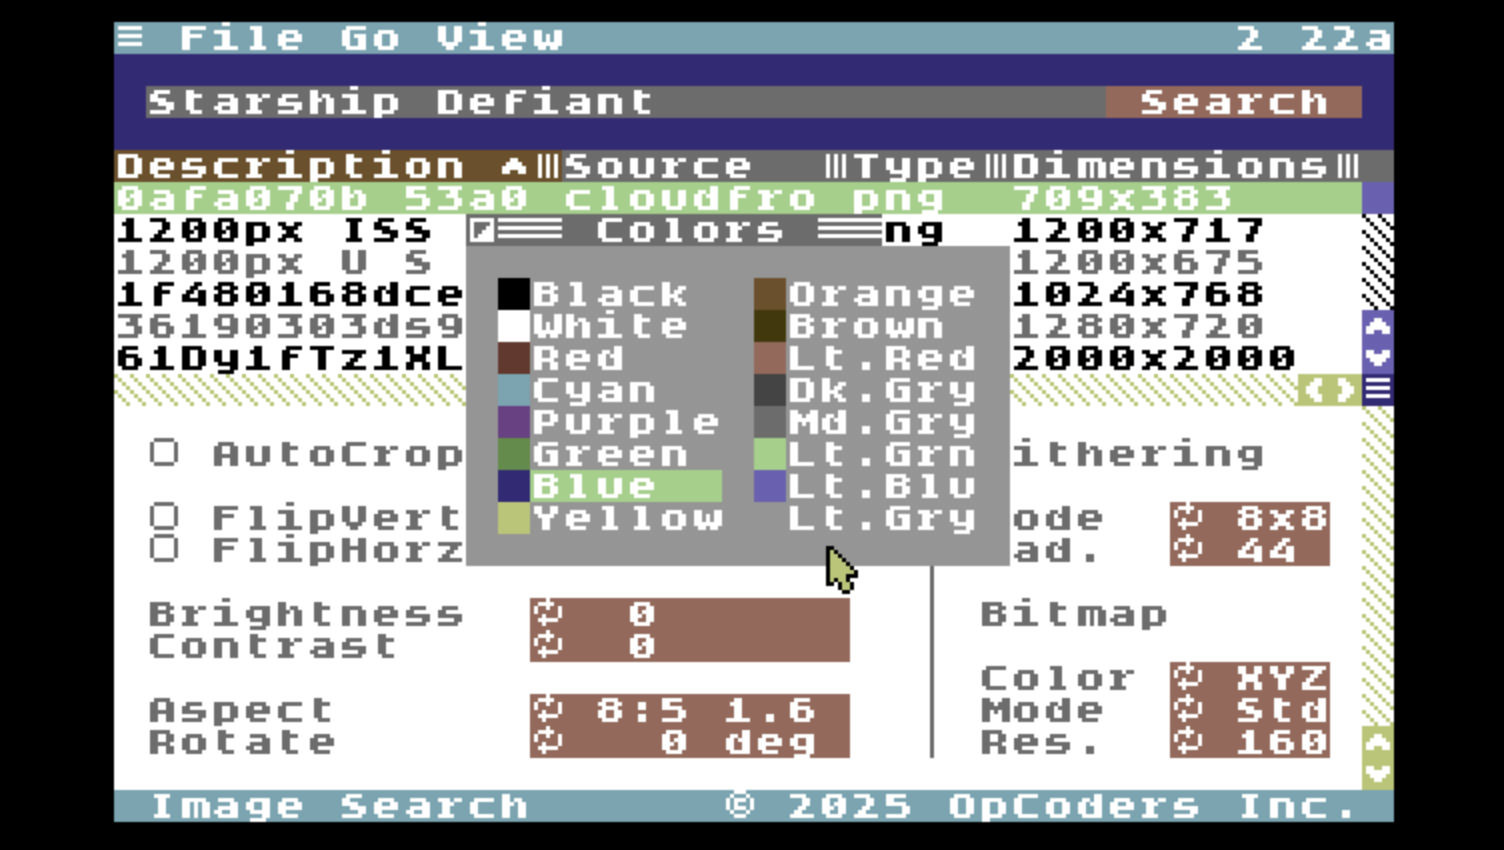
The Colors Utility can be used to customize the background color of the search bar. Choose Colors from the View menu, or press CONTROL+COMMODORE+C.
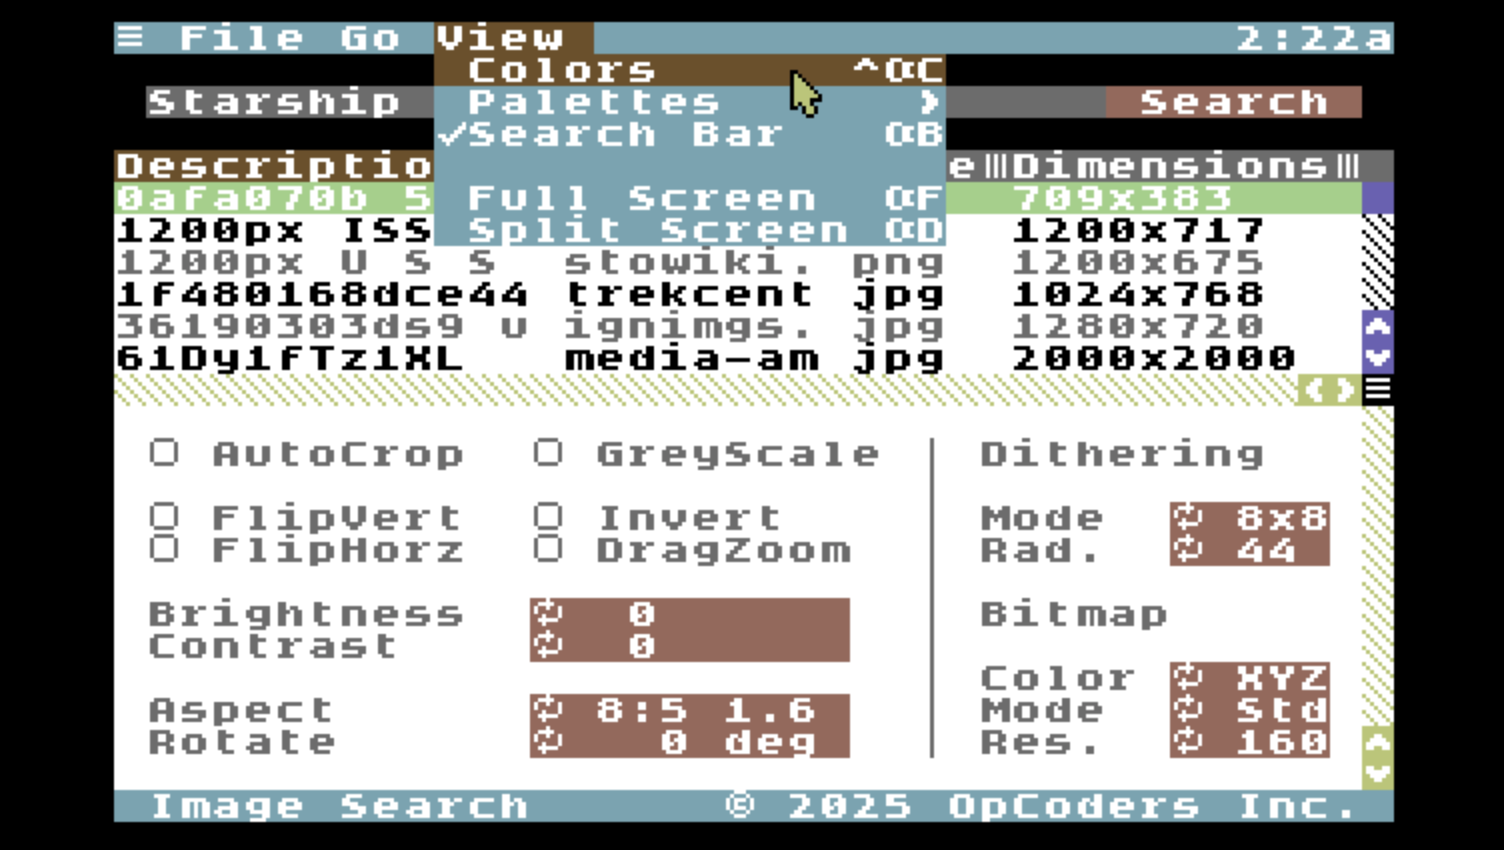
Choose Colors from the View menu
Pick a color from the Colors Utility to give Image Search a touch of color. It can look nice if this color matches your border color. Here are some examples.
Built-in Help
Image Search comes with a summary of this guide available right from the Utlities menu.
Choose Help from the Utilities menu, or press SHIFT+CONTROL+COMMODORE+?. The Help Utility opens up with a set of topics on the left.

Choose Help from the Utilities menu for built-in help
Low Memory Warning
There is problem with the Help Utility in version 1.07 of C64 OS. It doesn't properly send low-memory warnings to the Application when it is running low on memory. And it also doesn't check to make sure that its memory allocation requests were successful before plowing ahead and trying to load the help content.
Opening Help while search results are loaded in causes a lock up due to running out of memory. I apologize for this oversight. The problem is with the Help Utility and will be fixed in v1.08 of C64 OS. It is safe to open Help freshly after launching Image Search, before you've searched for anything. And it's also safe to open immediately after saving an image to a file, since all the memory is freed up in that procedure.
Using Alternative Proxy Servers
Image Search uses two proxy services, plus both proxies rely on a URL shortener service.
The search proxy service takes a search term and uses a commercial Image Search API to find and format the search results that are displayed in the table in Image Search. The URLs are also cached in the OpCoders URL shortener service and only the URL shortcode is downloaded by the C64.
The image conversion proxy service takes a URL shortcode and a series of optional commands to configure the adjustment and conversion options. This proxy downloads the original image, adjusts it with JIMP, converts it with RetroPixels and sends the resultant converted image data to the C64.
These services, especially image conversion, use a non-trivial amount of CPU processing in the OpCoders cloud infrastructure. This is, in part, what you are paying for when you subscribe to the Network Proxy Services provided by OpCoders Inc.
If you do not want to use or pay for the Network Proxy Services provided by OpCoders Inc., then, good news, the proxy services are open source and available on the OpCoders GitHub account. Both are written in NodeJS and each proxy service consists of just a single file.
The image search proxy can be found here:
https://github.com/OpCoders-Inc/network-proxy-services/blob/main/cnp.images.js
The image conversion proxy can be found here:
https://github.com/OpCoders-Inc/network-proxy-services/blob/main/cnp.image.js
Changing the proxy services in Image Search
When Image Search launches, it reads in the URLs for the proxy services from two text files stored in the Application's bundle.
In File Manager, navigate into the Image Search App bundle. (Select it, choose Options → Copy Place, then choose Options → Paste Place.) Select the proxy file and open MiniEdit from the Utilities menu. Change the URL to the proxy server and save the file. Relaunch Image Search from disk for it to load in the new proxy servers.
The image search proxy file:
//os/applications/Image Search/:sproxy.t
The image conversion proxy file:
//os/applications/Image Search/:iproxy.t
It is highly recommended that you backup the original sproxy.t and iproxy.t files before changing them.
Image Search is Open Source
One last detail worth mentioning. The Image Search Application is open source. The source code is included in the Application bundle, in the TurboMacroPro binary file format.
Hopefuly this source code will help C64 OS developers who are interested in learning to program against the CNP socket API.
Last modified: Jun 19, 2026