
C64 OS USER'S GUIDE
Chapter 2: Installation
Advanced VICE Configuration for IDE64
This subsection of Chapter 2: Installation, discusses the advanced set up and configuration of the VICE emulator on Windows or macOS for use with C64 OS. Advanced VICE configuration for IDE64 has the following steps:
- Download firmware and utilities
- Set up optional drive ROMs
- Set up IDE64 cartridge and other drives
- Partition and format media
- Transfer files over PCLink
Final installation instructions for C64 OS proceed using the installation instructions for IDE64.
Import resource links
Important resource links for additional IDE64 configuration are found at the end of this page.
Requirements
These instructions are to set up a virtual IDE64 from which C64 OS will run. There are some minimum requirements and some additional resources that are required and/or recommended. Check the important resource links at the end of this page for further information about how to acquire these.
- VICE v3.5 or greater: Version 3.5 is the earliest version that C64 OS supports.
- IDEDOS cartridge image: This can be fetched from the IDEDOS download system.
Download VICE, VICE Version and Screenshots
The latest version of VICE can be downloaded for free at: https://vice-emu.sourceforge.io.
The screenshots used in this tutorial are from VICE v3.7 for macOS. The appearance of the options may differ slightly in newer versions of VICE.
Download firmware and utilities
The latest stable firmware, which is fully supported by C64 OS, is IDEDOS 0.90.
Configure
The following table shows a summary of the IDEDOS configuration for use with VICE.
| Category | Value | Notes |
|---|---|---|
| Target system | Both Systems | Support for SuperCPU if used |
| Cartridge version | v4.1 | The same for 4.1 or 4.2, the latest hardware version |
| Disk drive speeder system | JiffyDOS | This will speed up other drives that support JiffyDOS |
| PCLink | USB | Choose $DE5D for USB Base Address. Default. |
| Misc Options | Second SID: none | Set the base address of a second SID if you have one. |
| Misc Options | Use optimized UPCLink transfers | This option should be checked on |
| Misc Options | Download in ".crt" format | This option must be checked on |
Go to the IDEDOS Download System webpage. There are several sections, each section provides options for compatibility with the IDE64 hardware that will be emulated by VICE.
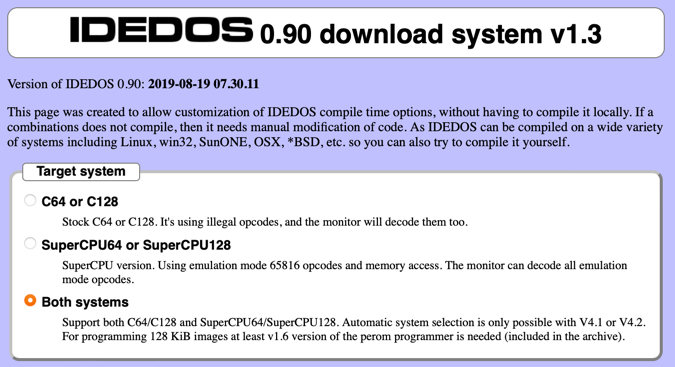
IDEDOS - Target System for VICE
Choose the IDE64 firmware for "Both systems," stock C64/C128 and SuperCPU. VICE can emulate the latest IDE64 hardware capable of supporting both stock and SuperCPU at the same time.
If you do not plan to use IDE64 with an emulated SuperCPU, you could also choose the first option, "C64 or C128."

IDEDOS - Cartridge Version
Choose "V4.1" for the cartridge version. This supports the v4.1 and v4.2 hardware, and VICE is capable of emulating both of these hardware revisions.

IDEDOS - Speeder System
Choosing JiffyDOS is recommended for the disk drive speeder system. You will be using IDE64 with other emulated storage devices on the IEC bus. If the device supports JiffyDOS, access to that device will be accelerated. This includes a CMD HD, CMD FD, or any of the legacy Commodore disk drives, if it configured in VICE to use a JiffyDOS drive ROM.
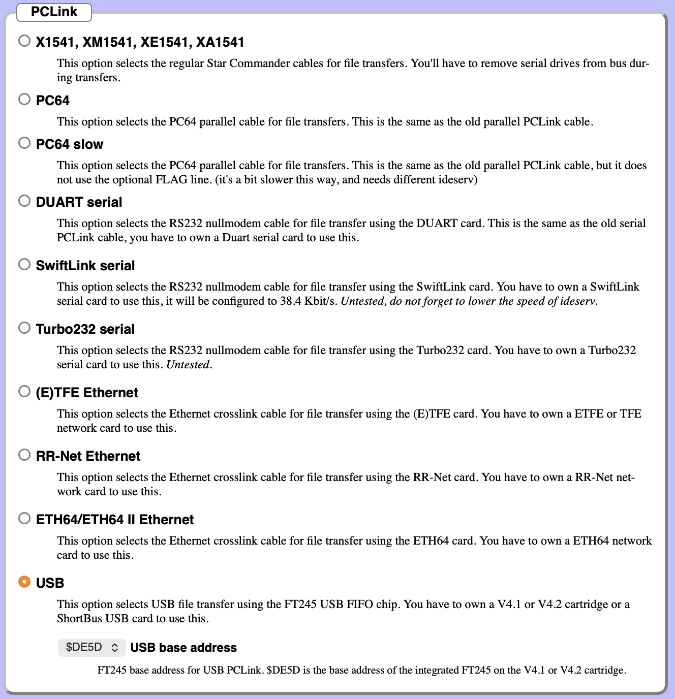
IDEDOS - PCLink USB
PCLink is a convenient technology built into IDE64 to allow it to transfer large files from the native file system of the Mac or PC running VICE, by running a special PCLink server program. How to set up PCLink is described in a section below.
PCLink on original hardware is able to function over a large number of physical connections. For use in VICE, choose the USB option. Keep the the default USB base address of $DE5D.
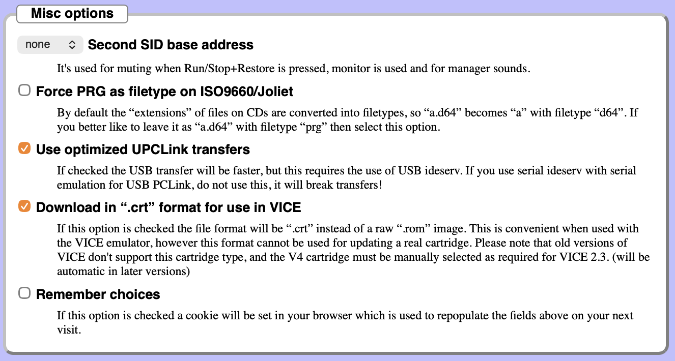
IDEDOS - Misc Options VICE
Under miscellaneous options, if you have configured a second SID chip in VICE, specify the base address where it is found. This option is used to allow IDE64 to mute the SID chip if STOP+RESTORE is used.
Since these instructions are for emulated IDE64 hardware, be sure to check (i.e., select) the option to download as a .CRT file for VICE. Also, since we have selected to use PCLink over USB, check on the option to use optimized UPCLink transfers.
Download
Click the "Download PEROM" button to download a .ZIP package containing a readme, a note and some other text files, and the configured PEROM file in .CRT format. Another .ZIP package is also found inside the first that contains the IDE64 utility programs that run on the C64.
Set up optional drive ROMs
IDE64 provides the computer with the ability to communicate using the JiffyDOS protocol. However, in order for disk drives to be accelerated by this, they have to be configured with a JiffyDOS drive rom. This is optional, but it will greatly speed up access to those disk drives.
In VICE, choose "Settings..." from the Preferences menu. From the left sidebar, unfold the Machine section. Select the ROM option under the Machine section heading. In the main configuration area on the right there are four tabs. Select the Drive ROMs tab.
VICE supplies default ROMs for many of the various drive models that it can emulate. If you have purchased a JiffyDOS drive ROM overlay, locate the row for the drive type and click the Browse... button at the end of that row. From the file picker dialog box, locate the JiffyDOS drive ROM file, select it and click Open.
In the example shown below, the 1541-II has been assigned a JiffyDOS drive ROM.

Select the JiffyDOS drive ROM for the 1541-II.
Set up the drive ROMs for any drive types for which you have purchased a JiffyDOS drive ROM overlay.
Close the settings window by clicking the close button in the bottom right corner. Then save VICE's settings by choosing "Save settings" from the Preferences menu.
Set up IDE64 cartridge and other drives
C64 OS can be run with the IDE64 configured as the only storage device.
However, configure and partition an IDE64 disk image, it is necessary to have access to a 1541 disk image that contains the IDE64 configuration tools. Instructions are also provided to configure a 1541-II disk drive.
Set up drive 12 as an IDE64
The IDE64 cartridge is able to provide up to 5 different devices to the C64: Primary master, primary slave, secondary master, secondary slave, plus a special PCLink device. First we are only configuring the primary master, and its default device number is 12. The PCLink device will be configured in a later section.
First create an empty file that will be formatted and partitioned as the IDE64 disk image. Name the file c64os.ide64.hdd. The size of the IDE64 media is autodetected from the size of the image file. In our example, we will create an image with 2 partitions of 128MB each. Therefore, we want an image file that is slightly larger than 128MB times 2. We will choose 260MB.
On macOS, open the Terminal application.
Enter the following command:

mkfile 260m c64os.ide64.hdd

On Windows, press Win + R, type cmd and press enter to open the Command Prompt.
Enter the following command:

fsutil file createnew c64os.ide64.hdd 268435456

The empty file will be created in your home directory.
In VICE, Choose "Settings..." from the Preferences menu. From the left sidebar, unfold the Cartridges section. Select the IDE64 option under the Cartridges section heading. In the main configuration area on the right, at the top are options for IDE64 revision. Choose Version 4.1 or Version 4.2.
Below that, there are four tabs, for Device 1, 2, 3 and 4. Select the Device 1 tab. This is for the device which the IDE64 setup utility refers to as primary master, or IDE 0.
In the row labeled Image file, click the Browse... button at the right end. From the file picker dialog box that opens, locate the c64os.ide64.hdd file that you just created. Select it and click Open, at the bottom right.
Check on "Autodetect image size".
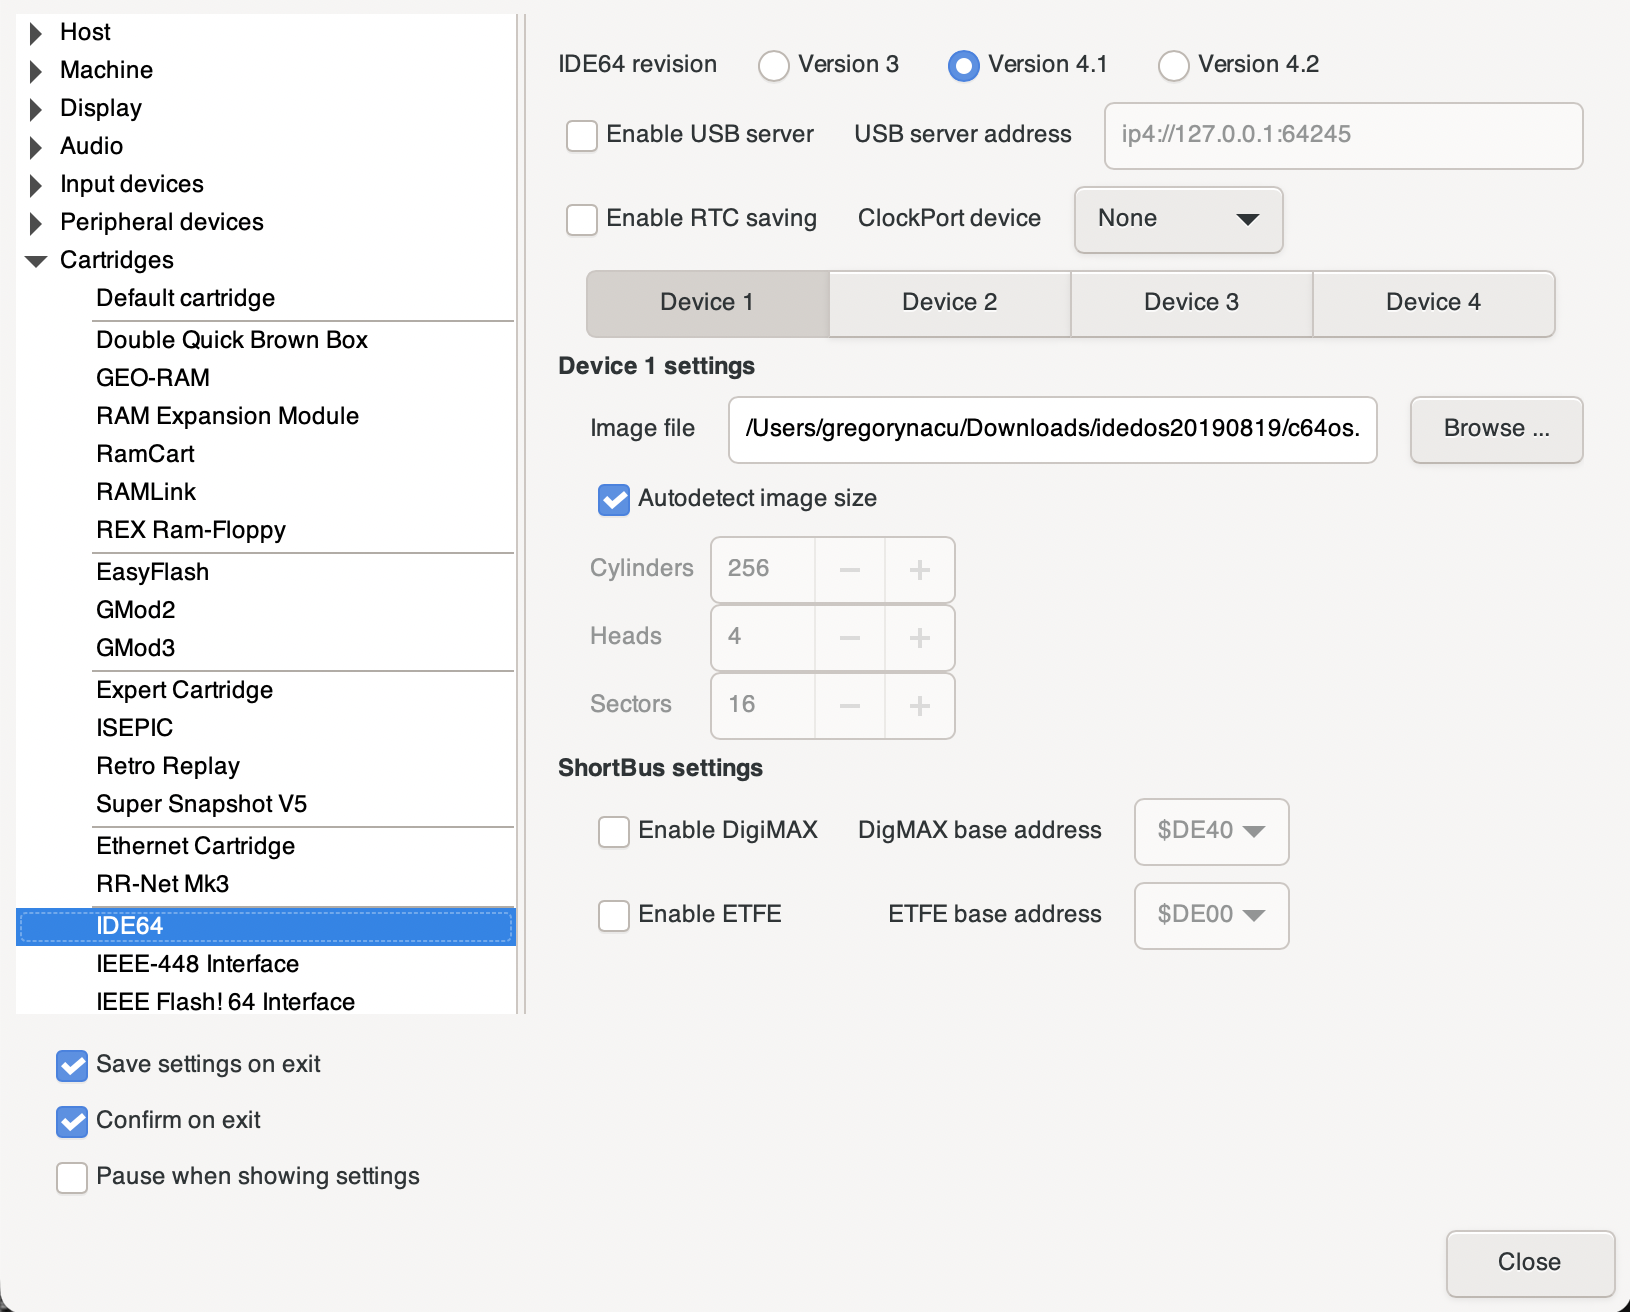
IDE64 cartridge configuration.
Close the settings window by clicking the close button in the bottom right corner. Then save VICE's settings by choosing "Save settings" from the Preferences menu.
Set up drive 8 as a 1541-II disk drive
Since most games, demos and other C64 software which runs from floppy disk is hardcoded to run from device 8, we will configure a virtual 1541 drive as device 8.
Choose "Settings..." from the Preferences menu. From the left sidebar, unfold the Peripheral devices section. Select the Drive option under the Peripheral devices section heading. In the main configuration area on the right there are four tabs, for Drive 8, 9, 10 and 11. Select the Drive 8 tab.
From the Drive model select box, choose CBM 1541-II. VICE provides default ROMs for the various disk drive models, however, during the set up of the drive ROMs, described above, you can configure a drive type with a JiffyDOS ROM. In the example above, we highlighted that a JiffyDOS ROM was being configured for the 1541-II. That corresponds with us now configuring a 1541-II as the drive for device 8.
Check on the "True drive emulation" option, do not enable the "Virtual device" nor the "IEC device" options. All the other settings can be left with their default values.

Drive 8, 1541-II configuration.
Close the settings window by clicking the close button in the bottom right corner. Then save VICE's settings by choosing "Save settings" from the Preferences menu.
Attach a .D64 disk image
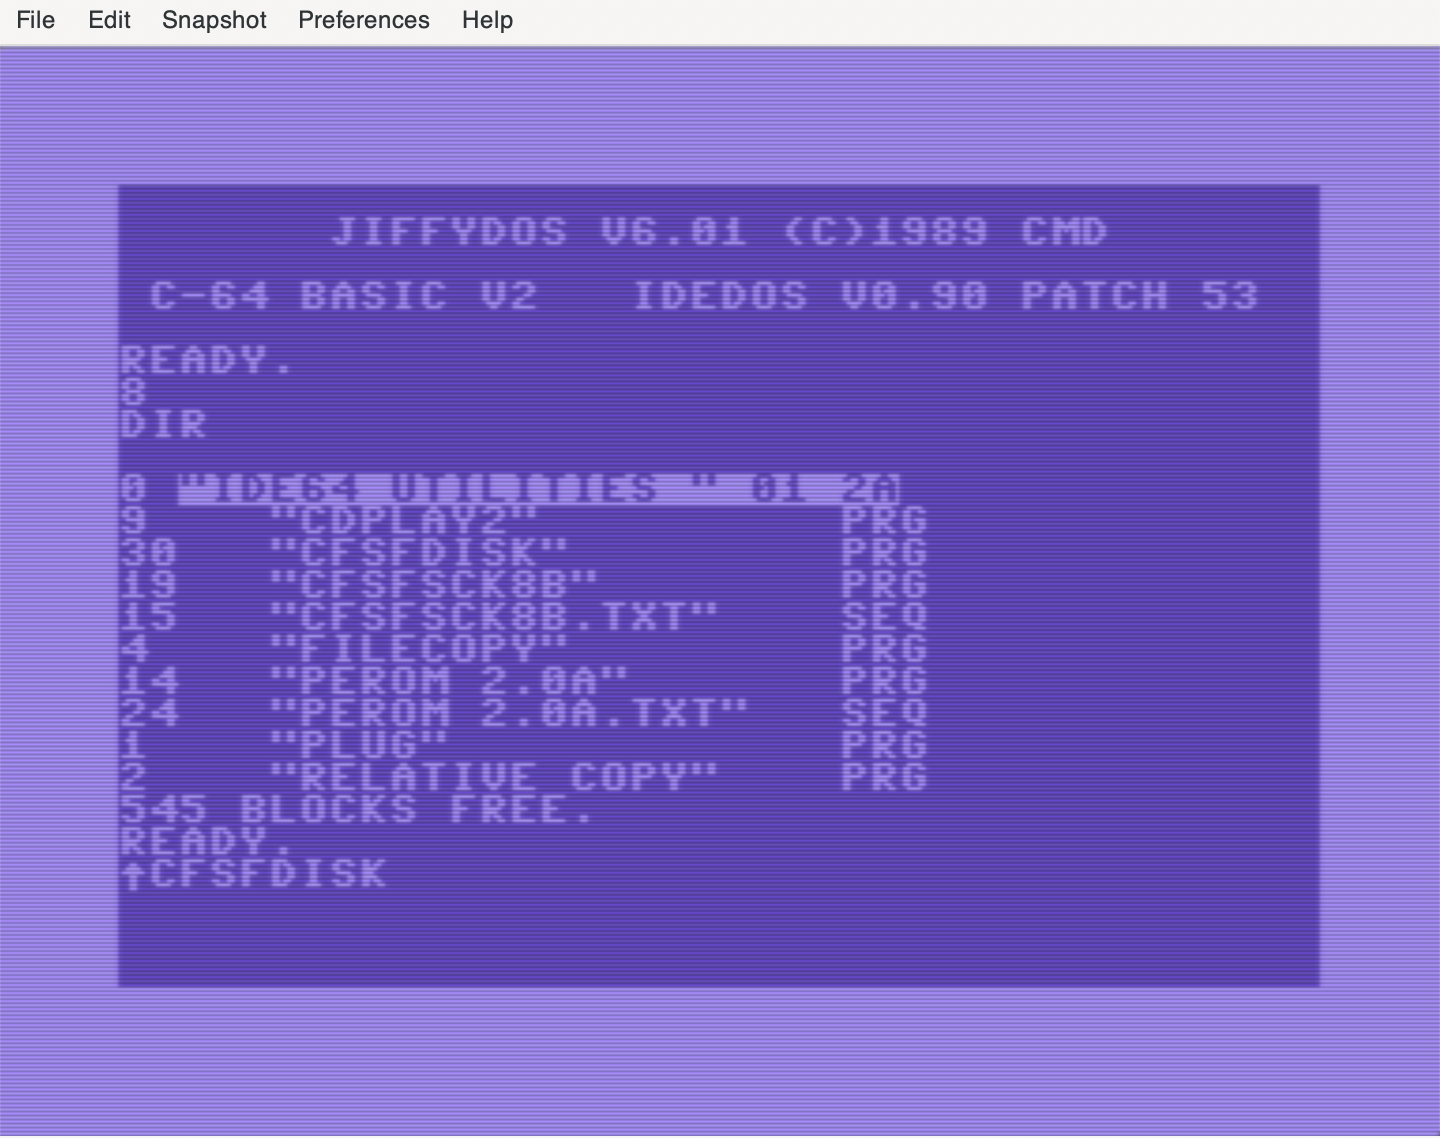
The most common way for C64 software to be distributed on the internet is in .D64 disk image files. In the important resource links section found at the end of this page, you can download the IDE64 Utilities disk in .D64 format. This disk provides programs for performing maintenance on the IDE64 file system, and for creating and managing partitions.
Each time VICE is started up afresh, it is necessary to attach the disk images to the various drives that have been configured. Choose Drive #8 under the Attach disk image submenu from the File menu. Or press ALT+8 on Windows or CMD+8 on macOS.

Attach a disk image to Drive 8, 1541-II.
From the file picker dialog box that opens, locate a .D64 disk image file. Select it and click Attach/Load, at the bottom right. Do not click the Autostart button.

Attach .D64 disk image.
The disk image is now attached and its contents are ready to be accessed via the virtual drive configured on device 8. Note that while C64 OS is running, you can repeat this procedure to change which .D64 image is attached to device 8. This is the virtual equivalent of physically swapping floppy disks. Be sure that no disk activity is underway before attempting to change which disk image is attached.
About VICE FS host file system device and IDE64
VICE implements a special host file system device, which identifies itself to the C64 as VICE FS. However, in testing, using VICE FS and IDE64 at the same time results in corrupted file accesses when reading from VICE FS.
Therefore, at the time of this writing, it is not possible to use the host file system device with IDE64.
Partition and format media
The IDEDOS which runs on IDE64 uses its own native file system called CFS. Because we have just created a blank IDE64 disk image, it is necessary to first create one or more partitions on the image.
Managing partitions cannot be performed with commands from the READY prompt. Instead you must use the partitioning utility that is included on the IDE64 utilities disk image that was attached device 8, above. The partitioning program is called cfsfdisk.
Attach the IDEDOS .crt image. Choose File → Attache cartridge image... Navigate to where you downloaded the .crt file and choose it and click Attach. The virtual C64 resets and the standard IDE64 start up screen is displayed. You are then taken to the READY prompt.

IDE64 Start up Screen
Before CFSfdisk can be used you must enable "direct write" mode on the IDE64. To enter IDE64's built-in CMOS Setup Utility, hold the back arrow key (top left of C64 keyboard) and press RESTORE.
This can sometimes be difficult to accomplish on VICE, due to unusual keymapping. If the positional keymap is used, the back arrow is where it would be on a C64, the tilde/backtick key above the TAB key. RESTORE is typically mapped to Page-Up. (On a MacBook, without a Page-Up key, hold the FN-key and press cursor up.)
Use the CURSOR keys and RETURN key to enter the standard setup screen, then move the selection about midway down to "Direct write." Use the PLUS and MINUS keys (+/-) to toggle the value from Disabled to Enabled.
Press the COMMODORE key to save and the STOP key to return to the previous screen. Use the CURSOR keys to move the selection to Save & Exit, press RETURN to save the changes and return to the READY prompt.


Load and run cfsfdisk from the utilities disk attached to device 8. The name of this utility comes from fdisk, a "fixed disk setup program" originally provided by IBM for the IBM PC/XT in 1983, and later provided by Microsoft as part of MS-DOS. The IDE64 version for C64 is called CFSfdisk because it creates and manages the CFS partitions used by IDE64.
Load and run CFSfdisk from device 8
CFSfdisk uses a bitmapped screen to produce a fake 80-column display. On a real C64 this can sometimes be difficult to read, but on VICE's emulated screen the text is crisp and easily legible.

CFSfdisk - Introductory Screen
CFSfdisk starts by asking you for the IDE64's "drive number", this is the C64 device number. We have previously configured the virtual IDE64 to device 12, which is how the primary device number is typically configured on physical IDE64 hardware. Press RETURN to accept the default of 12, and proceed.
Use the "m" command to view a help menu. Type "m" and press RETURN. A number of additional single letter commands are listed.
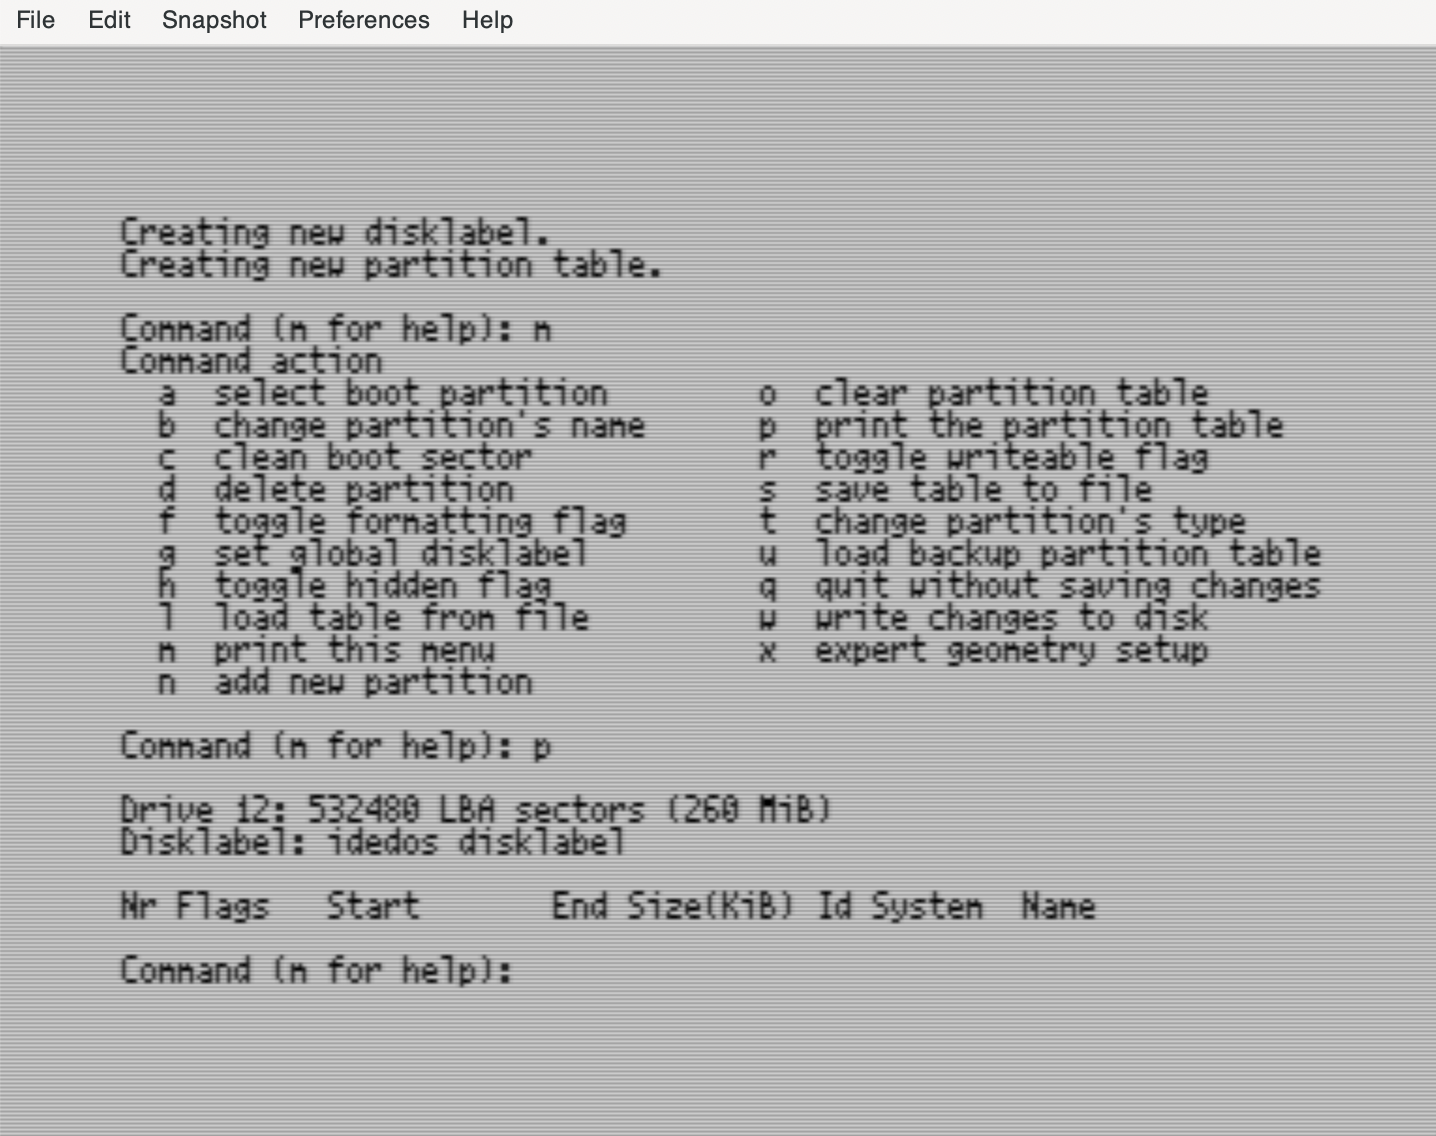
CFSfdisk - Help Menu and Partition List
You can list the current partition table using the "p" command (print the partition table.) On an empty disk image, there will initially be no partitions.
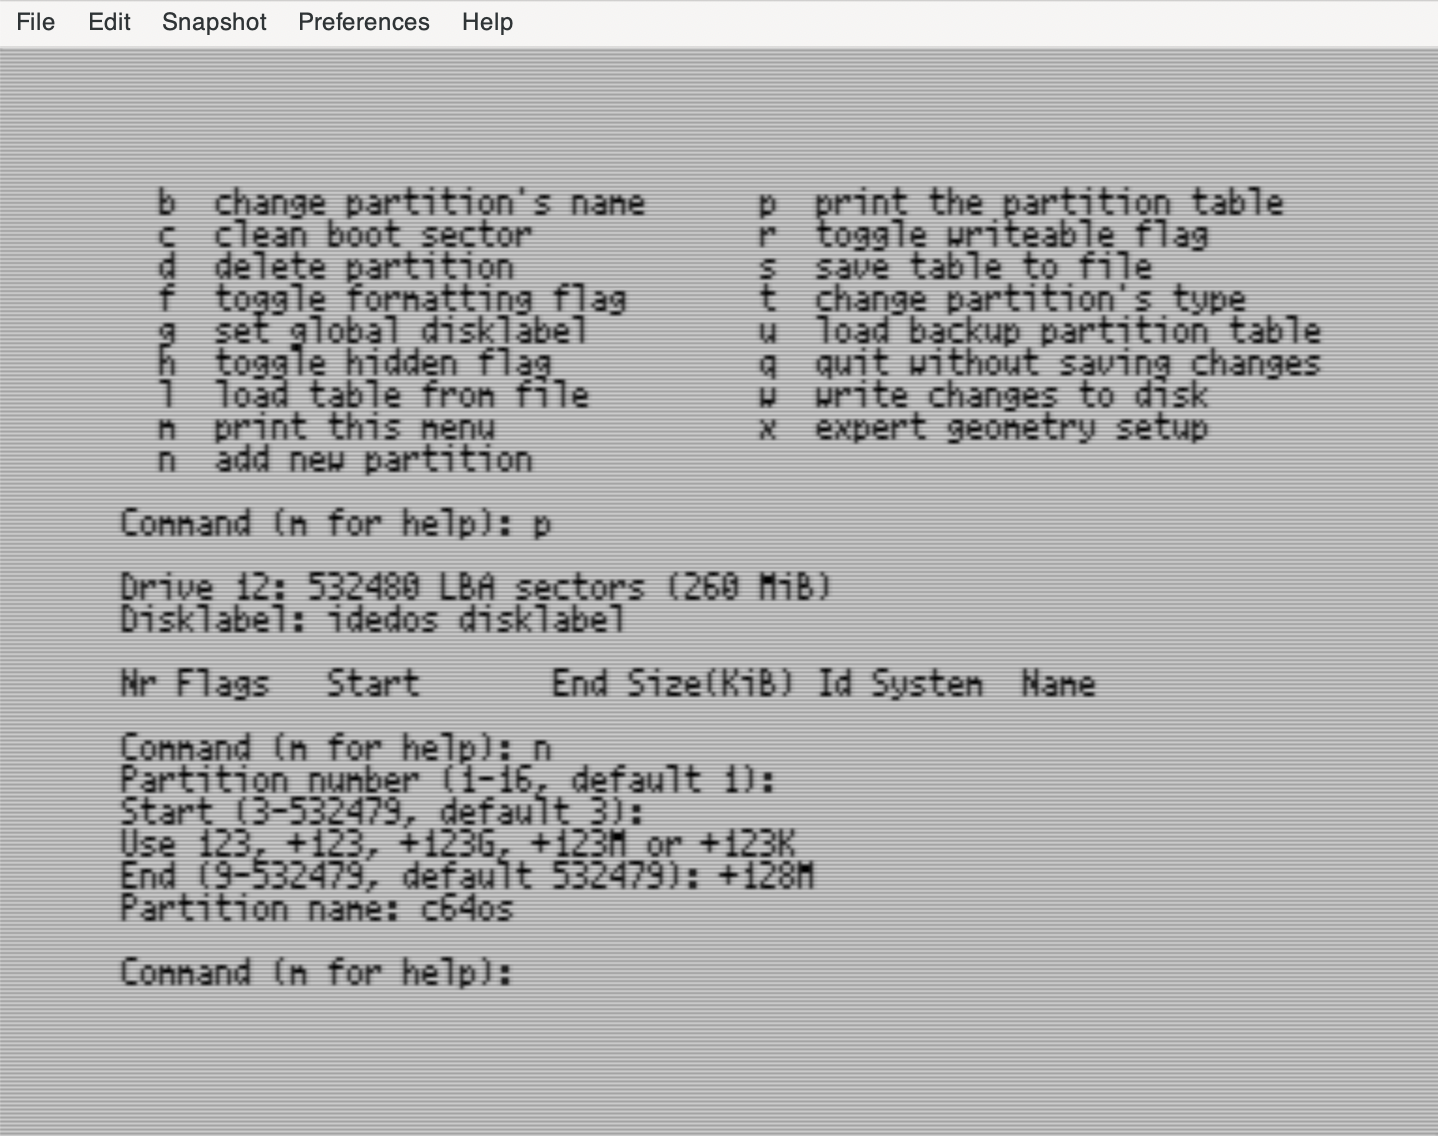
Create a new partition using the "n" command. It asks for a partition number, the default for the first partition is 1, press RETURN to accept this.
Next is a starting block position on the virtual medium. The default value should be accepted by pressing RETURN.
Next it asks you how much space this partition should use. There are multiple ways to express the space it should use. The recommended C64 OS configuration is a minimum of 2 partitions. Earlier we configured the disk image to have space for two 128MB partitions. The size for the first partition can be expressed by entering +128M and pressing RETURN.
Finally it asks for the new partition's name. This name appears in the partition directory. The recommended C64 OS configuration is for partition 1 to be called "c64os" (or something similarly identifying it as the C64 OS system partition). Press deleted to remove the default name, and replace it by typing "c64os" and press RETURN.
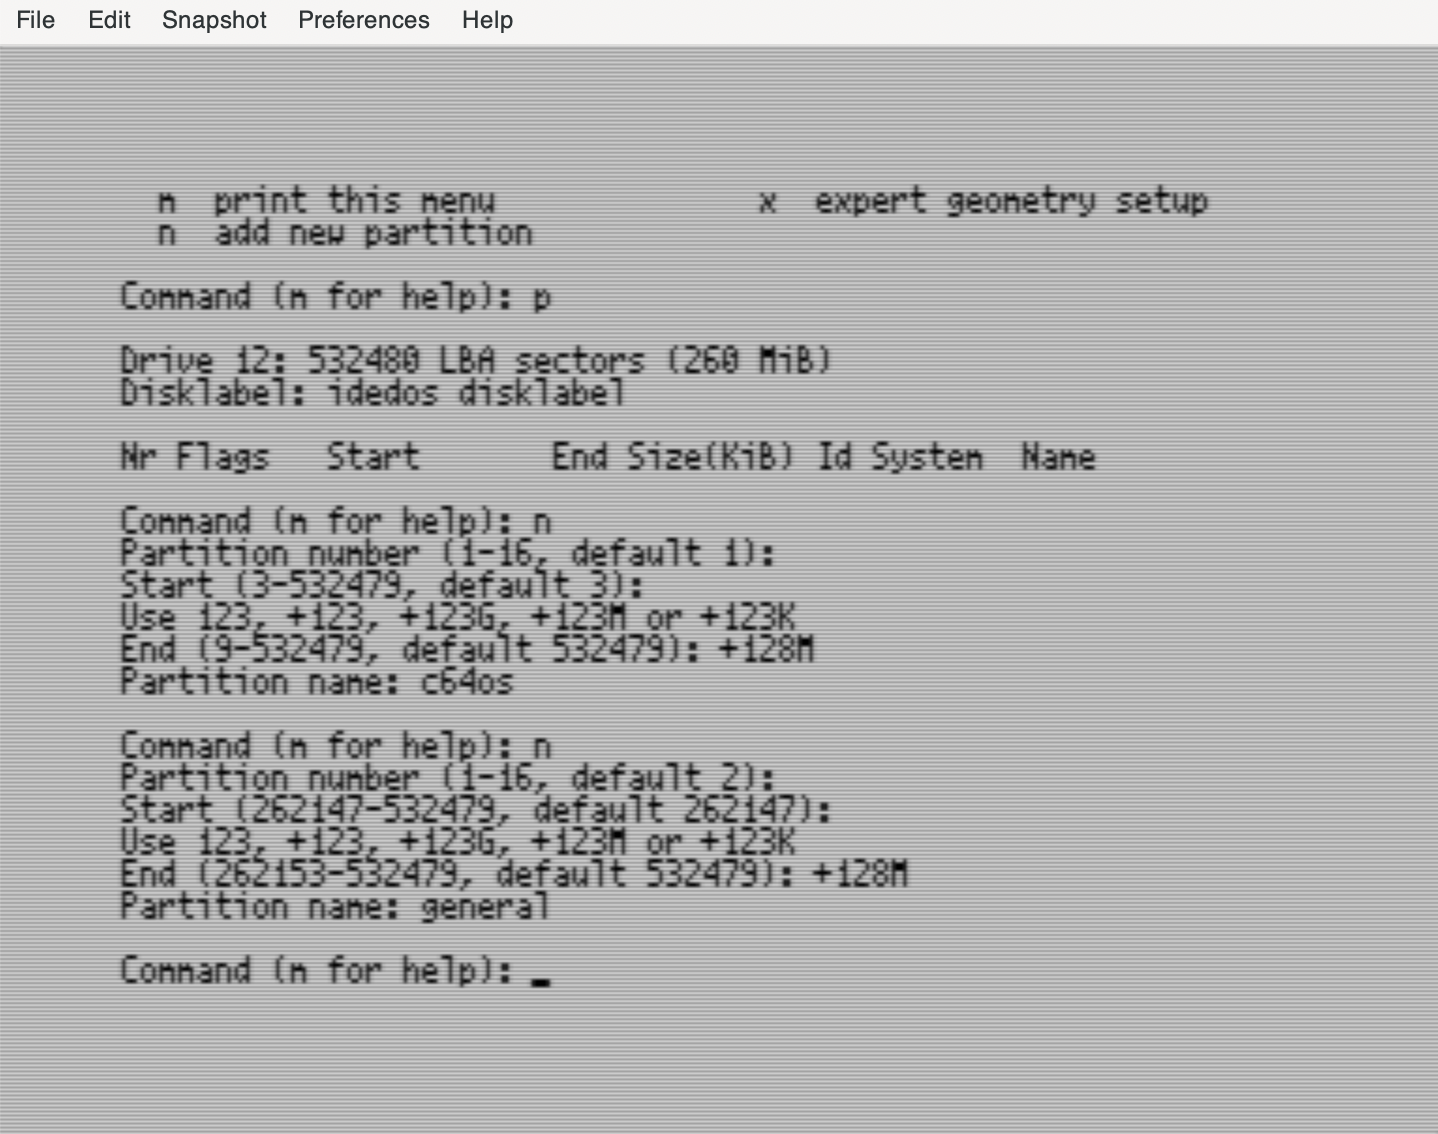
Repeat the steps above to create partition 2. Create a new partition by pressing "n" and RETURN. press RETURN again to accept the default partition number, 2. Press RETURN once more to accept the default starting offset on the virtual media.
The disk image has enough room for two 128MB partitions. Enter "+128M" and press RETURN to set this partition's size. Press delete to remove the default partition name, type "general" or a name something like this, and press RETURN to accept this name.
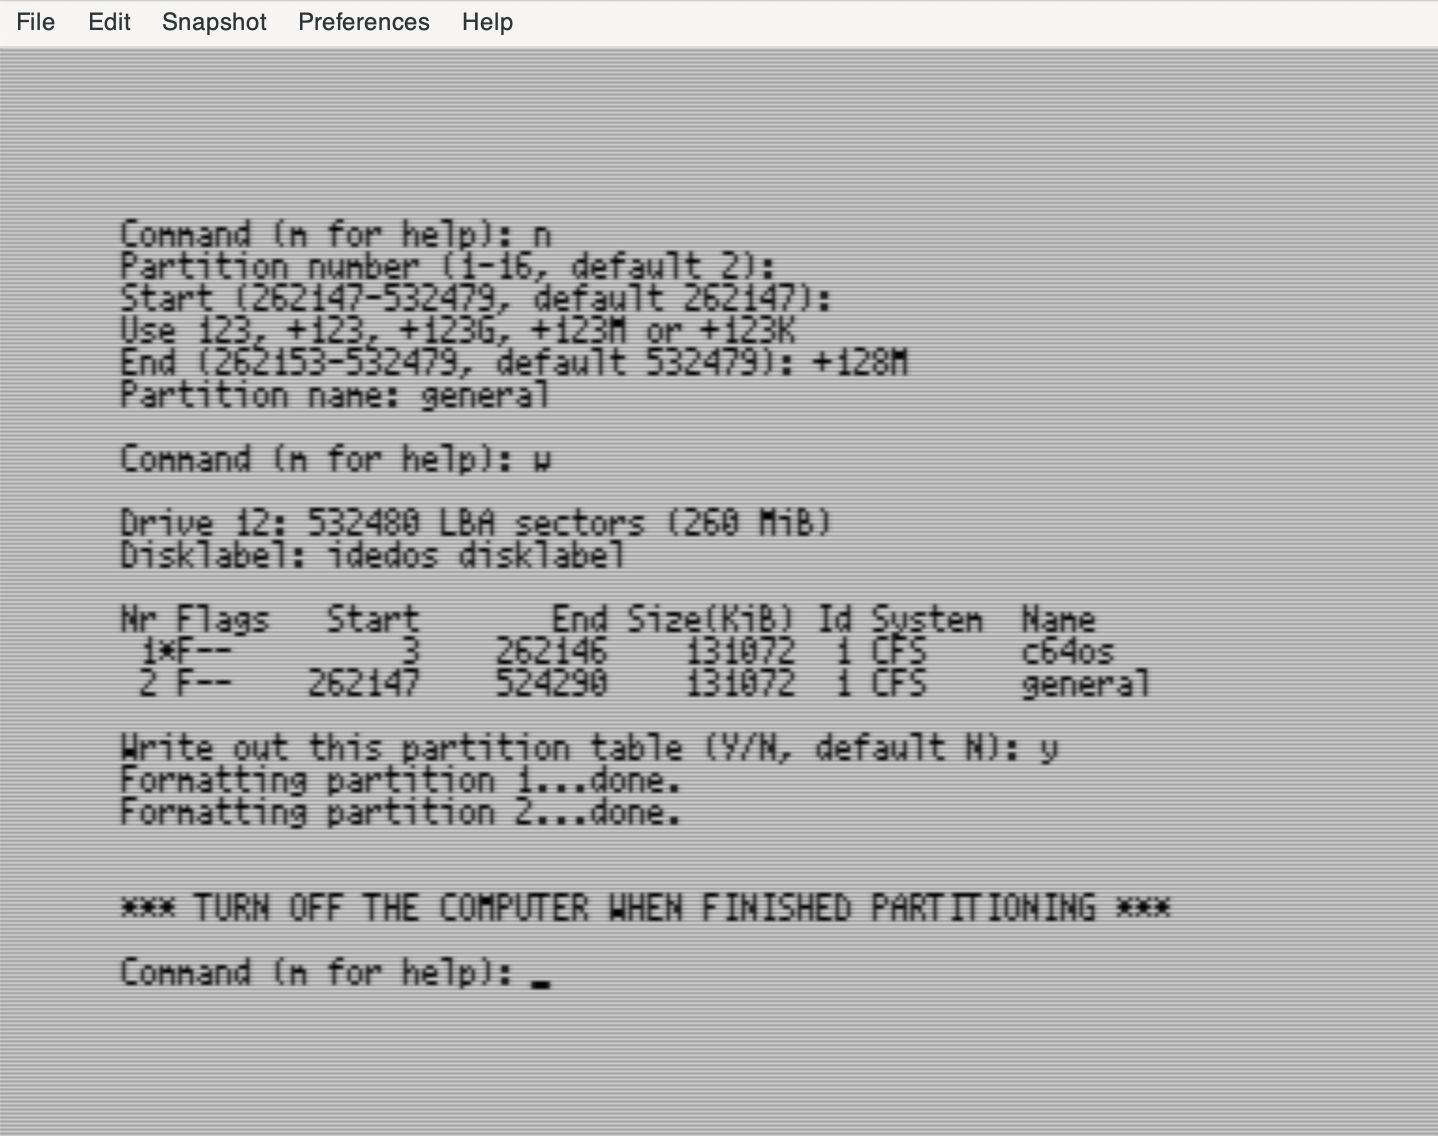
CFSfdisk - Write the Partition Table
Changes made to the partition table have not yet been committed to the virtual medium. To make the partition table changes permanent use the "w" command, write changes to disk. Confirm that you really want to make these changes by typing "y" and pressing RETURN. When the partitions have been created you are instructed to power off the computer.
If the IDE64 was not previously configured to have Direct Write enabled, you will get an error trying to write the partition table and will have to start again. After performing a VICE reset the IDE64's Direct Write mode reverts to disabled.
Reset VICE by choosing File → Reset → Hard reset. You will see the IDE64's standard start up screen before being returned to the READY prompt.
If everything worked correctly there should be 2 partitions available. Press CONTROL+D to cycle through the available devices. If pressed repeatedly it should cycle through 8 and 12. With device 12, the IDE64, selected, type "dir" and press RETURN. This should list a directory showing the empty contents of the root directory of the default current partition, partition 1.
From the READY prompt, issue the following command:
@$=p
This should list the IDE64's partition directory, and you should see the two partitions. More advanced options for partitioning the IDE64 and configuring special flags and options can be found in the IDE64 User's Guide.
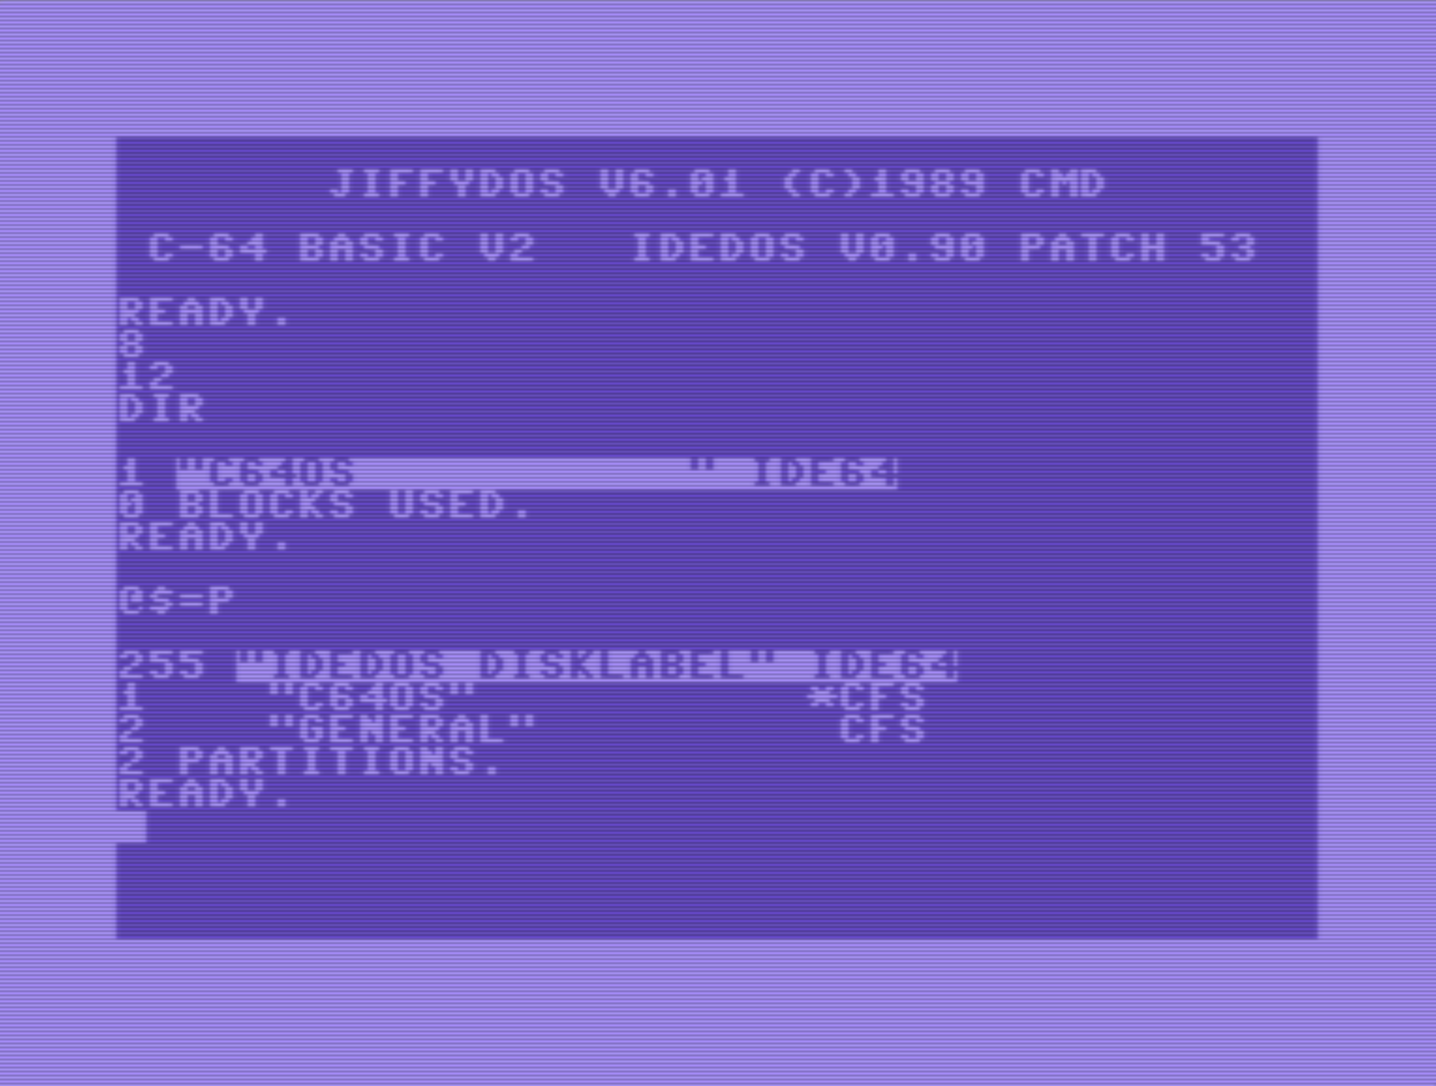
IDE64 - Two partitions in the partition directory
Transfer files over PCLink
In this final section of the guide for advanced installation using IDE64 on VICE, configuration and basic use of PCLink and the ideservd program is discussed.
PCLink is a convenient means of quickly and easily transfering large files from the Mac or PC's host file system directly to the file system of the emulated IDE64. PCLink with real IDE64 hardware is available over multiple physical connections. In VICE, PCLink can be emulated for transport over USB. This was selected at the beginning of this guide in the IDEDOS firmware.
When configured, PCLink appears to the C64 as another standard device number. To copy the C64 OS files from the PCLink to your IDE64's new partitions, you can use the IDE64's built-in File Manager or you can use the FileCopy tool provided by OpCoders Inc found in the important resource links at the bottom of this page.
Download and compile ideservd
ideservd is a small server program which is run on a Mac or PC. It provides the PCLink firmware running on IDE64, on the C64 in VICE, access to a directory of files stored on the Mac or PC's host file system.
In the important resource links below is a link to the IDE64 Downloads page. This is a page that provides downloads for documentation, tools, utilities and such to support IDE64. Under the SW Tools for IDE64 section, there is a download "PCLink Latest". Click to download this to a Mac or PC, and unzip the package. It contains an ideservd.exe executable command line program pre-compiled for Windows. It also contains source code for other platforms such as linux or macOS.
To compile for macOS, open the Terminal application and change to the src directory.
Change to a directory with macOS
Type "cd " (mind the space) but do not press RETURN yet.
Drag the "src" folder from the Finder onto the Terminal window. This copies the folder path to the Terminal, following the "cd " command.
Press RETURN and the shell running in the Terminal will be taken to the ideservd's src directory.
Type "make" and press RETURN. You may have to have XCode installed, which is available as a free download from the Mac App Store. If you have XCode installed already, it may ask you to confirm the license agreement. Follow the instructions it provides. After the license has been agreed to, run the "make" command again.
Wait for the compilation process to finish. When it finishes you will have a new executable program called "ideservd" in the src directory. ideservd is a command line program, so you need to run it from the Terminal in macOS or from the Command Prompt in Windows. You may copy this to a directory that is in your path, such as /usr/local/bin, to have access to it from anywhere.
ideservd supports all of the many different physical transport layers that PCLink supports. Below are instructions for how to use ideservd over VICE's emulated USB PCLink.
Using ideservd with VICE
The ideservd program has a special mode just for VICE. Support for the USB server must be enabled in VICE's IDE64 settings.
Open settings by choosing Preferences → Settings... from the menus. From the left side, unfold the Cartridges section and select IDE64. Near the top of the right section check the box to "Enable USB server". The default address used by both VICE and ideservd is "ip4://127.0.0.1:64245". Confirm that this is what appears in the USB server address field. Close the settings window by clicking Close at the bottom right. Save settings by choosing Preferences → Save settings from the menus.

VICE - IDE64 USB Server Settings
From the Terminal in macOS, or Command Prompt in Windows, ideservd will serve the current directory as the PCLink root directory, by default. If you have copied ideservd into a place for binaries somewhere in your path, you can run it from anywhere. It is recommended that you create an empty directory somewhere, specifically for sharing with IDE64. The following are instructions that can be used on macOS or Linux.
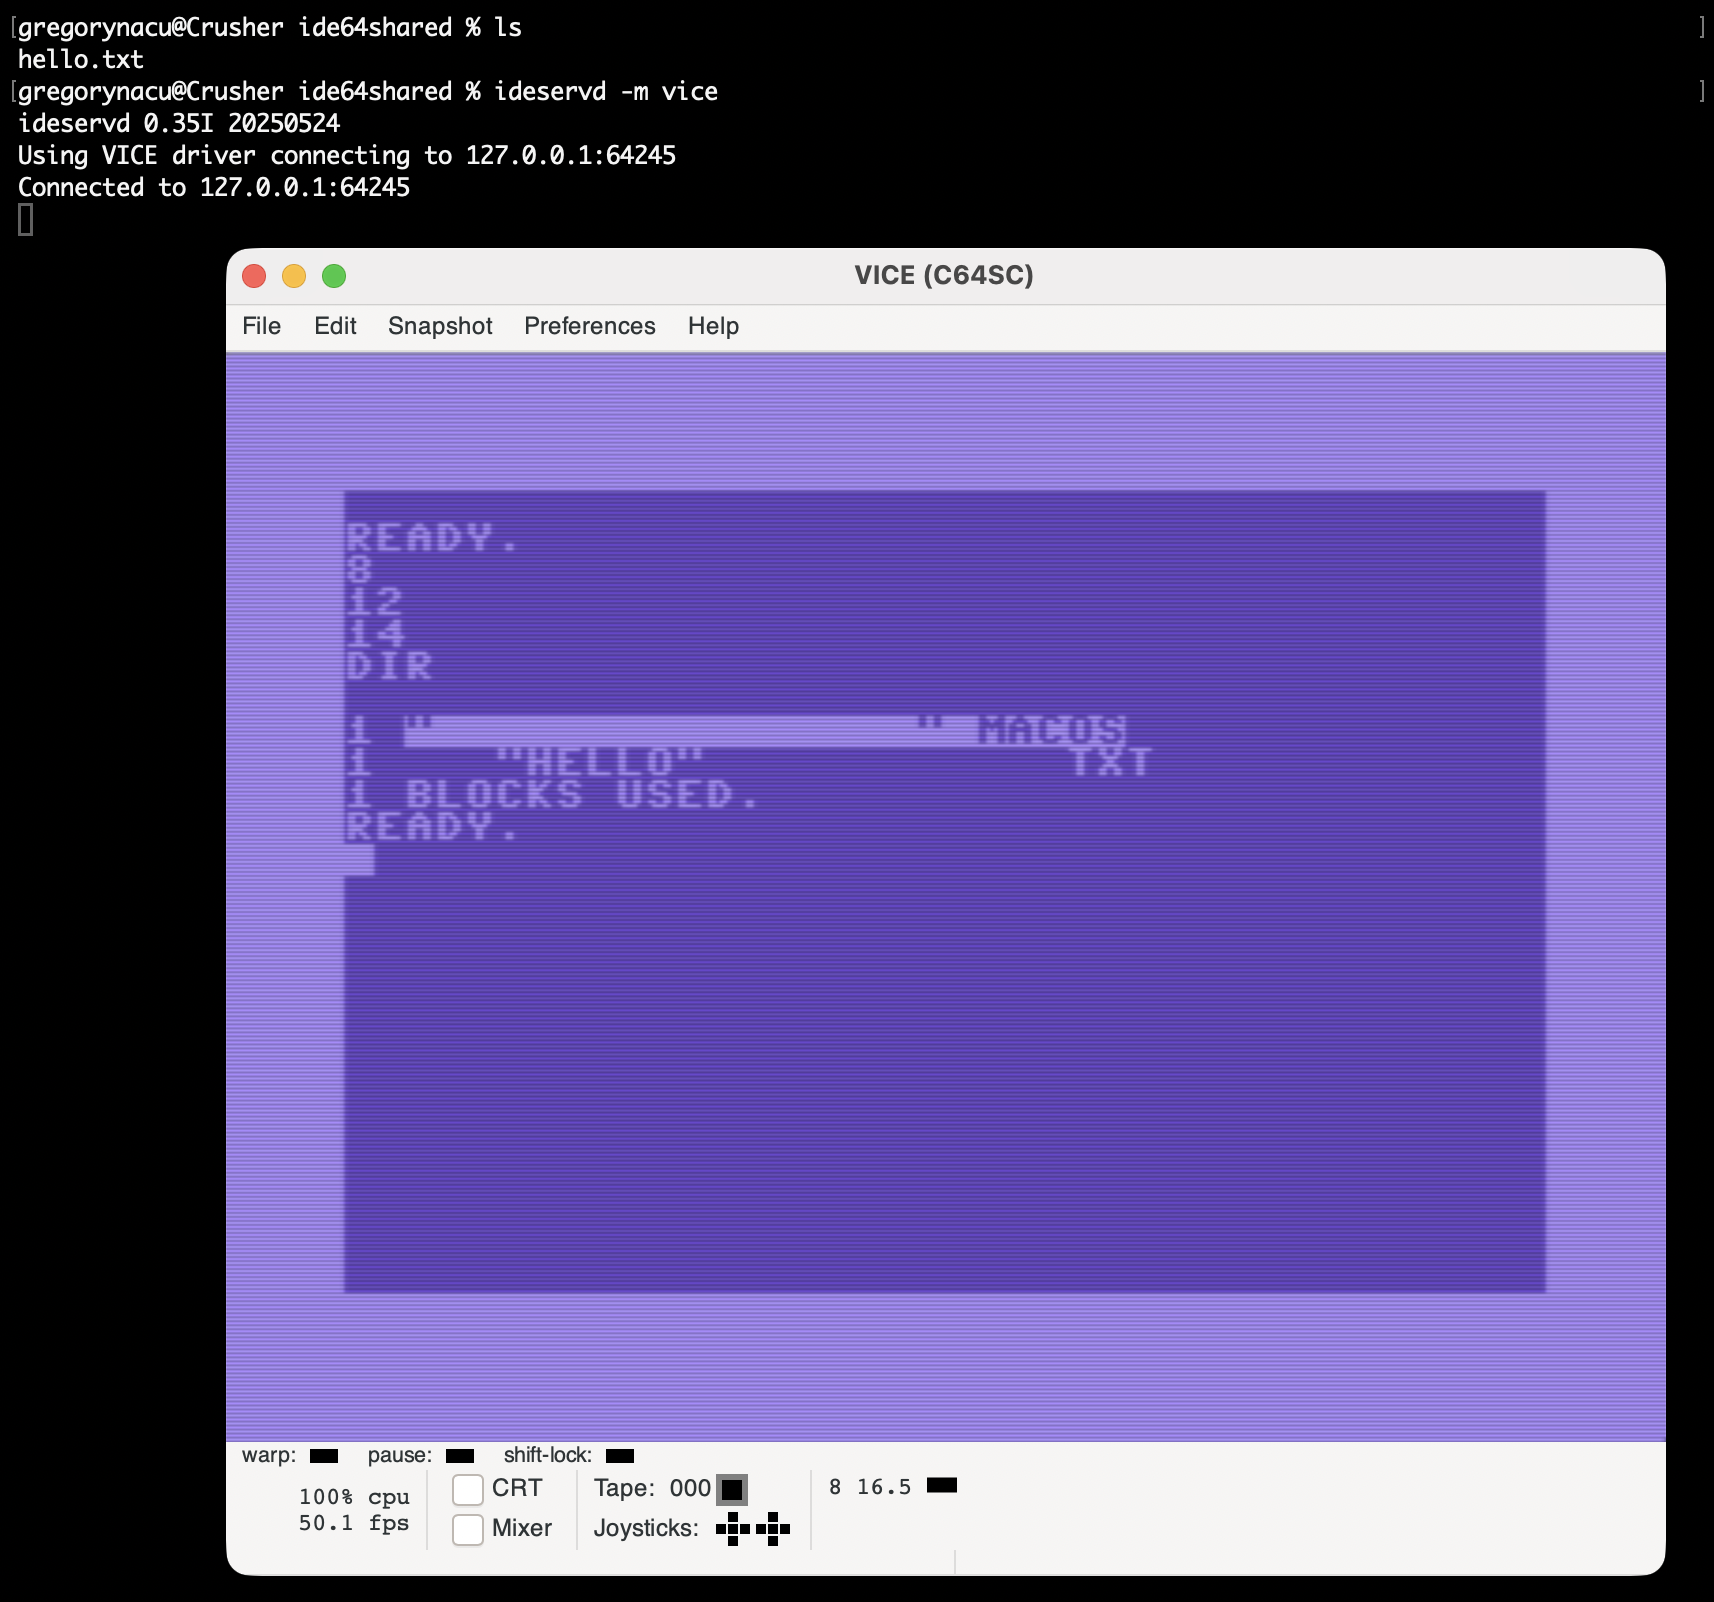
Create a directory in your home directory called "ide64shared"

cd ~
mkdir ide64shared

Change into the new directory and start ideservd

cd ~/ide64shared
ideservd -m vice
The -m flag is used to specify the transportation mode. ideservd has a special mode just for VICE. After starting ideservd, it should attempt to connect to VICE, and you should see the following output:
Using VICE driver connecting to 127.0.0.1:64245
Connected to 127.0.0.1:64245
From the C64 (READY prompt in VICE), the PCLink device (configured for device #14 by default) suddenly becomes available. Hold the CONTROL key and press "d" to cycle through the detected storage devices and set the current storage device. Device #14 should be in that list. If it is, list a directory from device 14 to see the list of files that are stored in the shared directory from the Mac or PC.
See below for additional options that can be configured for ideservd. Of particular interest is the behavior of the -P option.
Additional options for ideservd
There are a few important options that can be configured when running ideservd. To see all of the options type "ideservd -help" and press RETURN.
The -r option allows you to specify an alternative directory to serve to the IDE64, rather than the current directory.
The -l option can be used to specify a log file of accesses that the IDE64 makes over PCLink.
The -b option can be used to put ideservd into the background. This allows you to close the Terminal or Command Prompt window and ideservd continues to run.
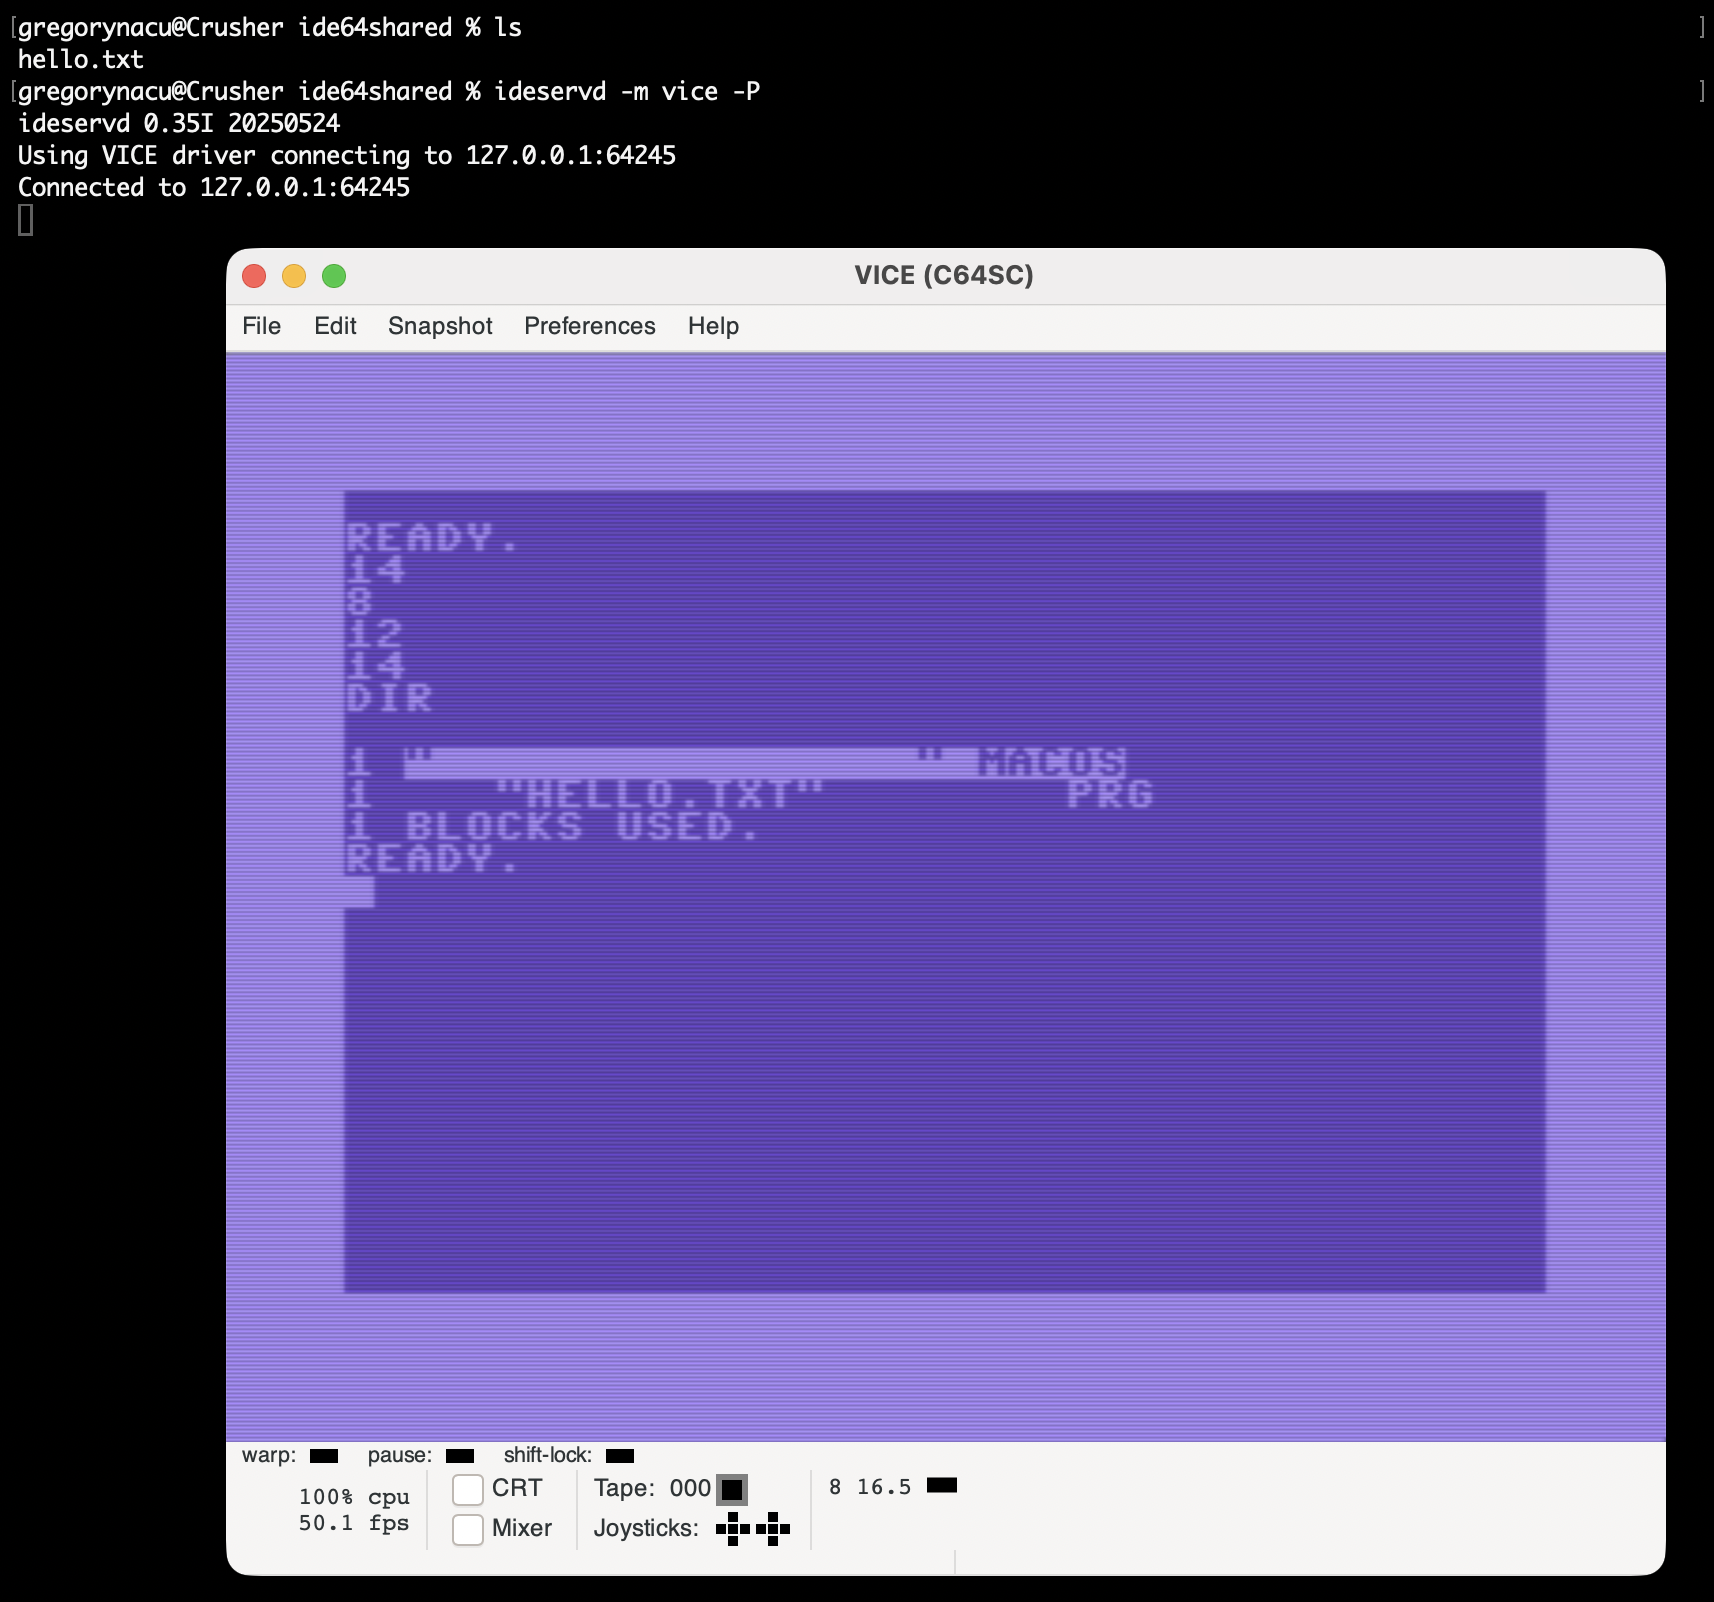
Using the -P or --allprg option is recommended, so that the C64 sees all of the files provided by the PCLink device as PRG-type files. See details below.
Importance of the -P option
IDEDOS has the non-standard ability (compare to other devices: 1541/1571/1581, CMD HD, FD, RL, or SD2IEC) to display any arbitrary CBM file type, not limited to PRG/SEQ/USR/REL/DEL. When PCLink is started without the -P option, its default behavior is to remove 3-character extensions from filenames and use those as the CBM file type instead.
This can be useful if the files in the host file system have extensions .prg or .seq, these will then get used as the standard PRG and SEQ CBM file types. However, C64 OS uses a myriad of filename extensions and it is critical that these not be stripped from the original filename.
See the example below on the left. Without the -P option, the filename in the host directory is "hello.txt", but in the PCLink directory the name has been reduced to "hello" with the non-standard CBM file type of "txt".
Compare this with the example below on the right. The -P option has been used with ideservd, and now in the PCLink directory the file lists as "hello.txt" with a CBM file type of PRG. Although this file really ought to be a SEQ-type file (text is just sequential data), having it list as PRG but with the full and correct filename (hello.txt) is acceptable.
Filecopy to transfer files to IDE64
The easiest way to transfer the C64 OS installation files over PCLink to the IDE64 is to copy the 4 installation files, plus the filecopy tool, into the directory that ideservd is sharing.
The filecopy tool is linked below under Important Resource Links. This tool is provided by OpCoders Inc. to make it easy to copy a file between any two C64 devices. No device detection is attempted, no special commands are required, and it is therefore a universal single-file two-drive file copier. Download filecopy and put it in the directory shared by ideservd.
Take the four C64 OS installation files from the system SD Card, or from a backup of the system card that you have made, and put them in the directory shared by ideservd.
- filecopy
- c64os
- c64os setup
- restore.car
- c64restore
Filecopy can be loaded and run directly from the PCLink device. The following assumes that the IDE64 device numbers are their defaults, the primary IDE64 device number is 12, and the PCLink device number is 14. Set the current partition number of the primary IDE64 device to the partition to which you want to install C64 OS, and make sure that current partition's current directory is the root directory.
Press CONTROL+D until 12 is the default device

Change to partition 1

@cp1

Change to the root directory

@cd//
Load and run filecopy from the PCLink device:
load"filecopy",14
run

filecopy tool
Filecopy only copies one file at a time. It asks 4 questions. Source device #, target device #, filename, and lastly, target file type, PRG or SEQ. It then copies the file and returns to the READY prompt. Filecopy is still in memory, and you can copy the next file by typing "run" and pressing RETURN to run filecopy again.
Run filecopy 4 times, to copy each of the 4 C64 OS installation files to the primary IDE64 device. When it asks for the source device #, enter 14. When it asks for the target device #, enter 12. Enter each of the 4 filenames, once per run of filecopy, and choose "p" for PRG for each of the file types. restore.car may optionally be copied as a SEQ file, but the others must be copied as PRG type files.
Note that restore.car is, by Commodore 64 standards, a very large file. It is over 3000 blocks. It is expected that copying this file will take several minutes. Do not interrupt the process, but allow it to run to completion. If it is still running after 20 to 30 minutes, it is possible that something has gone wrong.
While the file copy is taking place, you may enable VICE's warp mode to accelerate this process.
Final Installation
The C64 OS Installation files are now successfully installed on your IDE64 device. You may now proceed with the standard C64 OS installation process as documented in Chapter 2. Installation → Installation on IDE64.
Important resource links for VICE configuration
You need to create an IDE64 cartridge image created from the IDEDOS download system. The cartridge is configured with IDEDOS 0.90, the latest stable version, and compiled with some options. The instructions above describe which options are best for use with C64 OS in VICE.
http://singularcrew.hu/idedos/compile.php
To manage IDE64 storage and create new partitions, you need the IDE64 Utilities disk image which you can download here.
This utilities disk is not required to use C64 OS with the pre-configured IDE64 hard drive image, but it can still be useful if you want to perform additional, optional or advanced configuration.
IDE64 tools, utilities, user's guide, other documentation, plugins, and other cross-platform programs to support and work with IDE64 can be found on the IDE64 Download page. The PCLink (ideservd) software is available on this page, select "PCLink Latest".
http://www.ide64.org/down.html
You will need to copy the C64 OS installation files to the IDE64. The easiest way to do this is with the FileCopy tool by OpCoders Inc. It is available from the C64 OS Software Releases page, or you can directly download it here:
https://s3.amazonaws.com/com.c64os.resources/c64os/software_installs/filecopy
Next Chapter: Configuration and Settings
Table of Contents
This document is subject to revision updates.
Last modified: Feb 14, 2026