NEWS, EDITORIALS, REFERENCE
NEOS Mouse: Reborn
Have you ever heard of the NEOS mouse? You've probably heard that it sucks. And that impression is well earned. But there is a good reason for this, so let me explain exactly why it sucks and what we can do to make it useful again and give it a fresh breath of air.
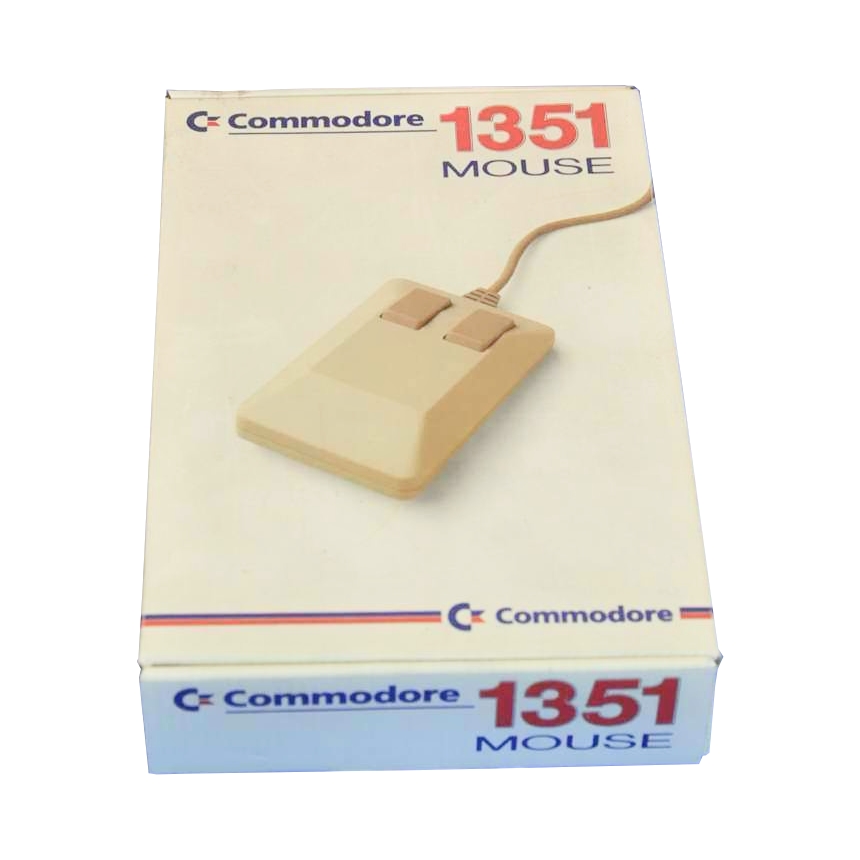
For some context, the standard mouse on the C64, C128, and compatible computers is the Commodore 1351 mouse. You're probably familiar with this one. Many people think of it as a "GEOS" mouse, because it shipped concurrently with the introduction of GEOS. And of course, using a real mouse with a graphical user interface is a huge step up in ease and productivity. Here's what the 1351 looks like:
If you've been around the block, you have probably also heard that you should steer clear of the infamous Commodore 1350 mouse. (Beware that little "0" rather than a "1".) The 1350 mouse is a joystick in mouse clothing and it totally stinks. To use a 1350, you have to continually roll the ball in a given direction, and while the ball is rolling the mouse effectively presses the joystick UP, DOWN, LEFT or RIGHT direction buttons. The cursor itself moves at a constant pace, just as though you were using a joystick. So, it's only as useful as a joystick for input but in a much less convenient format; your arm gets tired much faster having to constantly move the mouse, than your thumb gets tired having to constantly hold down a button. I have no idea why Commodore even bothered to make the 1350.
Shortly thereafter, they released the 1351, which is a true proportional mouse. It uses the SID chip's analog POT lines to read the ball movements. For this reason, it can only be used on a C64 and C128, which have a SID chip. It doesn't work on a VIC-20, for example, and it won't work on your C64 if it's missing the SID chip or has a simpler SID chip replacement that doesn't support the POT lines. (I'm lookin' at you SwinSID Nano.)
The 1351 went on to establish the mouse standard for the Commodore 64. Adapters, such as MicroMys, mouSTer, and a bunch of other lesser-known ones, make more modern mice (PS/2 or USB) behave like the 1351.
What is the NEOS mouse?
The NEOS mouse was released in 1985, the same year as the underwhelming Commodore 1350. The NEOS mouse is a true proportional mouse, so in that respect it's better than a 1350. However the Commodore 1351 was released just one year later in 1986, and that quickly put an end to any interest in the NEOS mouse.
You can read more about its details in this C64-wiki article. Unfortunately the article is not written by an English-first-language speaker so it is a bit stilted and hard to understand. The article says that the NEOS mouse is GEOS compatible, but this is not quite true. It's only GEOS compatible when NEOS is put in joystick mode. The joystick mode makes NEOS behave just like a Commodore 1350, so that's not exactly great. GEOS does not have a driver for the NEOS mouse in its native proportional mode. We're about to dive in and find out why.
Here's what the NEOS mouse looks like. Its body shape is similar to the 1350/1351 or the original Amiga "tank" mouse. Its edges are a bit more rounded, the two buttons are blue instead of beige. They have little ridges on them and are slightly rounded at the front. To be perfectly honest, I find the NEOS mouse comfortable to hold. I don't think it looks bad at all and, its build quality actually feels much better than the Commodore 1351 mouse.
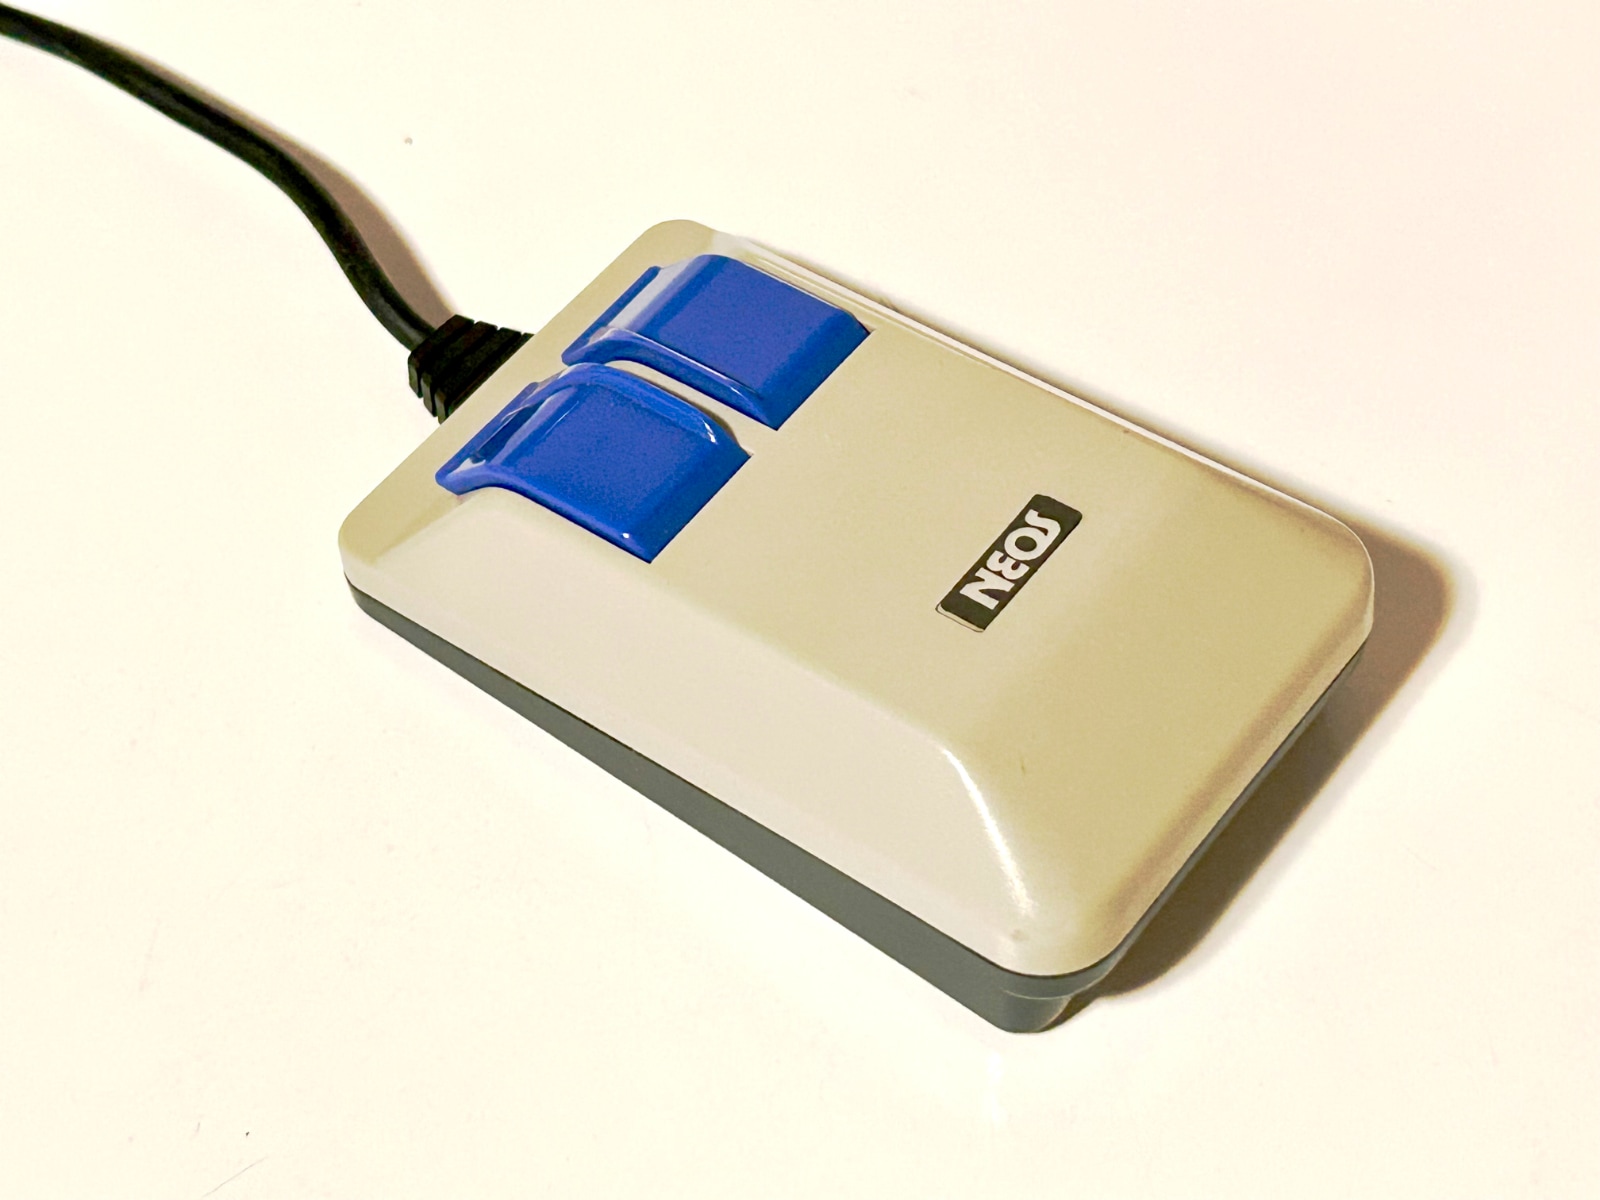
NEOS Mouse — This one is my own.
The little pads on the bottom (that make the mouse slide on a surface) feel more robust; the cable feels more flexible and slightly smoother and more rubbery, in a higher quality way. The cable's connector at the end is slimmer, more like a joystick than like the 1351's bulky block connector. The mouse itself feels slightly heftier; it's just a better overall build quality. Commodore was known for being cheap, not for being high quality, so this shouldn't surprise anyone.
How do joysticks and mice work?
And what's wrong with the NEOS mouse?
The problems with the NEOS mouse are the direct result of how it works.
The NEOS mouse was originally created for the MSX computer. This was a computer standard made by the ASCII Corporation from Japan, with an architecture conceived of by Microsoft. It was manufactured by several companies, including Sharp and Sony.
In order to make that mouse work on the Commodore 64, only very minimal changes were made, mostly to the wiring in the connector. In other words, this is not a product designed with the C64 as a first-class citizen.
It's a bit complicated and requires some background. To that end, let's talk about how a C64 joystick works, then how the 1350 works, then the 1351. I'll briefly mention how the MicroMys and mouSTer adapters work, and then finally we'll talk about the NEOS mouse in this context.
How does a joystick work?
The C64 has two CIA chips, one is for the User Port and IEC serial port, and the other one is for the keyboard plus the two controller ports.
The CIA has two 8-bit data ports, whose bits can be independently configured for either input or output. To scan the keyboard, one of those two ports is set as inputs, and the other is set as outputs. The keyboard, more or less, consists of 64 keys arranged in 8 columns of 8 keys each. If you imagine the two 8-bit CIA ports forming a matrix, each key on the keyboard is at an intersection in that matrix. I wrote a blog post, How the C64 keyboard works, that goes into much more detail.
What we notice though is that all the bits of the CIA's two ports are occupied just with the keyboard, so how does it also manage to scan the joysticks? The controller ports have to make double use of the same CIA port lines that the keyboard uses. See the snippet of the C64 schematic below.
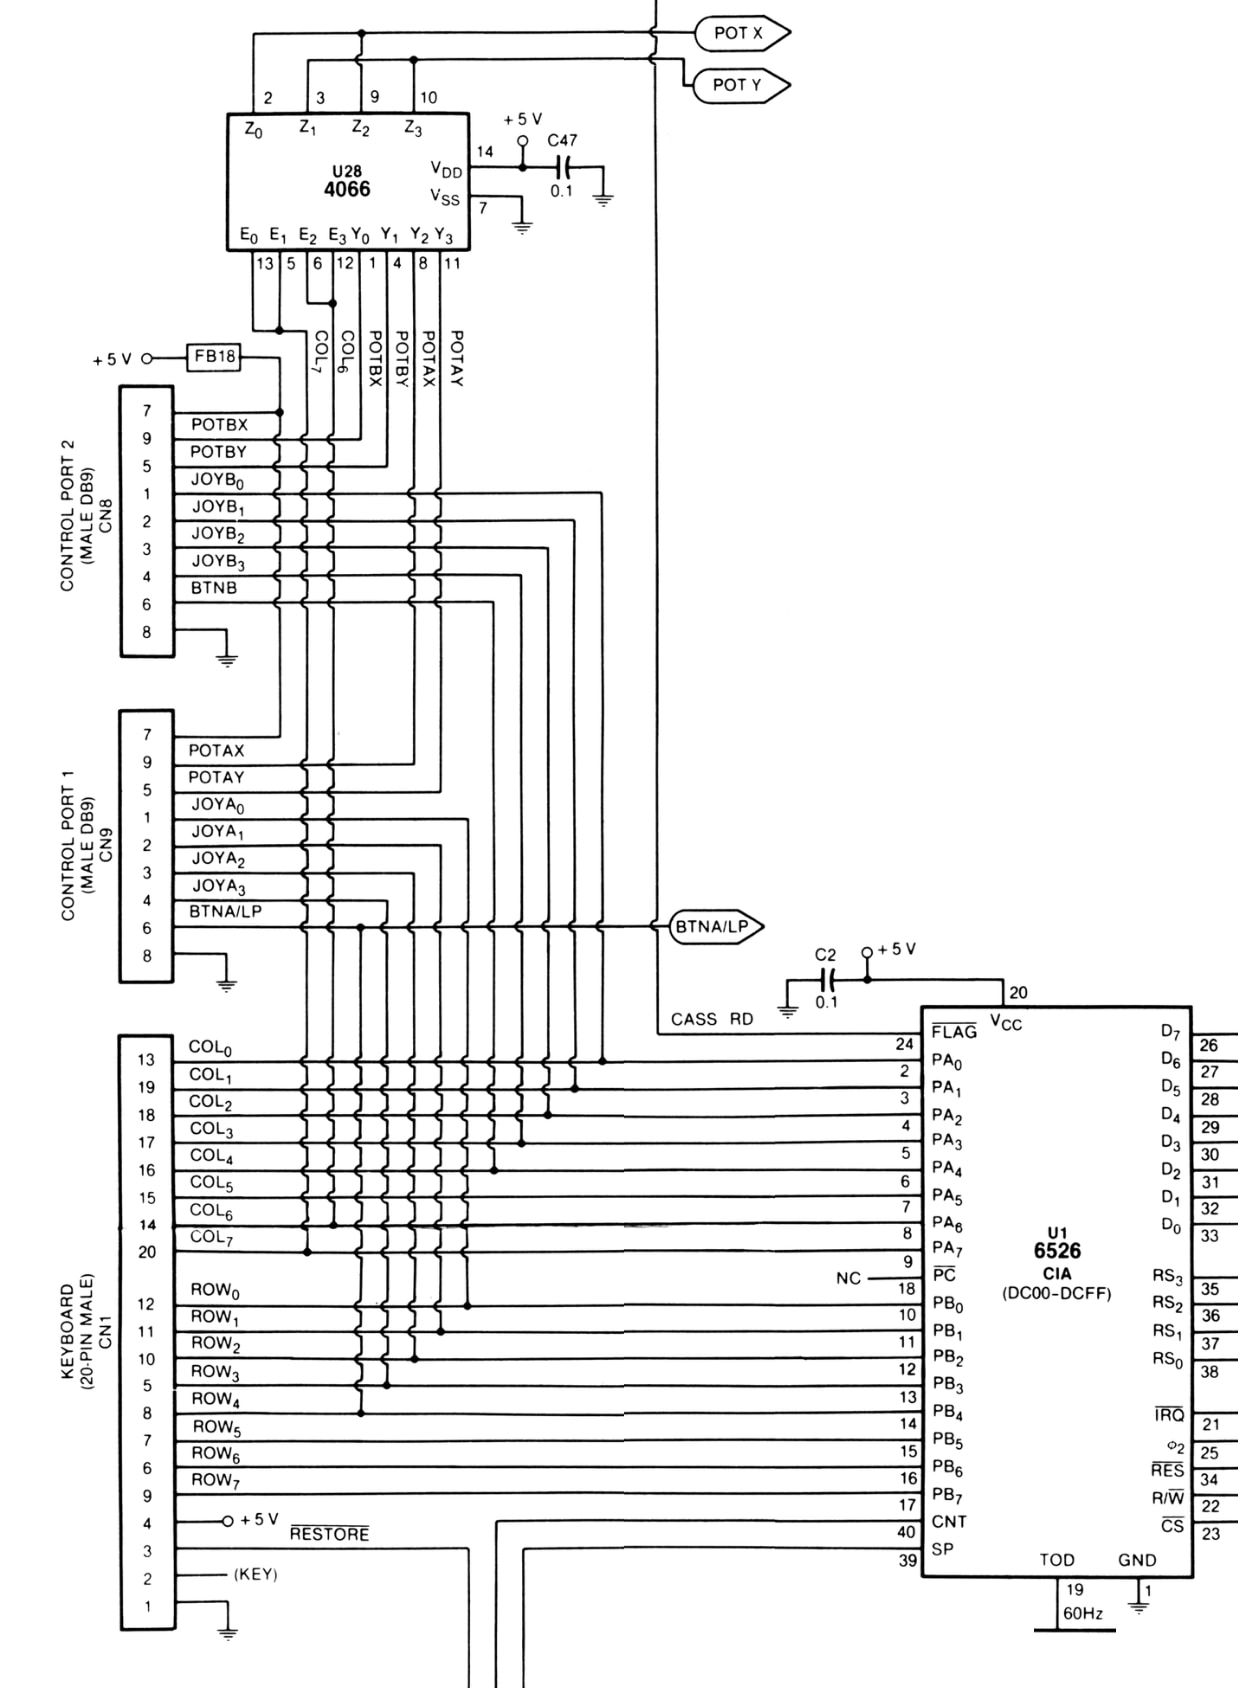
Keyboard, Controllers, Schematic
This schematic has been simplified, removing components that we don't need to focus on. You can see that the keyboard has 8 bits for columns and 8 bits for rows. But the controller ports connect to some of these same lines.
A joystick has five primary digital buttons. UP, DOWN, LEFT, RIGHT and FIRE. And they're digital because these are either open or closed and nothing in between. These five buttons of controller port 1 are connected to the first five bits (b0-b4) of the keyboard's rows. And the same five buttons on controller port 2 are connected to the first five bits of the keyboard's columns. When you press a joystick button, it connects its CIA port bit line to ground. Every C64 user has experienced that if you mess with the joystick at the READY prompt, you'll either see random-looking characters appear on the screen. Or if your buddy is messing with the joystick buttons while you try to type, you tell him to stop doing that(!) because it interferes with the computer's ability to properly read what you're typing. Now it's clear exactly why.
A smarter keyboard driver (like the one in C64 OS) can't fix the problem but it can mitigate the damage. The trick is to clear all the port output lines (no keyboard columns selected) and then read the keyboard rows port and check for any bits pulled low. If a row bit is low when no columns are selected it indicates that a controller port is pulling that line low.1 Since it knows that a controller is causing interference, the driver can skip scanning the keyboard on this interrupt service cycle. The keyboard can't be scanned so it might miss something typed, but it also won't misscan and receive noise. It's not perfect, but it helps.
In addition to the 5 digital buttons, each controller port also has two POT lines, X and Y, which are on pins 5 and 9 of the controller ports. However, it's the SID chip that reads these POT lines, and there is only one SID and it has only two POT registers. Therefore, the C64 includes a 4066 (U28 on the schematic). The 4066 is a 'Quad Bilateral Switch' which can be used to multiplex analog or digital signals. All four controller port POT lines go into this chip, but only two POT lines are output. Two more bits from the CIA's keyboard columns port, bits 6 and 7 are used to switch which controller port's POT lines pass through to the SID chip.
How does a 1350 mouse work?
The Commodore 1350 mouse is essentially always in "joystick mode" (it has no proportional mode). Therefore, it behaves just like a joystick.
While the mouse is being moved upwards (away from you), its output is as though the joystick UP button were depressed. While the mouse is moving downwards (towards you), the joystick DOWN button is depressed. Likewise for left and right. But the mouse has to be continously moving in order for that signal to remain activated (pulled low). So although it looks cool to have a mouse connected to the C64, it's actually less convenient than just pressing and holding down buttons on a joystick.
The left mouse button is wired to the joystick's FIRE button line. And the right mouse button is wired to the POT X line. In order to read the right button, first, the controller port that the mouse is connected to must be selected by the 4066. Then you read the SID chip's POT X register. If it's close to 0 the button is depressed; if it's close to 255 the button is released. The easiest way to distinguish between these is to read the register and then if the high bit is set it's in the upper half of possible values. Conveniently, there are two 6502 opcodes that branch on the the high bit; BPL (branches if high bit is low), BMI (branches if high bit is high).
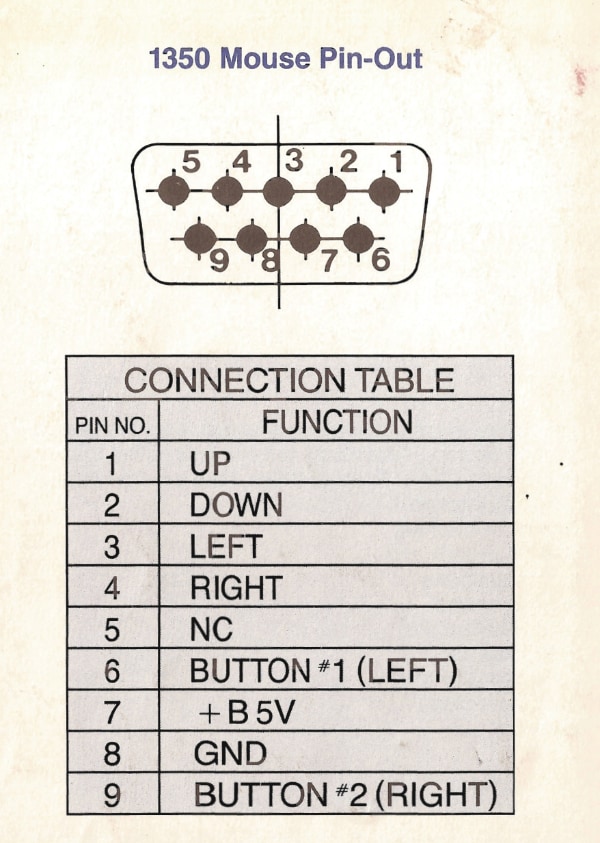
Pin 9 in the table above is listed as Button #2 (RIGHT). And if we look at the schematic further above, we can confirm that indeed Pin 9 goes to POT X.
How does a 1351 mouse work?
For starters, the 1351 has a 1350-compatible mode. By default, it enters its native proportional mode on power-up. To enter the 1350-compatible mode, hold the right mouse button down as you power up the computer. When it's in 1350-compatible mode it behaves exactly the same as a 1350 mouse. Left button = FIRE, Right button = POT X.
The 1351 native or proportional mode is what makes it useful as a mouse. In this mode the X and Y directions of the ball are communicated using a digital protocol transmitted via the POT X and POT Y lines. It's "digital" over an analog signal line, which makes it a bit confusing to program unless you know how it works.
I won't go into huge detail here. You can read my blog post 1351 Mouse and Mouse Driver for all the gory details. But essentially a 5-bit signed number is transmitted to the C64, shifted left by one bit to deal with the inherently noisy nature of an analog signal. (i.e., bit 0 is effectively noise.) When the POT register is read, bits 1, 2, 3, and 4 are shifted right, and bit 5 is shifted left twice, moving it to bit 7. Now you have an 8-bit signed number that represents a distance and direction of travel on that axis.
While the two POT lines handle the proportional movement, the left mouse button is FIRE and the right mouse button maps to joystick UP.
How does MicroMys or mouSTer work?
Besides being more complex and supporting additional modes, their main mode on the C64 is 1351-compatible. In this mode, movements of the mouse are translated to POT X and POT Y values, just like the 1351. Left and right buttons are FIRE and UP, respectively, just as on the 1351.
But there is also support for a mouse wheel. When the wheel is rolled in one direction, the joystick LEFT button is pulsed, as if the user briefly pressed LEFT a few times. When the wheel is rolled in the opposite direction, joystick RIGHT is pulsed. So it is very easy to read mouse wheel movements.
As far as I know, C64 OS is the only C64 software that takes advantage of the wheel extension in these adapters.2 With the MicroMys/mouSTer driver, the wheel movements are captured as mouse events. These are propagated through the object-oriented user interface toolkit, and handled by the TKScroll class. This allows the mouse wheel to scroll any C64 OS UI that shows a standard scroll bar. That's pretty great. It doesn't require any special support from the application itself, as long as its UI is built using the standard Toolkit. Very cool.
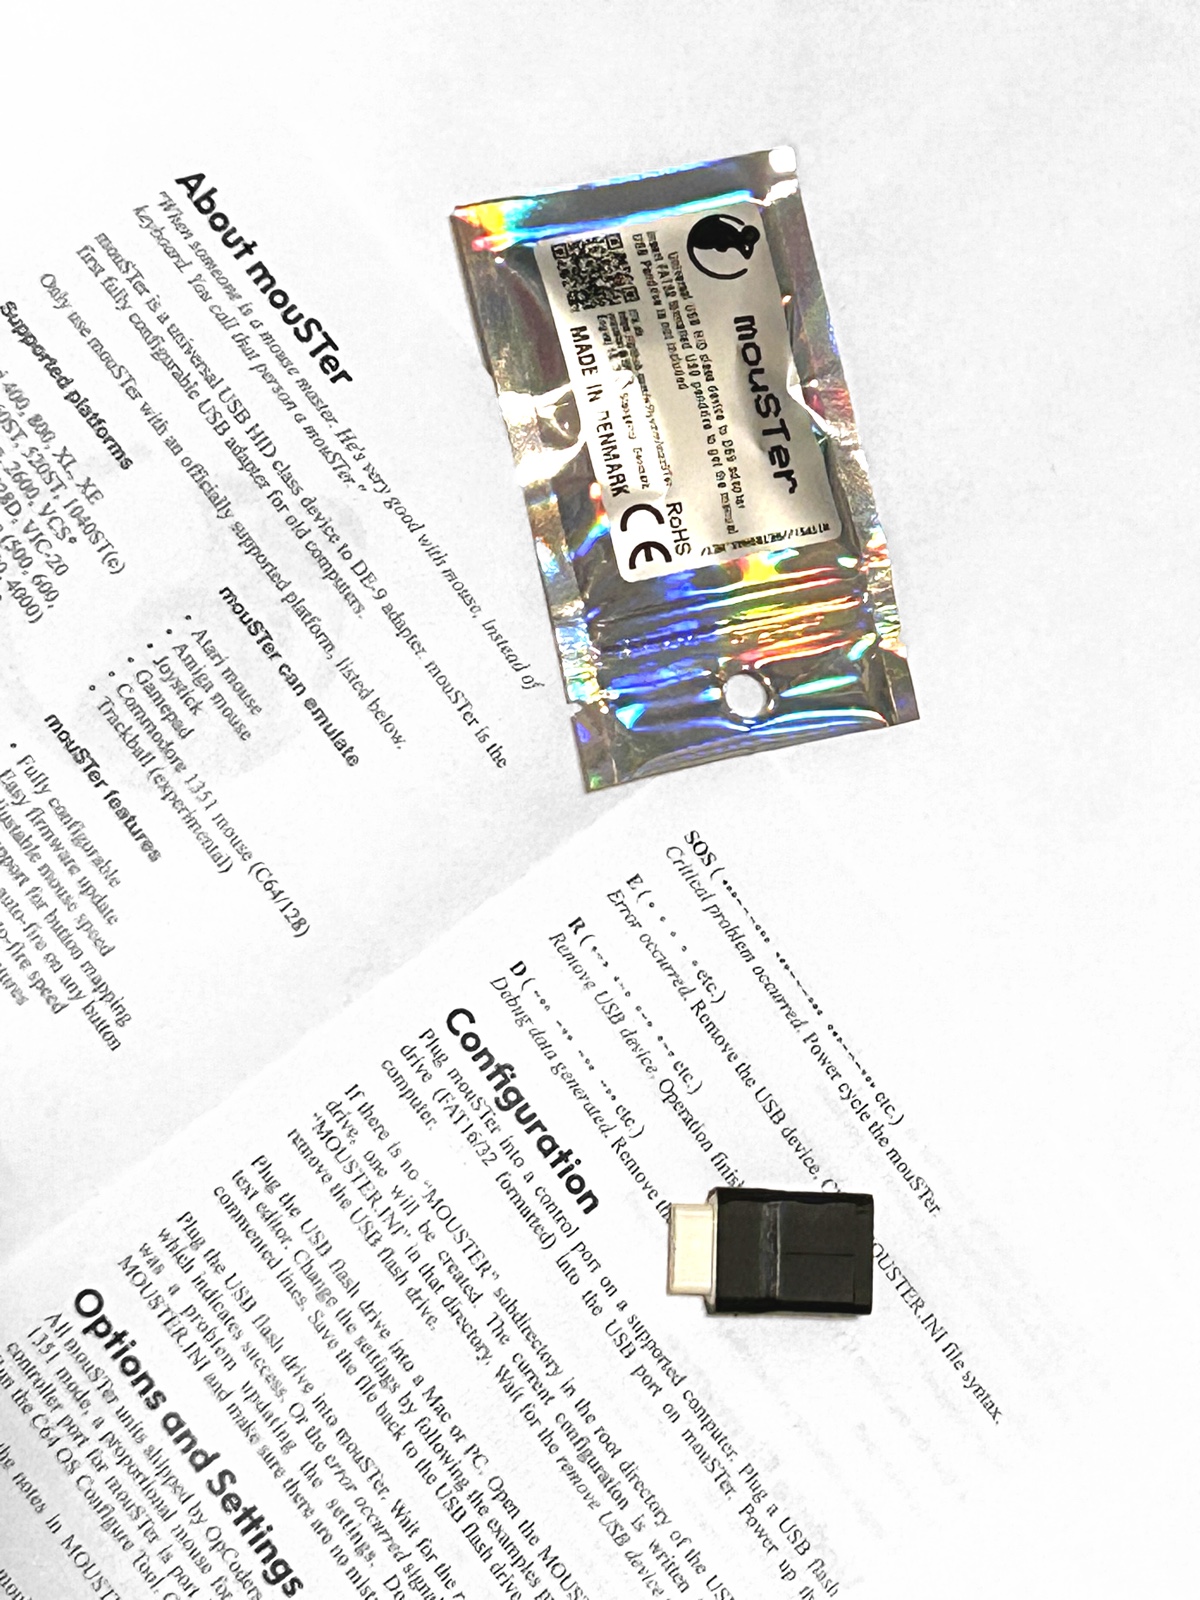
(I am also the official North American reseller of mouSTer. So, please feel free to buy one from the OpCoders Store. 😀 They're a great little device.)
How does the NEOS mouse work?
We now have some pretty good background for learning how the NEOS mouse works and seeing why it's problematic on the C64. Then we can talk about how to fix this.
1350 Mode
First, the NEOS mouse also has a Commodore 1350-compatible mode (just like the 1351 has). Similarly, you can hold the right mouse button down as you power up the computer and the NEOS mouse will behave just like a 1350. In this respect, it is "compatible" with a variety of C64 software. Technically it can be used with any software that uses a joystick. And it can be used with the GEOS driver, which probably also reads the right mouse button from POT X.
However, we've already established that the 1350 mode is pretty junky, so this is just barely a point in the NEOS mouse's favor.
Native/Proportional Mode
In the native or proportional mode, the NEOS mouse doesn't use the SID chip for analog movements. One benefit is that the mouse movements can be read even if your SID chip is broken or missing, and theoretically it could work on other computers that don't have a SID chip (like a VIC-20, but don't quote me on this). In principle though, it doesn't depend on a SID chip.3
Instead, it uses a digital communications protocol that makes use of the five joystick lines: FIRE is used as a strobe signal, and UP/DOWN/LEFT/RIGHT are used to transfer a 4-bit data nybble. The four direction lines make sense to transmit a nybble since they are connected to the low 4 bits of either Port A or Port B of the CIA. We could say they are nybble-aligned, which is convenient.
The protocol is quite simple. First, set the FIRE line as an output. Then in your interrupt service routine (i.e., 50 or 60 times a second) you begin:
- Pull the strobe signal low.
- Delay for around 100 cycles.
- Read the CIA port byte and you've got the high nybble of the X axis.
- Pull the strobe line high again.
- Delay for around 65 cycles.
- Read the CIA port byte again and you now have the low nybble of the X axis.
You then programmatically combine these nybbles and you have an 8-bit signed number representing distance and direction of travel on the X axis. Repeat this sequence again to get the Y axis data:
- Pull the strobe signal low.
- Delay for around 65 cycles. (Not 100 this time).
- Read the CIA port byte and you've got the high nybble of the Y axis.
- Pull the strobe line high again.
- Delay for around 65 cycles.
- Read the CIA port byte again and you now have the low nybble of the Y axis.
Programmatically combine the nybbles and you've got the 8-bit signed value for the Y axis and you're done.
In my experience writing a driver, it is also necessary to reverse the sign of the value, which you can do by taking the 2's complement. I recommend computing the 2's complement after reading all 4 nybbles so as not to complicate the timing or delays between reading the nybbles.
Reading the right mouse button is the same as in 1350 mode, you read the SID chip's POT X, and its high bit is the state of the button. So you do need a SID chip for this, right? Well, we'll come back to this shortly.
What about the left button? The problem is that the joystick FIRE line is used as the strobe signal line. How can you read the left button if you're using that same line as the strobe signal line? At first I didn't think it was possible to read it at all. But it turns out that it is possible, with a caveat. To read the left button, you have to first change the data direction of the FIRE line to be an input. Then read it, and you get the state of the left button. In order to do the nybble transfer timing, I recommend you read the left button last. Set the FIRE line for input, read the left button, set the FIRE line for output again, and then leave it that way until the next interrupt service routine. When that begins, the FIRE line will already be an output, and it'll already be high, ready to be pulled low for the first strobe signal.
The Main Problem
The main problem is that, as we have already seen, the joystick lines are shared with the keyboard interface. As the keyboard driver manipulates the CIA port lines to scan the keyboard matrix, it activates the NEOS mouse's communications protocol, and the NEOS mouse starts actively putting data on the joystick UP/DOWN/LEFT/RIGHT lines. This is then exactly like what happens if you fiddle with a joystick while trying to type. No matter what port you put the mouse in, it either types random gunk on the screen automatically, or it interferes and prevents the keyboard from being scanned.
You might think, well that's just a matter of the driver, right? As far as I can tell, there is no way around this. But even if there were a clever way to write a keyboard driver to avoid this problem, the C64's KERNAL ROM doesn't do any such clever workaround. So if you plug a NEOS mouse into either controller port 1 or 2, and then turn on the C64—you cannot type anything! OMG, that is awful. How was this thing ever sold for use on a Commodore 64?! You can't type anything when the mouse is plugged in.
This is hard to believe, but it's true. Look, I've highlighted the relevant detail in the official NEOS Mouse Instruction Manual.
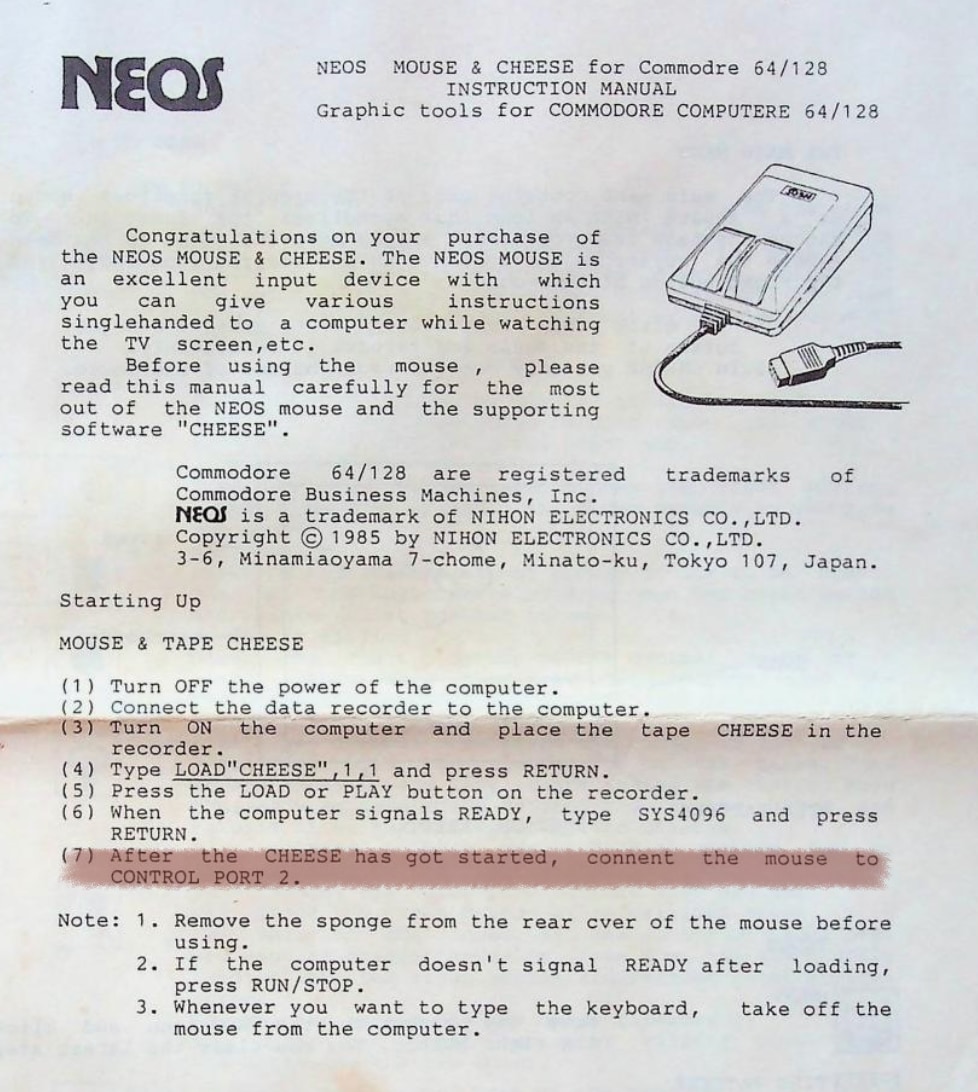
NEOS Mouse Instruction Manual
It says very clearly: With the computer off, hook up your cassette recorder. Power on the computer, load the CHEESE software off the tape and run it with a SYS command. Then, only after CHEESE is up and running, plug the NEOS mouse into port 2. Plug it in live while the computer is powered on. This is actually not recommended. It's probably fine, but that port was not designed to be hot-pluggable.
Once you're in the CHEESE program, how does it use the keyboard? Answer: It doesn't. According to the Instruction Manual, it actually says that whenever you want to type on the keyboard, "take off the mouse from the computer." WOW!
The Second Problem
There is a second problem. It's not as critical as the first, but it is a bit weird. Because the left mouse button and the strobe signal are the same line, there are restrictions on their use.
For example, it is possible to scan to see if the left button is down. However, while the left button is held down, it becomes electrically impossible to send the strobe signal. That means it is impossible to read mouse movements while the left button is depressed.
Think about what that means. You cannot press and hold the left button on something and then drag the mouse to a new position and then release. In a drawing program, you'd do this to set the start point of a line and then drag to the end point and release to draw the line. Or with a pencil tool you'd hold the button down to draw pixels as you move and release to stop drawing pixels. But this is not doable with the left button.
In C64 OS it's even more critical. To activate the menus you have to click and hold down the button while you drag to select a menu item, and release to choose that menu item. Plus other things, like dragging scroll bars, dragging split screen areas, dragging to resize table columns, etc. Clicking, holding, dragging, and releasing, is a fundamental use case for a mouse, and you can't do it with a NEOS mouse's left button. Ouch.
CHEESE is the (quite sophisticated) drawing software that shipped with the NEOS mouse. How does it work with this restriction? The Instruction Manual for CHEESE says that you right click on everything. There you have it. If we can make the NEOS mouse work at all in C64 OS, it will always behave like a left-handed mouse. The right button is always primary, since you can hold it and drag the mouse at the same time. The left button is always secondary but it at least allows you to make clicks at specific locations, such as on a Utility title bar to toggle window shade.
Overcoming the Main Problem
The main problem is that the NEOS mouse's proportional-mode communications protocol is fundamentally incompatible with how the Commodore 64 uses the CIA to scan the keyboard. Quite simply, the CIA cannot properly scan the keyboard as long as the NEOS mouse is connected to those same CIA lines. In an operating system such as C64 OS, it is essential that the mouse and keyboard both be usable at the same time.
But there is another CIA in the Commodore 64. It is used to control the User Port (and the IEC serial port). Somewhere in my searches about the NEOS mouse, it mentioned that there may be a special adapter created for it that connects to the User Port. This makes a lot of sense, for two reasons: The NEOS mouse doesn't use the SID's POT lines for the analog movement info. It's a purely digital communications protocol that the CIA chip is eminently suited to handle. Second, the User Port exposes 9 bits of General Purpose I/O that are not shared with anything else.
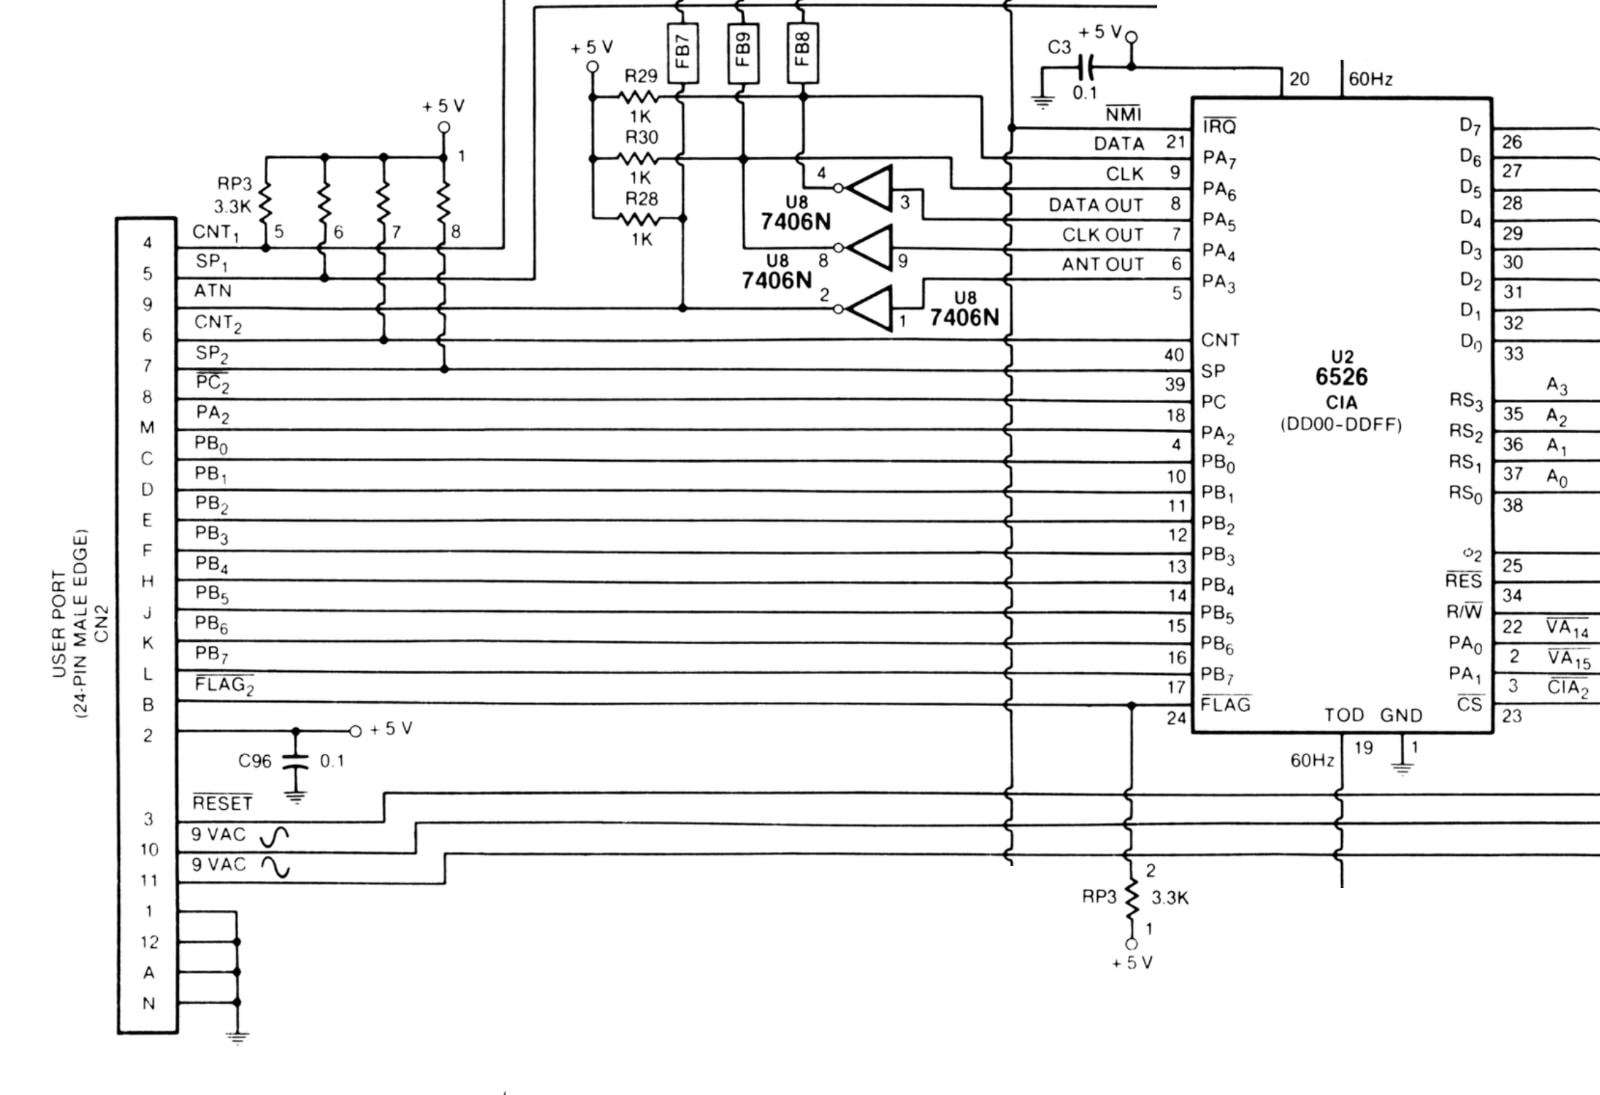
User Port Schematic
Above is the relevant snippet of the C64 schematic for the User Port. Again, details have been removed for clarity of focus.
What we can see is that all of CIA 2's Port B is available on the User Port. PB0-PB7 on the CIA chip go directly over to the User Port as C, D, E, F, H, J, K, and L. On the User Port, the topside edge connector leads are numbered 1 to 12. The bottom leads are labeled with letters, however for reasons of avoiding ambiguities certain letters are skipped. They are labeled A, B, C, D, E, F, H, J, K, L, M, N. Note that I and G are left out because they look too much like 1 and 6. In addition to all 8 bits from Port B, we also have bit 2 from Port A, if it were needed.
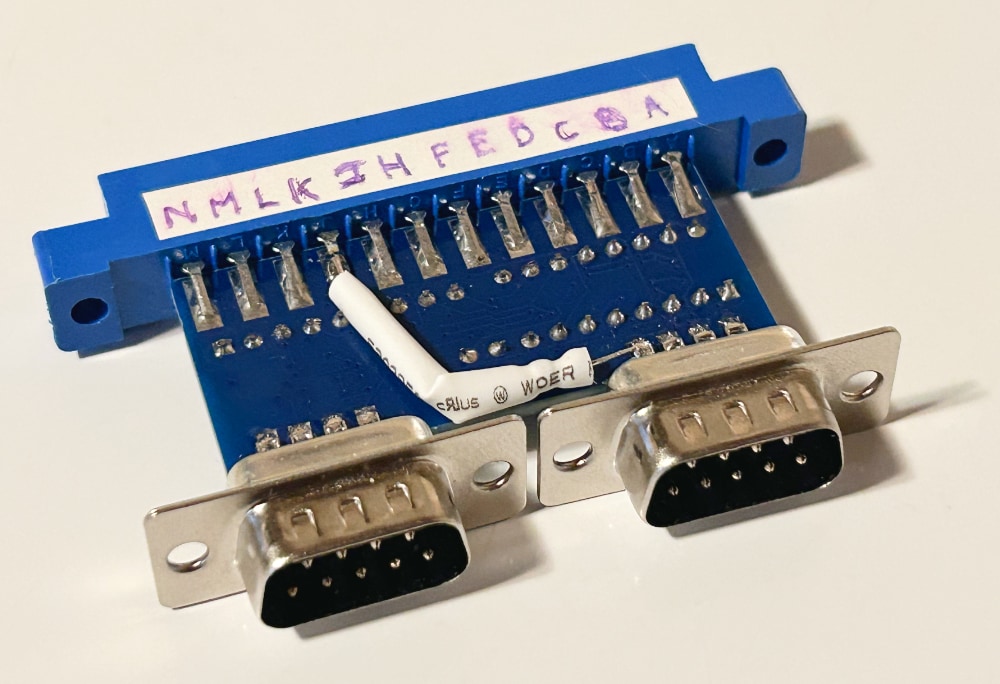
4-Player Adapter
As it turns out, there already exists a rather popular adapter for plugging joysticks into the User Port. It's the 4-player adapter. There are at least two kinds of 4-player adapter for the C64, but by far the most popular is the one called "CGA" for Classic Games Adapter. This one is sold by Individual Computers, and it is also carried by Protovision. And you can usually find them on eBay by searching for "4-player adapter C64". In the rest of this post, we are discussing the CGA-type 4-player adapter, but just be aware that there is another kind, which I haven't looked into.
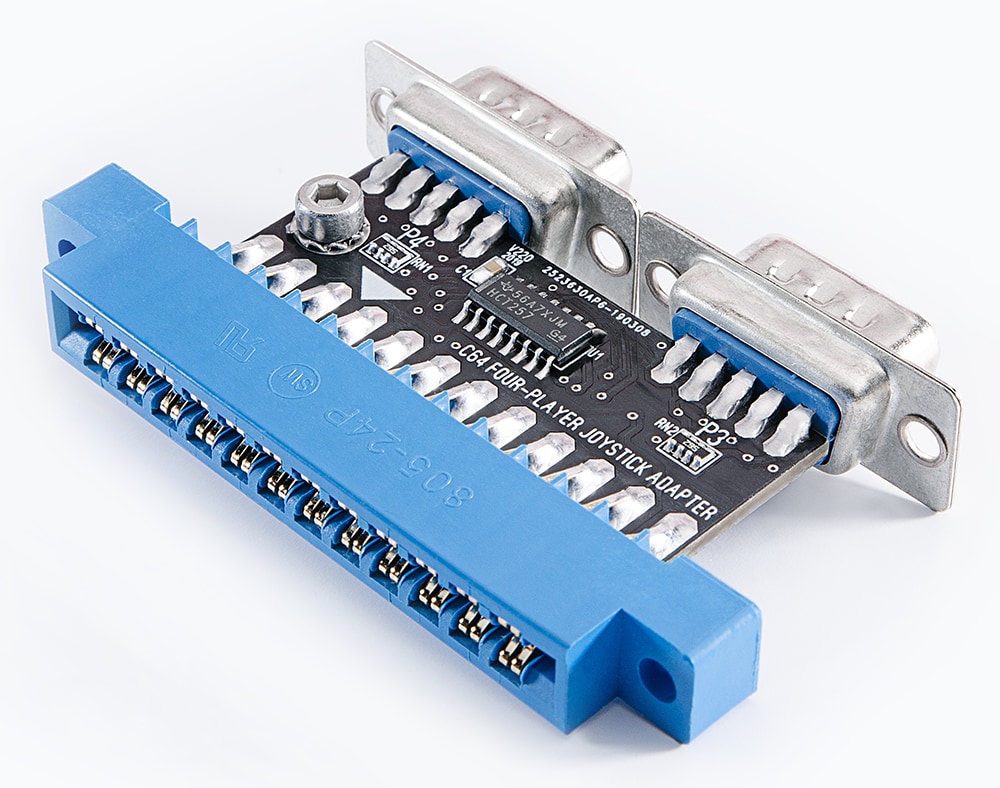
CGA-Type 4-Player Adapter
The 4-player adapter has two (mostly) standard controller ports. They have +5V and ground, as well as the 5 standard joystick buttons, UP, DOWN, LEFT, RIGHT and FIRE. These controller ports do not have the POT X or POT Y lines (nor do either of them provide the light pen line). The reason they don't have these connections is because there are no lines on the User Port that can route these signals to the SID chip, (or the VIC-II's /LP pin).
In fact, there is another subtle problem. Each controller port needs 5 data lines for the 5 standard joystick buttons. But 5 + 5 would be 10 lines, and we have already seen that the User Port only gives access to 9 data lines from the CIA chip. All 8 bits from Port B, and Bit 2 from Port A. So how does it work? The adapter includes a chip, such as the HC257, which you can see above. The HC257 is a Quad 2-Channel Multiplexer. It can take four inputs from two sources and switch which of those two sources is connected to the outputs.4
So here's how it works. Joystick lines UP, DOWN, LEFT and RIGHT from both ports go into the quad multiplexer. The 4 outputs from the multiplexer go to bits 0, 1, 2, and 3 of Port B. The FIRE button from the ports each go independently to bits 4 and 5 of Port B. And lastly, bit 7 of Port B is used as an output to control the multiplexer switches. On each interrupt service routine, to read the two joysticks, first, set Port B bit 7 high, then read all of Port B. The signals are on bits 0, 1, 2, 3 and 4. Next, output Port B bit 7 low, read all of Port B, and the signals are on bits 0, 1, 2, 3 and 5. Perform a bit of shifting to normalize those and you're good to go.
Using Bit 6
After all this, Bit 6 of Port B is unused. (Bit 2 of Port A isn't used either, but we don't need it.) The NEOS mouse's right button, although it is routed to the POT X line, this is only out of necessity because a sixth digital data line isn't available on the standard controller ports.
The signal the NEOS mouse right button outputs is not analog. While the right button is not depressed, it outputs +5V; when pressed it outputs 0V. This is then read as a simple high/low from the SID's POT X register.
This is a bit different than a joystick's buttons. When a joystick button is not depressed its signal line is "not connected." From a software perspective this is not an important distinction; the CIAs internally pull-up when not connected and thus read high. However from a hardware perspective this difference does matter.
Since there is no POT X or POT Y line on the User Port, the pins 9 and 5 on the two controller ports on the 4-player adapter are just not wired up to anything. All we need to do is wire pin 9 (POT X, i.e., the NEOS mouse's right button) from one of the two ports to the unused Bit 6 on the User Port.
The SID chip POT lines are designed to take higher voltages without being damaged. The CIA's data lines need some resistance to avoid being damaged when both the CIA data bit is set to output and the NEOS mouse is simultaneously driving the line high.
Wiring up the right mouse button
There is some general confusion over which of the two ports ought to be called port 3 and which ought to be port 4. On the side of the C64 the one closest to the front is clearly labeled port 1, and the one closer to the power switch is port 2. In my C64 Luggable project I have a 4-player adapter and all 4 controller ports are mounted on the front plate. Obviously I want these to be in order, left to right, ports 1, 2, 3 and 4.
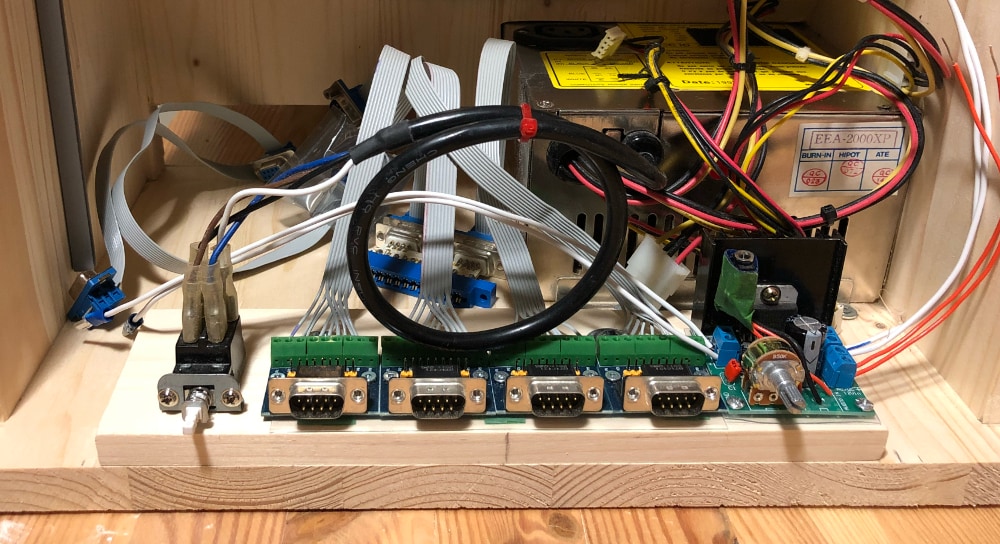
C64 Luggable - 4 Controller Ports
In my experience, though, game programmers are inconsistent about which is port 3 and which is port 4. In some games you can choose 3 player mode, and that game needs joysticks in ports 1, 2, and 4. It's annoying but dealable. In C64 OS, there is a 4-player joystick/game-controller driver, and the convention I've settled on is to call the port closest to the left edge of the machine port 3, and the port closest to the middle of the back of the machine port 4. I don't know if this is 'right.' But it's the convention I'm going with here.
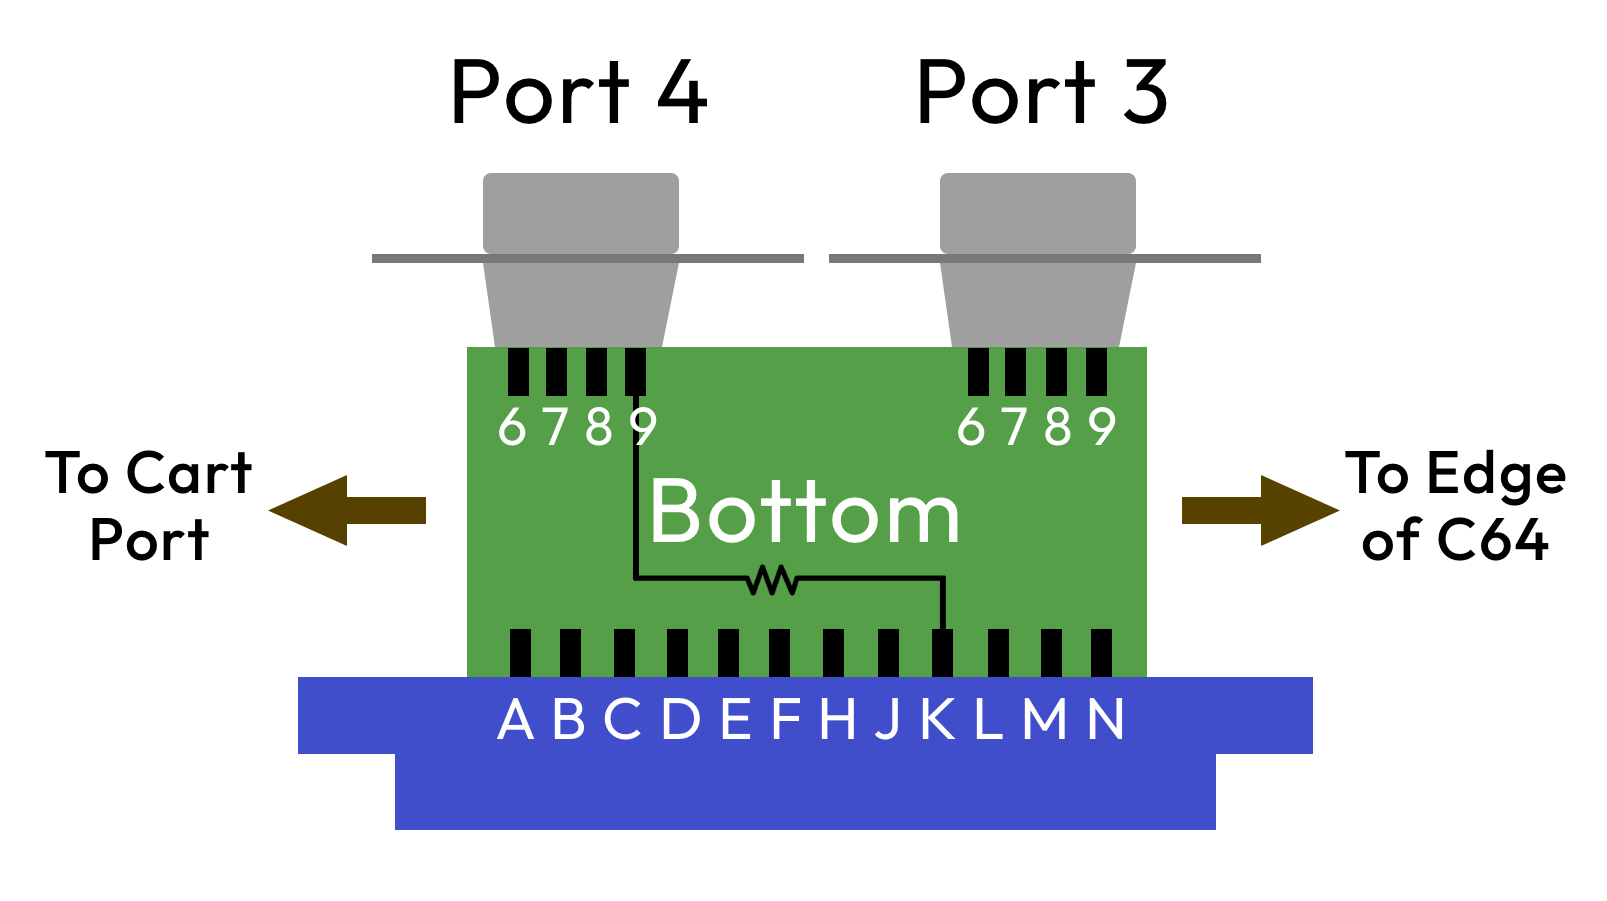
If we flip our 4-player adapter upside down, then port 4 is on the left. Below is a diagram showing the pin numbers for the 2 ports and the labeled pins on the User Port. We are going to set this up so that the NEOS mouse can be plugged into port 4. We just need to solder a resistor between pin 9 of port 4 and pin K of the User Port.
4-player adapter, bottom - Resistor
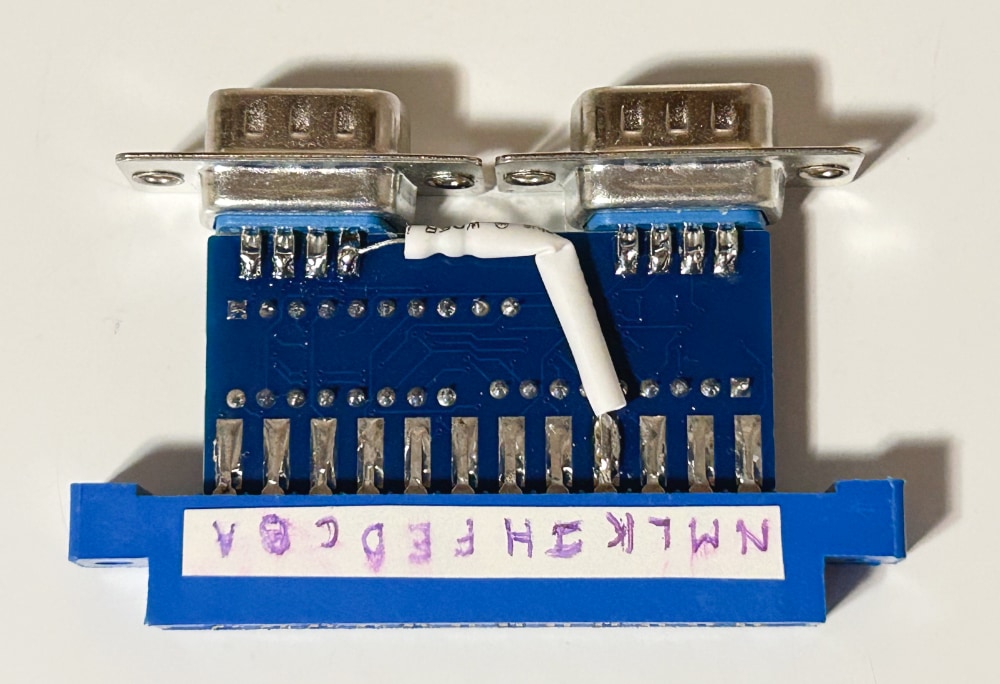
Shown below is more or less where we want our resistor to go. But it has to pass by other pins. To be safe and prevent a short, it is recommended to wrap the lead with insulation. I put mine inside a little piece of shrink tube.
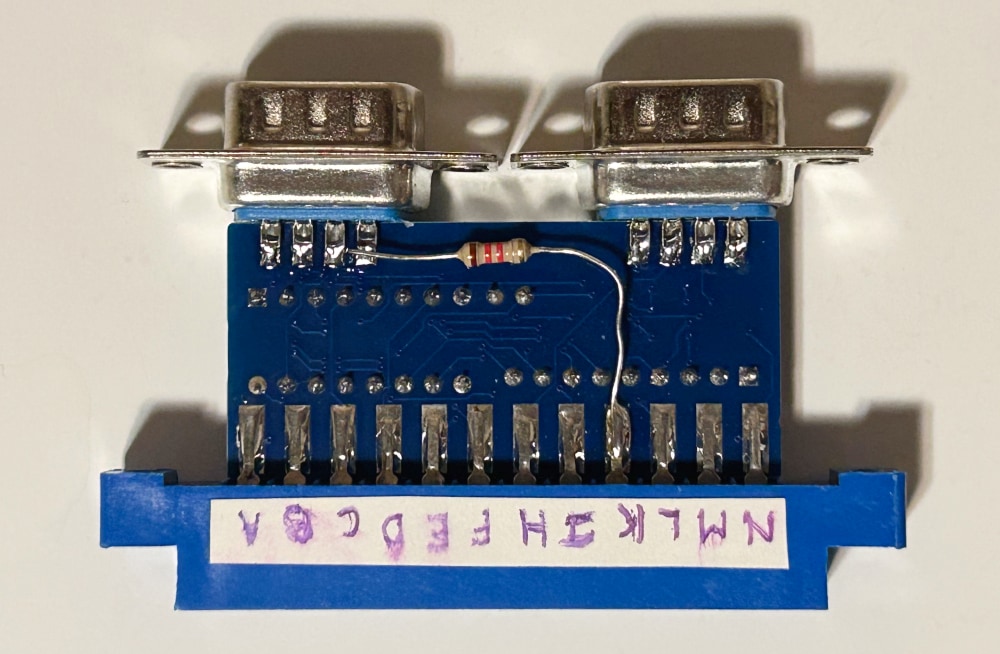
4-player adapter, resistor placement
Conveniently, these are both on the bottom, so the resistor doesn't have to wrap around the PCB and it's neatly hidden when the adapter is plugged in. When looking at the bottom, port 4 is on the left, pin 9 is the rightmost of its four pins. And pin K on the User Port is 4th from the right. I've been working with Jim Cannell from the UK (who also generously donated me a NEOS mouse for testing). In our experiments, if the resistance is too high, the CIA doesn't detect button changes; if it's too low, it risks damaging the CIA. A resistance of around 1.2 kΩ seems to be a sweet spot. (Disclaimer: I'm not an electrical engineer, and I cannot guarantee that this won't damage your CIA chip. Only perform this modification if you are comfortable doing so, knowing the risks.)
This mod is so simple that anyone with a soldering iron should be able to pull it off. Now, of course, you do need a special NEOS mouse driver that reads it from this User Port adapter. I have written the driver for C64 OS, and it will be released as part of C64 OS v1.09. The Configure Tool has also been updated to allow you to choose this driver.
The caveat is that it still behaves like a left-handed mouse. The primary click is the right button, which you can use to click and drag. Secondary click is the left button, which you can use to click on various things, such as to toggle window shade on a Utility, or erase or copy a character in Desktop Designer, and so on.
And here you have it in its final form.
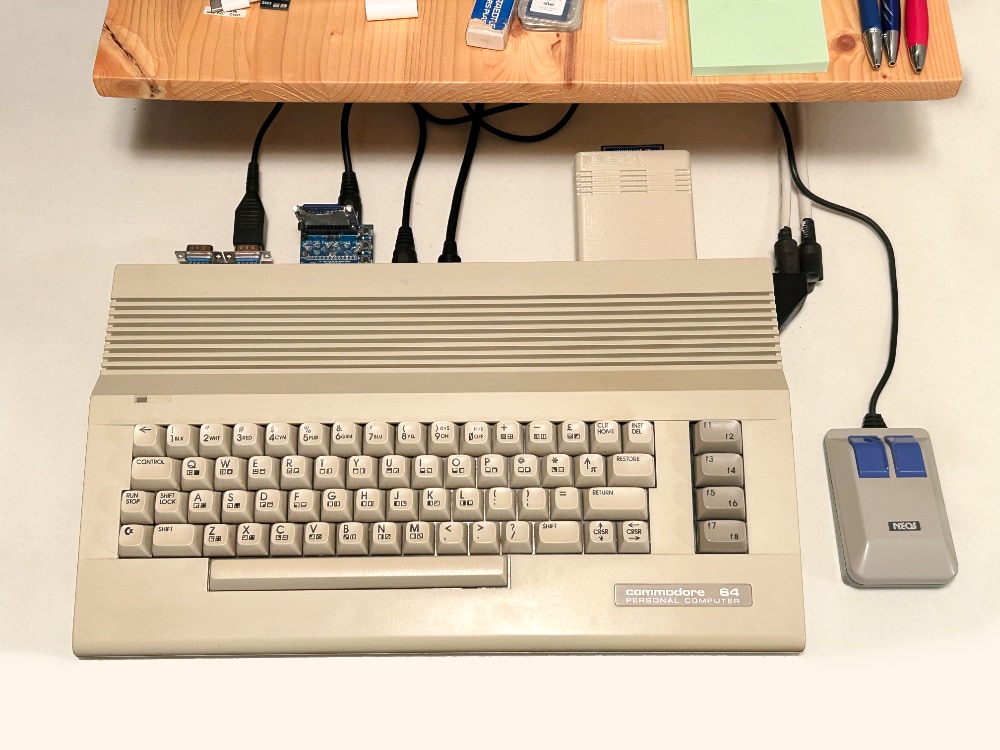
NEOS mouse connected to a C64c
I have a few random thoughts.
- You can leave NEOS mouse plugged in all the time, as it no longer interferes with the C64 keyboard.
- It's kinda nice that the spot on the desk where the mouse moves has no cables jutting out.
- The NEOS mouse cable is plenty long enough to go from the User Port to the right side of the C64.
- The fact that the main controller ports are unoccupied leaves them free from joysticks. So you can actually have a mouse and two joysticks all hooked up at the same time, each on its own port.
- Unfortunately, NEOS mouse doesn't have a scroll wheel. But, such was the era.
- I love making old and neglected hardware useful again, especially when it's C64 OS that serves that purpose.
Final Thoughts
I don't know how many NEOS mice there are out there in the world. But I suspect there are quite a few. Most of them are probably sitting in a box somewhere not being used.
The 4-player adapter is quite popular. If you have one already, performing this modification is very easy, even for an absolute beginner with a soldering iron, and only requires a single component; a resistor. The modification is also non-invasive, and it's a snap to reverse it if you ever wanted to.
If you don't have a 4-player adapter yet, well, now there is another reason for getting one. You can buy them here:
Or look for them on eBay.
Remember, the NEOS mouse driver for the modified CGA-type 4-player adapter is coming to C64 OS in the next system update: v1.09.
Cool Idea for a Game
I had one last idea. I'm no good as a games programmer, but I had a cool idea for a game. Normally you can't hook up two 1351 mice at a time, since the controller ports both feed to only one SID chip. However, you could hook up a 1351 and a NEOS mouse at the same time.
I am imagining a 2-player Air Hockey game. Each player holds a mouse, and uses it to move his paddle around in a smooth and analog way. Each player tries to hit the puck into the goal on the opponent's side. This would be really cool!
- This works for one of the controller ports at least. Some more work is needed to check for buttons pressed on the other port.
- If ever there were something subject to change, it's gotta be this. But as of the time of this writing, Jens Schönfeld from Individual Computers, who makes the MicroMys, does not know of any other C64 software that uses the mouse wheel. That is despite the hardware having this feature for many years. Go C64 OS!
- The "movements" don't depend on the SID chip. We still have to talk about how the right button is read. Technically the right button doesn't "require" a SID either, except for when the mouse is used in a standard controller port. But we're getting ahead of ourselves.
- It's not always an HC257 specifically. But it is always a chip that does the same job.
Do you like what you see?
You've just read one of my high-quality, long-form, weblog posts, for free! First, thank you for your interest, it makes producing this content feel worthwhile. I love to hear your input and feedback in the forums below. And I do my best to answer every question.
I'm creating C64 OS and documenting my progress along the way, to give something to you and contribute to the Commodore community. Please consider purchasing one of the items I am currently offering or making a small donation, to help me continue to bring you updates, in-depth technical discussions and programming reference. Your generous support is greatly appreciated.
Greg Naçu — C64OS.com